
Introduction
The GeoImage object visualizes a geo-referenced image in the x/y plane where you can control the height the image is placed at. Imagery has many uses within the Fledermaus visualization system and it is commonly draped on related surfaces. It is often very useful to be able to bring 2D imagery into the 3D scene to complement the 3D data currently loaded. For example, one might have a bathymetric map showing the depths of a lake or a river channel and want to bring in a satellite image of the region. The 2D image can be added to the scene as a geoimage object properly geo-referenced within the scene .
To add a Geoimage to the scene, select the Import > Import Image... menu option. Some of the image file formats supported include:
-
tiff
-
jpeg/jpeg2000
-
png
-
bmp
-
shade
-
kap
Storage Format
All Fledermaus GeoImage files have the file extension .geoimage.
Properties
|
Name |
Description |
|---|---|
|
Column Count |
The number of columns of pixels in the image. |
|
Row Count |
The number of rows of pixels in the image. |
|
Cell Size |
The pixel resolution (pixels are square). |
Attributes
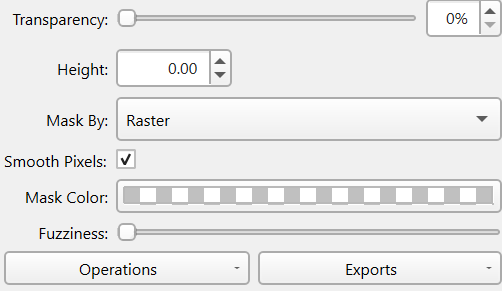
The Transparency slider applies the percentage of transparency to the whole GeoImage object allowing data from objects behind the image to blend with the Image.
The Height operation specifies the vertical (Z) position of the image.
The Mask By option includes None, Color, and Raster options. When None is selected all the image's pixels are displayed. When Raster is selected any pixels in the image whose alpha value is zero will not be rendered allowing one to mask out portions of the image. An alpha value of zero means to mask (hide) the pixel, whereas the default 255 value means show the pixel. The final Color option allows for some simple dynamic masking where you can select a color and have any part of the image with the same color have its pixel hidden. This is done dynamically and does not actually modify the imagery data. For example you may have a chart which normally has a white background. The mask by Color makes it trivial to select the white background and remove it from the image displayed. To set the mask color click on the Mask Color option below the Mask By control. This will bring up a dialog to select the color and a control to pick the color from the scene if desired.
The Fuzziness slider works with the mask by color option to make it so it selects similar colors to the set mask color widening the mask selection based on the slider bars value.
Operations
To see the operations available for the surface object type right click the object's name and look in the Operations sub-menu or look at the Operations dropdown menu at the bottom left of the attribute panel. These operations include:
Change Object Coordinate System...
While this should be very rarely needed it can be used if necessary to change the coordinate system currently applied to the object. No projection is done here you are just telling it that this new coordinate system is what the object should have been in in the first place.
Reproject Object...
Generally there are better ways to handle (re)projection work but if you really just want to convert this image into a new projection this will work. The Reproject Object option will produce a new surface by transforming the existing one into the new projection you have chosen then adds the result to the current scene.
Reproject Object To Scene...
If an object is current marked as Undisplayable in the Scene control dock this is normally because it is in a different projection than the scene is. As images don't dynamically auto-project if you want to see this object in the current scene's CRS than one can use this option. It will result in a new surface being produced that can be displayed in the current Scene.
Compute Mask
This operation lets you knock a hole in the selected image based on any other surfaces that are visible in the scene by setting any overlapping pixels transparency to 100%. You can see the results by change the Mask By attribute to Raster which eliminates any image pixels whose alpha value is 0 (i.e transparent).
Crop
If you have a selection drawn on the surface the Crop operation will create a new GeoImage object with any data outside of the selection removed.
Resample
This operation provides a tool for resampling an image to a different resolution based on several methods. Click here for details.
Switch RGB/Greyscale Mode
If one happens to have a RGB color image and one wants greyscale simply choose this operation and a new image copy will be created and loaded with a greyscale representation of the image.
Mask Selected Area
If you have made a selection on an image one can utilize this operation to make the area of the selection transparent so you can "see-through" this portion of the image. This can be useful for example if you have other more important data under a part of the image and you want to knock a hole in the image in that area so the underlying area can be seen.
Reposition Image in Scene
This operation is used to apply a translation to the image object. A dialog box is shown to enter a positive or negative amount by which the image should be moved. This operation permanently changes the coordinates of the image so if you apply a shift and want to change the object back you would need to apply an opposite shift. For objects with a projected coordinate system the shifts are in units of the data, normally meters or feet. If you have a geographic object the expected shifts are assumed to be meters which is turned into an approximate shift in degrees based on the average latitude of the object. Shifts are only supported in the Easting/Northing or Longitude/Latitude directions. Shifts in height/depth are not supported by this operation.
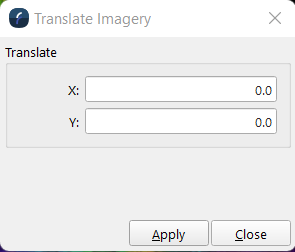
To apply a shift click the Apply button. You can apply the same shift multiple times by just clicking the Apply button again while you watch the results of your shift. Each time you apply a shift the image file is modified and saved with the new shifted coordinates. Click Close dismisses the dialog box.
Merge
The merge tool is a data fusion tool which allows one to merge multiple selected images into a single new image with a specified resolution and various option for how to merge overlapping cells from multiple surfaces. This is a very handy tool if one needs to deliver a single final image built from separate individual ones. Click here for details.
Exports
Export to ArcGIS...
Assuming you have the ESRI GIS Engine setup this tool lets you push data into ESRI geodata sets. The tool is described in detail here.
Export to Google Earth KML...
Exports the image to a Google Earth KML file which can be easily loaded into Google Earth. Click here for details.
Export to 3D PDF...
Exports a copy of the image as a 3D PDF file for use in Adobe Acrobat. There are limitations of the size of the file as Fledermaus can easily generate surfaces much larger than the capability of PDF viewers so you may have to break the area up if it large. Click here for details.
Export to Image...
Used to export the image data to various imagery formats. Click here for details.
Return to Fledermaus Visual Objects
Return to Fledermaus Reference Manual