This part of the Knowledge Base provides an overview of how to use Qinsy in general. It can be used as a handheld for both new users and for the more experienced users.
On this page:
User Interface
Since Qinsy Survey is a Microsoft Windows® based software package, it has a standard MSWindows look and feel. This means that menu options and buttons operate the same way as other packages running under Windows.
In most windows, using the right mouse button on a part of the screen opens a menu containing options relevant to that part of the window. The same options can also be found in the main menu bar located at the top of the window.
Most windows can be resized by simply dragging the corners while holding down the left mouse button. Windows that cannot be resized will either have a “greyed out” maximize button or none at all.
The following picture provides an overview of the used terminology with respect to the User Interface.
Most settings and options can be started in a number of ways, i.e. through the right click menu, the menu bar, the toolbar or from an icon in the window area. Throughout this manual only one method will be shown in an example, but other ways of accessing the command may exist.
Help
Since this document is written as a quick start, only the most frequently used options are described. For more detailed help, a number of options are available:
Drivers Manual - This manual will provide information on cable layout and interface settings for various types of equipment. The drivers manual can be accessed from the Console and Database Setup. It can also be found on the QPS website.
Knowledge Base - Here you can find “How-to” documents on specific subjects. It can be accessed from the Console and it can also be found on the QPS website.
Inline Help - The Inline Help can be accessed from any location within the software.
There are a number of ways to access the Inline Help:
Press function key [F1] on the keyboard
Click on the Help menu item in the menu bar.
Use the question mark to find general information about the application.
Structure of Qinsy
Qinsy Survey is a modular built program, which means that it is not one program, but a suite of linked applications. The entry point for Qinsy is a program called the Console. From this Console all other programs are started.
Database
The base of each survey in Qinsy is the Template Database. This is created with the Database Setup program started from the Setup option in the Console. This Template Database contains all info about the configuration and settings to be used during the survey. When recording a copy is made of this template database and raw data is added, so both raw data and the configuration and settings used to acquire that data are stored together in one single database (file). The advantage of such a single database containing all information belonging to a certain dataset is that settings can be changed on a file-by-file basis without affecting the overall project settings made during the start of the project.
Project
Qinsy Survey allows the user to store data on a project basis. The Manage Projects option in the Console allows the user to manage the projects. As soon as a new project (folder) in Qinsy is started a number of sub folders will be created. Each sub folder contains data of a specific type. Qinsy will automatically search for data in that specific sub folder once a project has been selected. Information files that are relevant for a number of projects (e.g. chart data or vessel shape files) can be stored in a general common files folder. This Common Files Folder can be set from the Console.
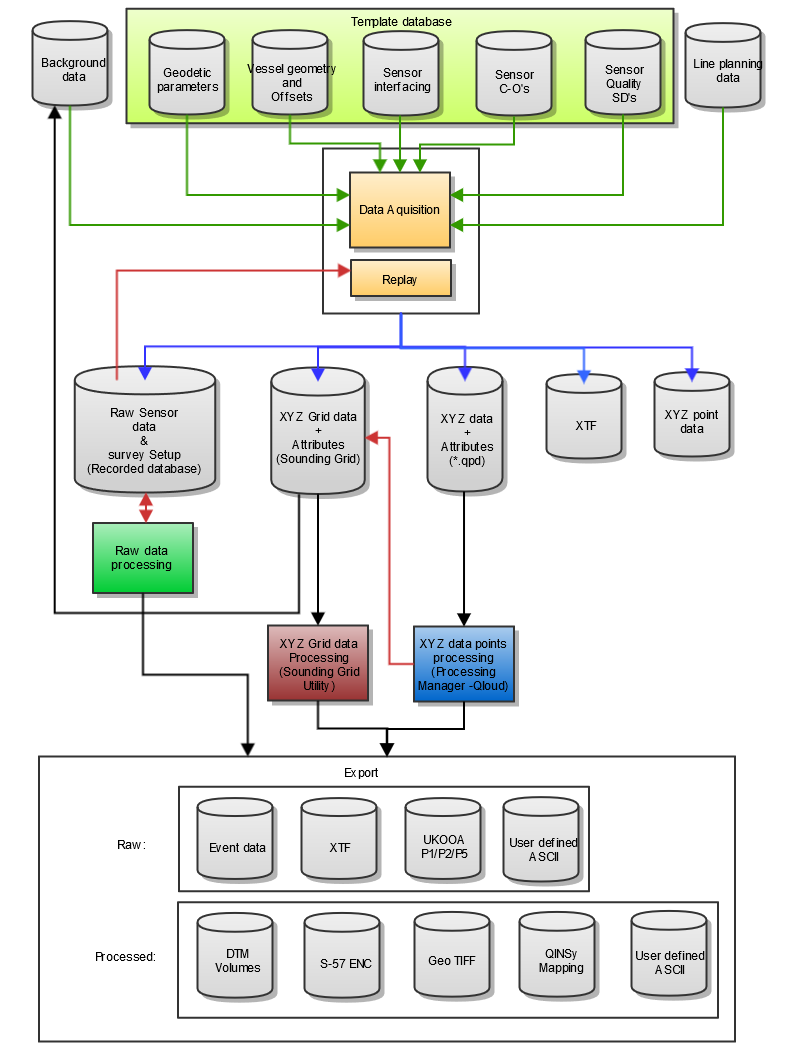
Data Flow
It depends on the type of survey conducted which modules of Qinsy will be used. The data flow scheme below gives an overview of the most extended use of Qinsy:
Console
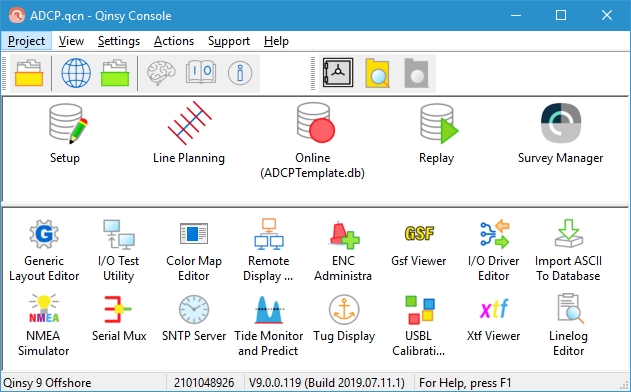
After starting the Console, a window looking like the figure below will become available:
The icons in the top half of the window are always present. These buttons represent the various stages of a survey.
The icons have the following functions:
Setup - This application is used to configure the template database for the project and to activate a certain database or template . Use this application to change for example the geodetic parameters, vessel shape, sensor I/O or other parts of the system configuration.
Line Planning - Create a set of survey lines or create boundaries within which to sail or to calculate volumes. This button starts the Survey Manager in Line Planning mode.
Online - This button will start the Controller with the selected template. This template is used as the base for the raw data collection.
Replay - This application allows the user to change the database configuration and replay the data. Another option is to analyze the raw data that was gathered during the survey on a sensor basis.
Survey Manager - The Survey Manager's main function is support of a survey with the following functions:
Sounding Grid operations
Plotting
Line planning
CAD Functionality
Designs
Vertical Offset Models
Some processing related functionality is available such as exports and the access to the Validator.
Apart from the basic applications there are a number of additional applications that may appear in the bottom half of the window. These icons can be switched on or off depending on the wishes of the user.
Switching these icons on or off is done like this:
Right click in the bottom half of the window
Select Add/Remove QPS programs from the menu
Select / De-select the programs to be shown in the bottom half of the window
There are several programs that are normally used on a regular basis.
These are:
I/O Test Utility - The I/O tester displays the raw data that is received on the PC communication ports.
I/O Driver Editor - With this tool the user can create his own driver to read an ASCII string.
Generic Layout Editor - With this tool the user can define a display, an online Output String , a log File or Export from the database file.
ENC Administrator - With this tool electronic navigation charts in the 000-format can be converted into QNC-files with can be displayed in the Navigation Display.
Remote Display Controller - The Controller can put all the online data on a local network; then the Remote Display Controller can display this data on every pc connected to this network.
License Manager
Under the Help option in the Console press the 'View License Status' option to check on the licenses in use.
The HASP dongle/softlock license contains a license for the Qinsy software. Several Add-Ons are available. The permission on the dongle allows certain programs to run.
The License Manager is a program that is used to install your license or, when it is already installed, to update it or to show the user which modules are enabled on that license and until which date the license is enabled.
When there is a time tag on the license, then there is an Expiration Date. When the user has bought a perpetual license, the expiration date is “Always Valid”. The Support and Maintenance line indicates until which date you can download updates from the QPS website and receive support from the Support desk.
To update the license press the “Upgrade Dongle…”/"Update SoftLocks" button and copy and paste the received 256 character upgrade code into this window and press OK. Upgrading a license takes only a few seconds.
Project Folder
Qinsy Survey allows the user to store data on project basis. As soon as a new project (folder) in Qinsy is started a number of sub folders will be created. Each sub folder contains data of a specific type. Qinsy will automatically search for data in that specific sub folder once a project has been selected.
The subfolders created are:
Annotations
Annotation areas can be createn in the Survey Manager and in the Navigation Display. (*.qgfanno) An annotation text or image can be added to these, plus an icon to draw attention in the navigation screen.
Database
Template databases with the Project settings and Configuration as well as the Databases with logged data. (.db) When a database has been analyzed, a copy of the database is made and stored as (.filt.db)
DtmData
DTM data files selected in the Session Setup. The qpd files will be stored in a sub folder with the name of the vessel after the files are loaded into the Survey Manager.
DxfToQxf
Chart data in the DXF format (e.g. AutoCAD) or the QXF format which is converted with the DXF Convertor.
Export
Data that is exported from a processing session to another format like ASCII.
Geoid
The location for the river lines model as created by the Geoid Model Utility.
Graphics
Folder to store screen captures or GeoTIFF images.
GridData
The Sounding Grid files created with the Sounding Grid Utility.
Import
Import data can be stored here.
LineData
The line databases created with the Line Manager. (*.qgfline)
LogFiles
Logfiles created while running the Alert Display or when using the Man Over Board option (*.txt) or the Generic Logging option. Also the LineLogs of the online survey are stored here.
Mapping
The project files of Qinsy Mapping (Terramodel) (*.pro) - now obsolete
QNC
The charts as used in this project are stored here. (*.qnc)
Results
The results of Positioning calculation (position and node parameters) (*.res)
Settings
Settings files used by the Display Manager, Generic Logging or the Sound Velocity Processor.
Support
All general files, for example the shape file.
TEMP
All temporary files.
Tide
Tidal data files created by the Tide Data Manager.
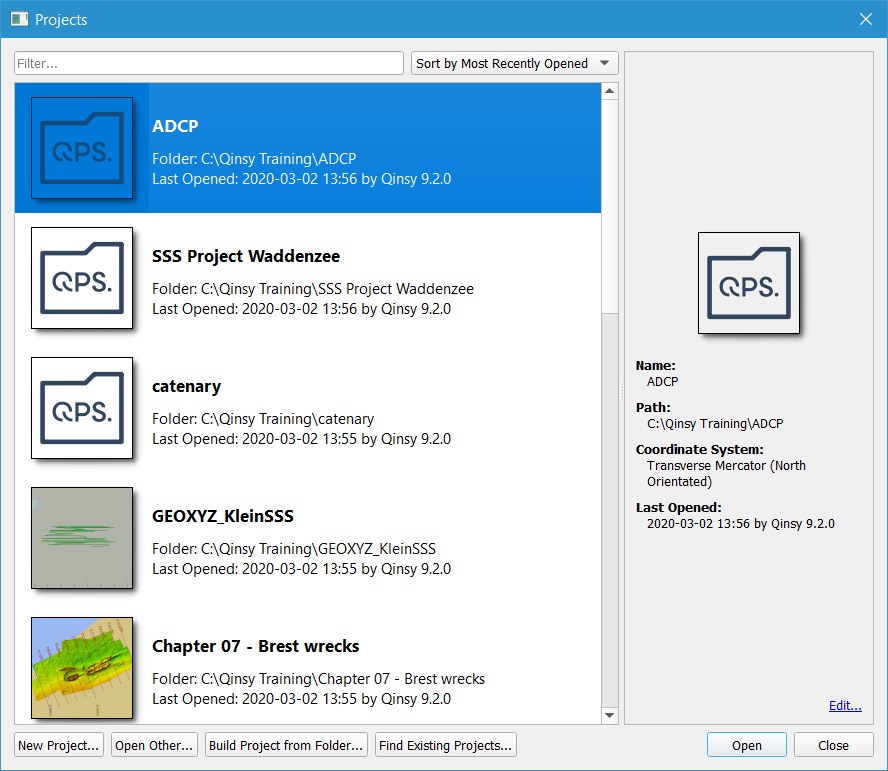
Click on the 'Select Project' button in the Console to open the project folder window in which all projects are listed. Use the various buttons at the bottom of the screen to add or remove project folders from the list. Use the “New Project” button to create a new project and select the folder that is created.
A project that has been copied onto the hard disk can be selected using the 'Find Existing Projects' option.
Common Files Folder
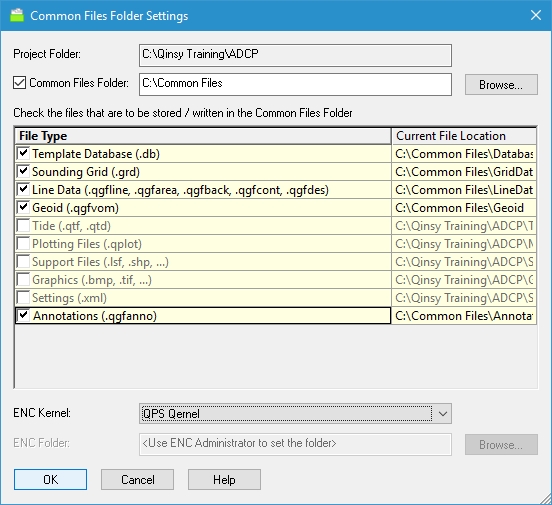
Information files that are relevant for a number of projects (e.g. chart data or vessel shape files) can be stored in a Common Files folder. This common files folder can be set from the Console using the following steps:
Click on the 'Select Common File Folder' button in the Console
The following window will appear:
Select a Common Files Folder using the Browse button
Enable the file types which should be stored in the Common Files Folder.
Shortcuts
A shortcut to Windows Explorer exists in the Toolbar of the Console: Click on to open the Project Folder of the current project. Click on to access the selected Common Files Folder.
JavaScript errors detected
Please note, these errors can depend on your browser setup.
If this problem persists, please contact our support.