Wobble Analysis Tool option of the Tools menu in the Main Menu bar.
What it Does
Qimera provides a wobble analysis tool that allows you to dynamically adjust the echosounder and/or motion sensor configuration in a trial-and-error method to isolate causes of integration errors resulting in so-called "wobbles" in the sounding footprint results.
General Description
The tool uses the full refraction engine so that the result you see on the screen is the result you can expect in processing. Wobble analysis operations are done using the prioritized motion sensor system. If you wish to perform an analysis on a secondary system, you must re-prioritize these as the primary sensor for the wobble test Raw Sonar Files using the Processing Settings dialog and then run the Wobble Analysis again. This will not overwrite the configuration changes established for the original primary sensor.
Wobble Analysis Main Application Window
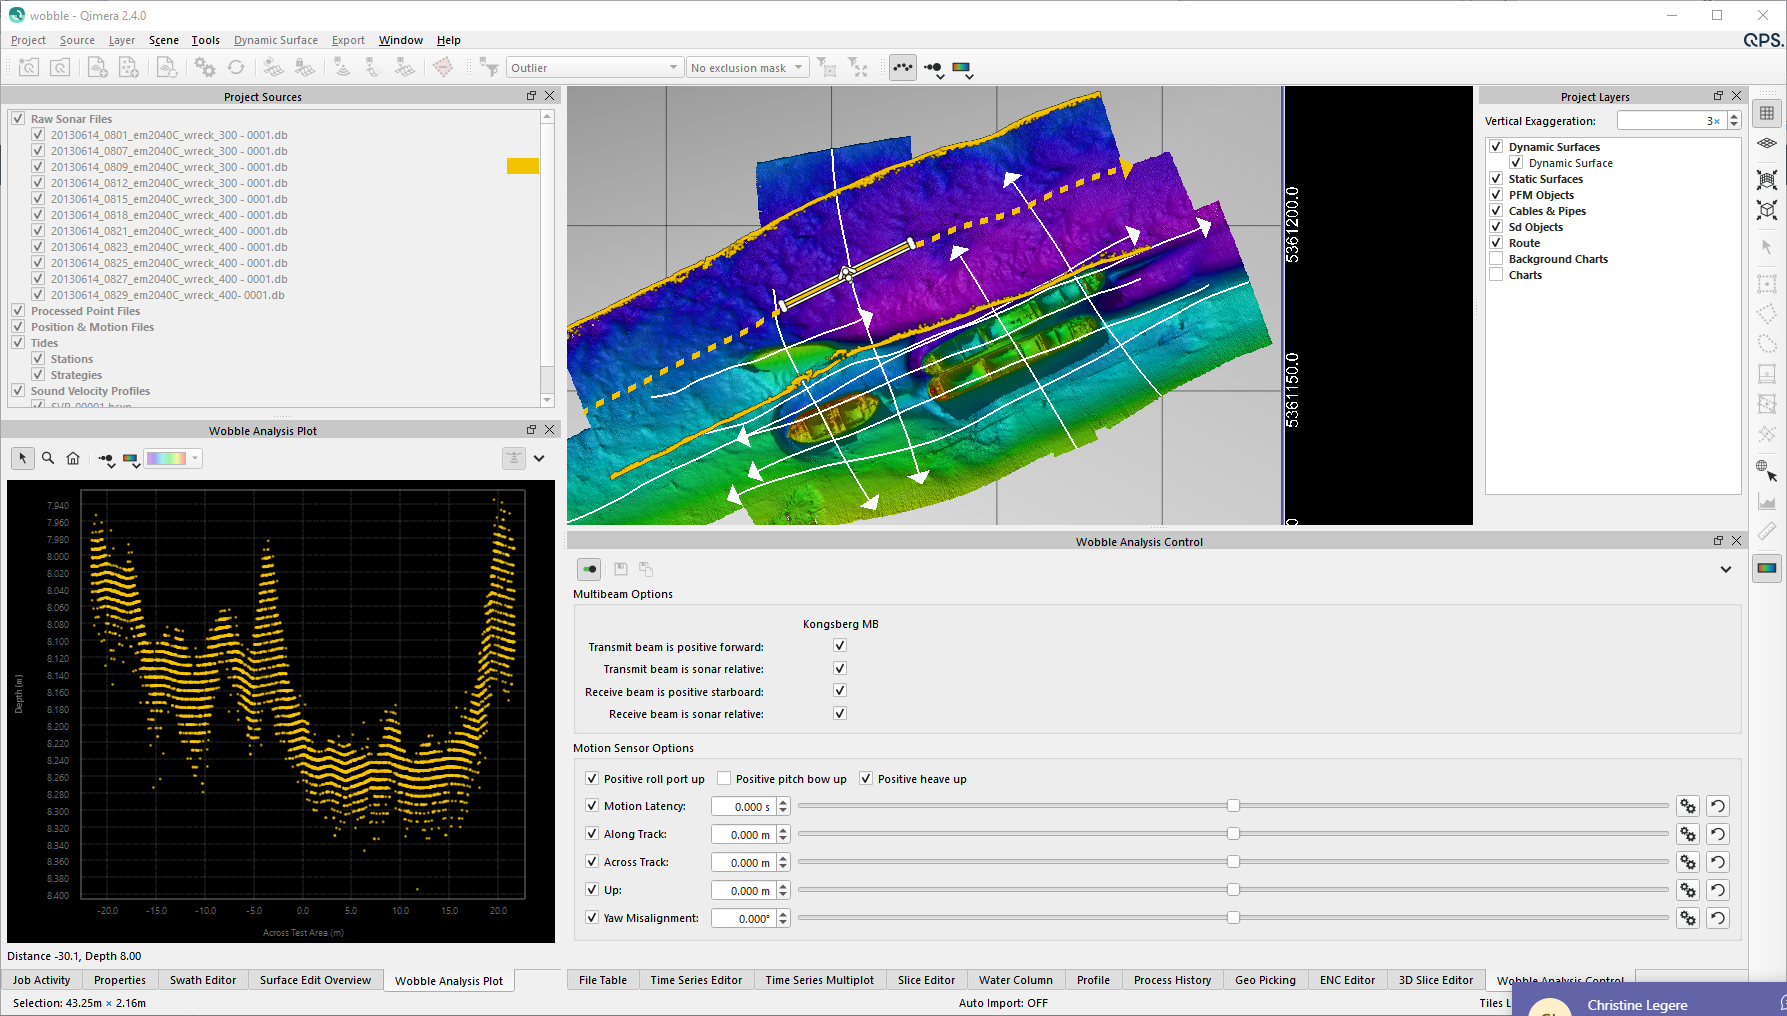
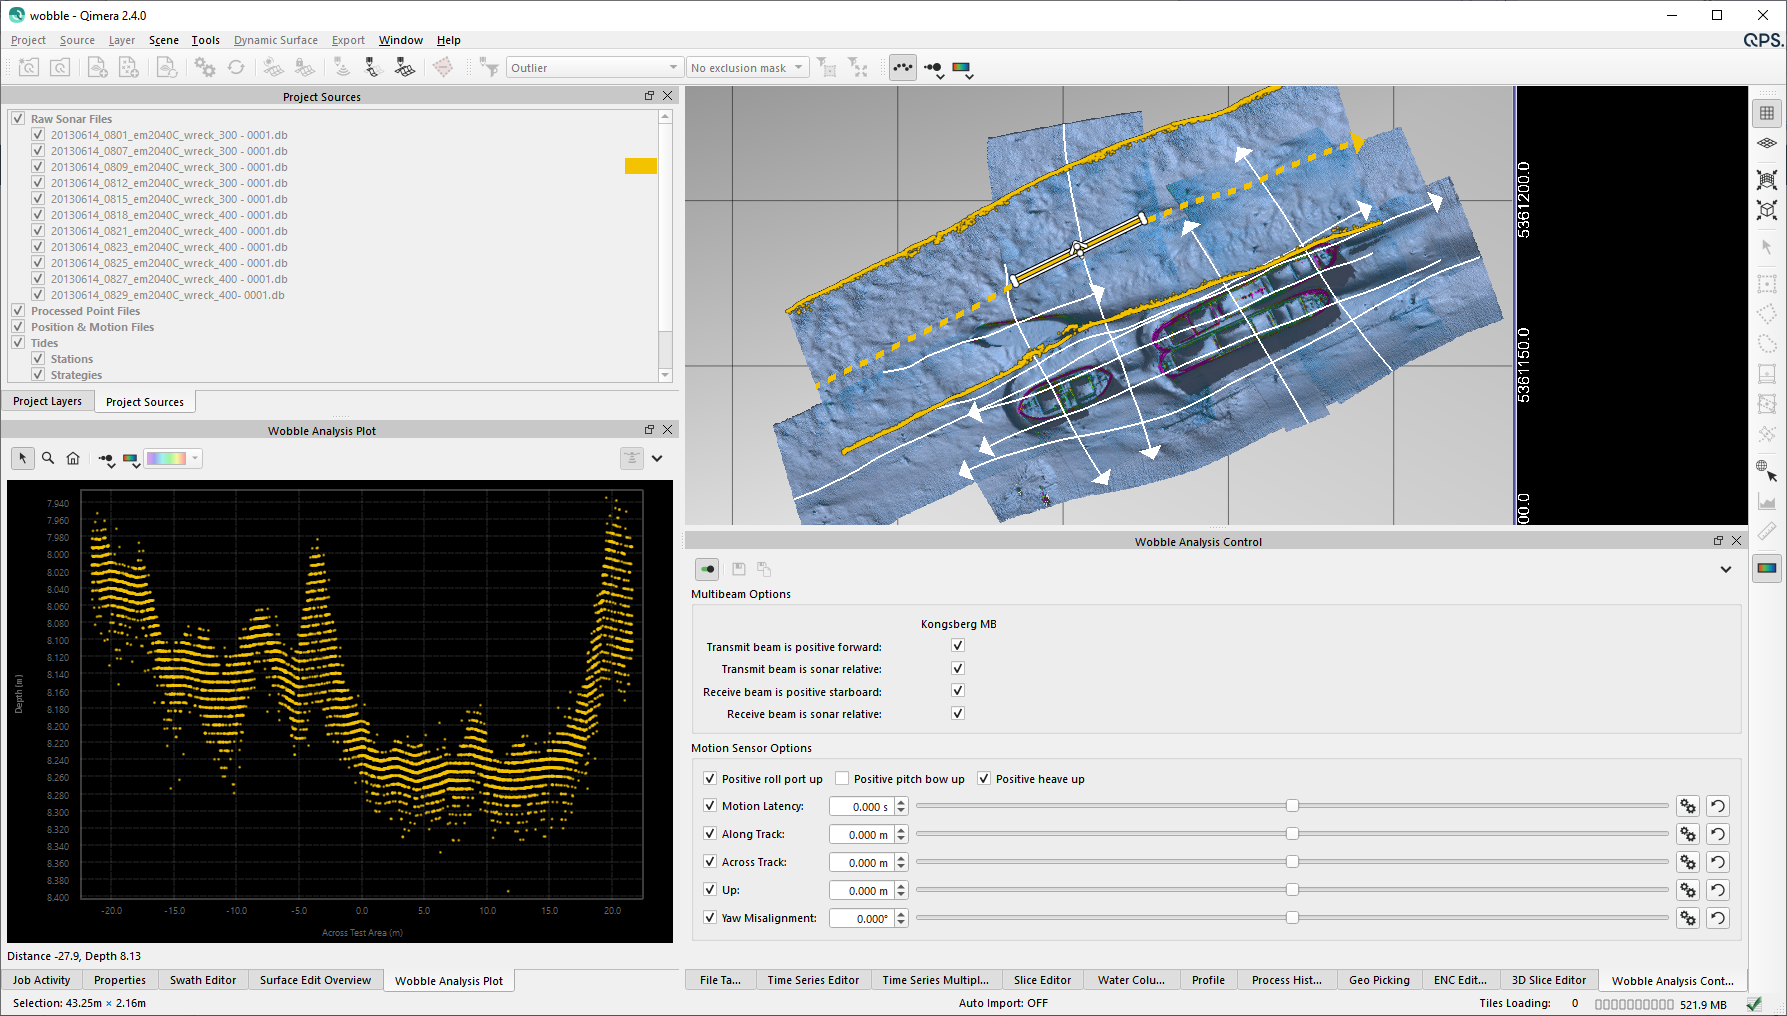
The wobble analysis tool is meant to work in conjunction with the Qimera 4D Scene in the main Qimera application window; this is where the user can choose appropriate spatial subsets of data to examine for the purposes of analysis. The process begins by selecting one Raw Sonar File from the Qimera Project Sources Dock and then accessing Wobble Analysis Tool under the Tools menu. The Wobble Analysis Tool automatically draws a Dynamic Selection box in the Qimera 4D Scene centered on the average location of the selected line. Most of the functionality of Qimera is locked when running the Wobble Analysis Tool so it is advisable to set view preferences prior to running the tool. For example, setting the color map to Copper to better highlight the color coding of footprint locations and the survey line in the scene. In Qimera version 2.1, the wobble analysis controls and plots are now integrated into the main application. This allows use of the wobble analysis and the scene to be more seamless. The user can also float the Plot or Control window allowing for a more customized experience. When the wobble analysis tool is off, the control docks are automatically hidden to reduce clutter.
Wobble Analysis Control Window
The majority of the user interaction for a wobble calibration is done in the wobble analysis control window. It has 2 main areas, as described in the section below. A toolbar at the top of the window controls the ability to save and exit the tool.
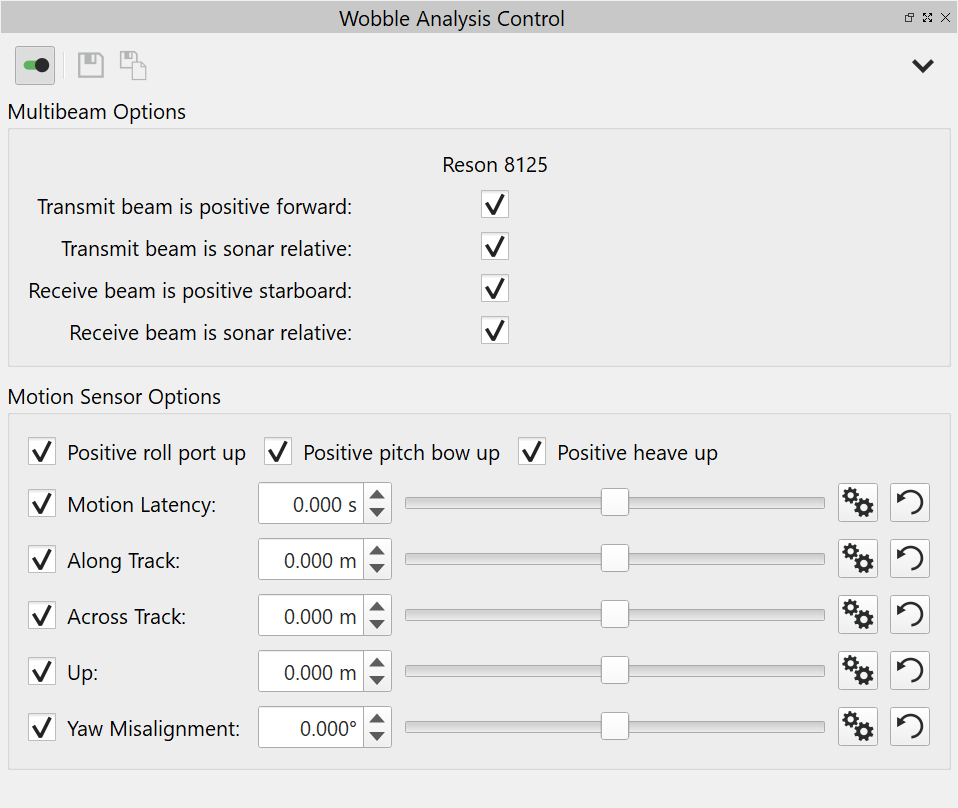
Multibeam Options
For every mulitibeam sensor in your file, you will have the following options:
Transmit beam is positive forward: This specifies the sign convention of the transmitter beam angle for sensors that allow for steering of the transmitter beam pattern in the fore-aft direction.
Transmit beam is sonar relative: This specifies whether beam angles reported by the transmitter are relative to the sonar frame or to the vertical (when they are referenced to the vertical, they are pre-corrected for pitch).
Receive beam is positive starboard: This specifies the sign convention of the receiver beam angle.
Receive beam is sonar relative: This specifies whether beam angles reported by the receiver are relative to the sonar frame or to the vertical (when they are referenced to the vertical, they are pre-corrected for roll).
Laser Options
There are currently no specific options for laser systems in the wobble analysis control window. However, you can still make adjustments to your primary motion system used by the laser system.
Motion Sensor Options
For the primary motion sensor, you will have the following options:
Positive roll port up: This specifies the motion sensor's sign convention for roll.
Positive pitch bow up: This specifies the motion sensor's sign convention for pitch.
Positive heave up: This specifies the motion sensor's sign convention for heave.
Motion Latency: This specifies the motion sensor's time latency in seconds.
Motion along/across/up position offset: These three allow you to adjust the motion sensor's spatial offset relative to its existing location. This controls the induced heave effect that occurs when the heave sensor is displaced from the CoG. Similar dynamic errors can occur if the multibeam sonar head location is in error. Adjusting the heave sensor location may account for this but it is advisable to review, and if possible resurvey, the sensor locations on the vessel.
Yaw Misalignment: This specifies the angular offset in yaw for the motion sensor, relative to the fore-aft longitudinal axis of the survey platform. In situations where the motion sensor is misaligned in the ship's reference frame, the roll and pitch signals reported by the sensor can be subject to cross talk. Adjusting this slider allows you to attempt to solve for the yaw misalignment angle.
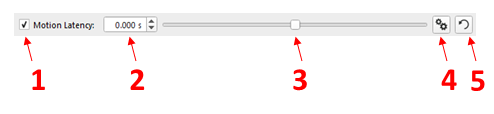
Motion sensor adjustment widget
Checkbox: this toggles whether or not this adjustment is enabled or disabled. This is useful for quickly examining before/after scenarios, particularly for screen shots documenting a problem.
Offset adjustment spin box: You can enter the offset in the spin box or adjust it using the adjustment arrows that are part of the spin box controller.
Offset adjustment slider bar: You can adjust the offset using this slider bar. Holding down the shift key decreases the sensitivity to mouse movement so that small adjustments can be made to fine tune an offset.
Range edit: Adjust the minimum and maximum range of the slider bar. The default is to limit this to +/- 1 sec for time offsets and +/-5 meters for location offsets.
Reset zero: Resets the current offset value to zero.
Control Window Toolbar
On/Off
This button works the same as the Qimera Tools→Wobble Analysis menu option. It will turn the wobble analysis widgets on or off.
Save and Apply Button
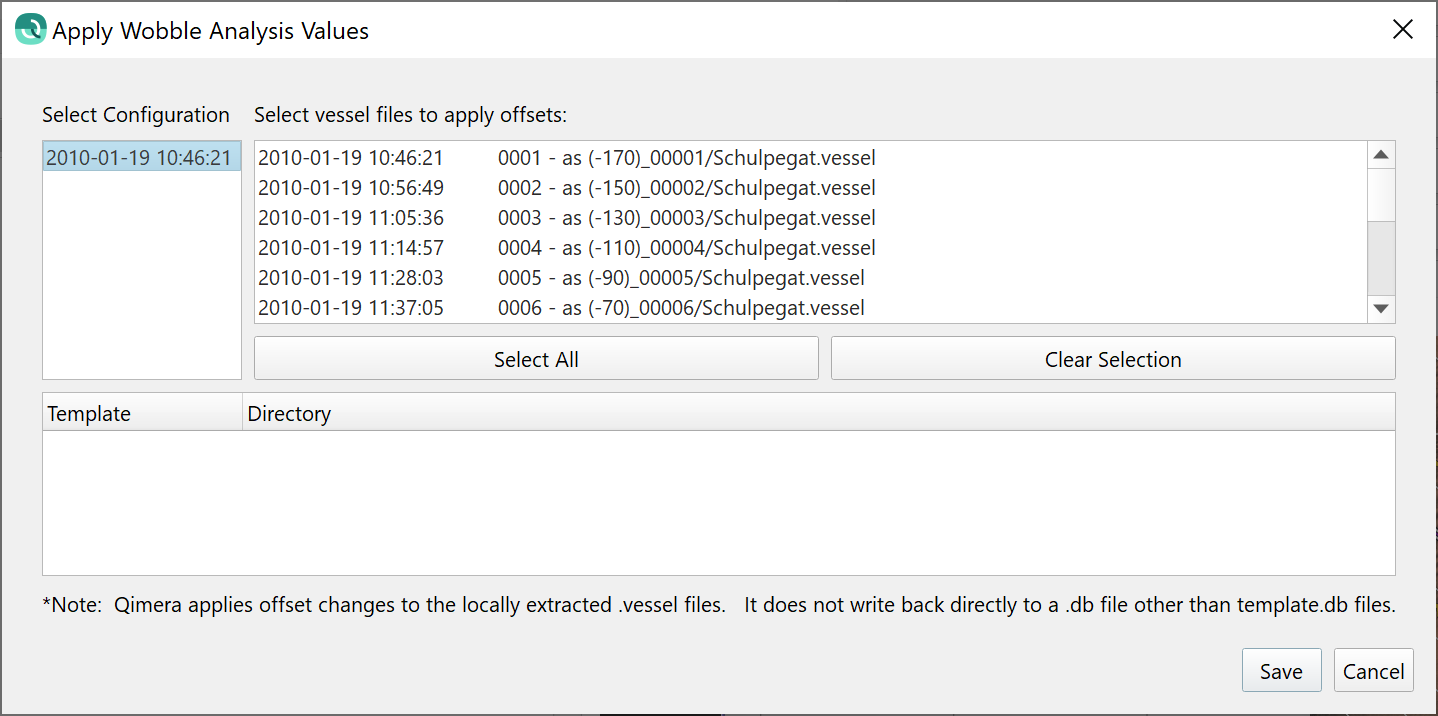
This button allows you to save a copy of your wobble analysis results to a file which can then be applied to the vessel configuration files associated with all raw sonar files from the same vessel. This session file is applied to vessel configuration files by either clicking the Apply button or by loading it in the Vessel Configuration Editor. Applying a configuration change will trigger a reaction from the Dynamic Workflow engine. When you apply a configuration change, you will be presented with a file selection dialog in which you choose a file path and provide a file name. This file name will be used to save a wobble analysis session file. Afterward, you will be presented with a dialog (shown below) which allows you to choose which raw sonar files you would like to apply the configuration change to. Clicking in the right hand list allows you to perform a standard multi-selection. For files that are imported at a later stage, you must apply the wobble test configuration file to the newly imported files as discussed in the Qimera Vessel Editor documentation. The Template window shows all template files available for application of the wobble analysis. They appear here as a checked list.
Save Copy
This button allows you to save a copy of your wobble analysis results to a file which can then be applied to the vessel configuration files associated with all raw sonar files from the same vessel at a later time. See the Qimera Vessel Editor documentation for more information on applying configuration files.
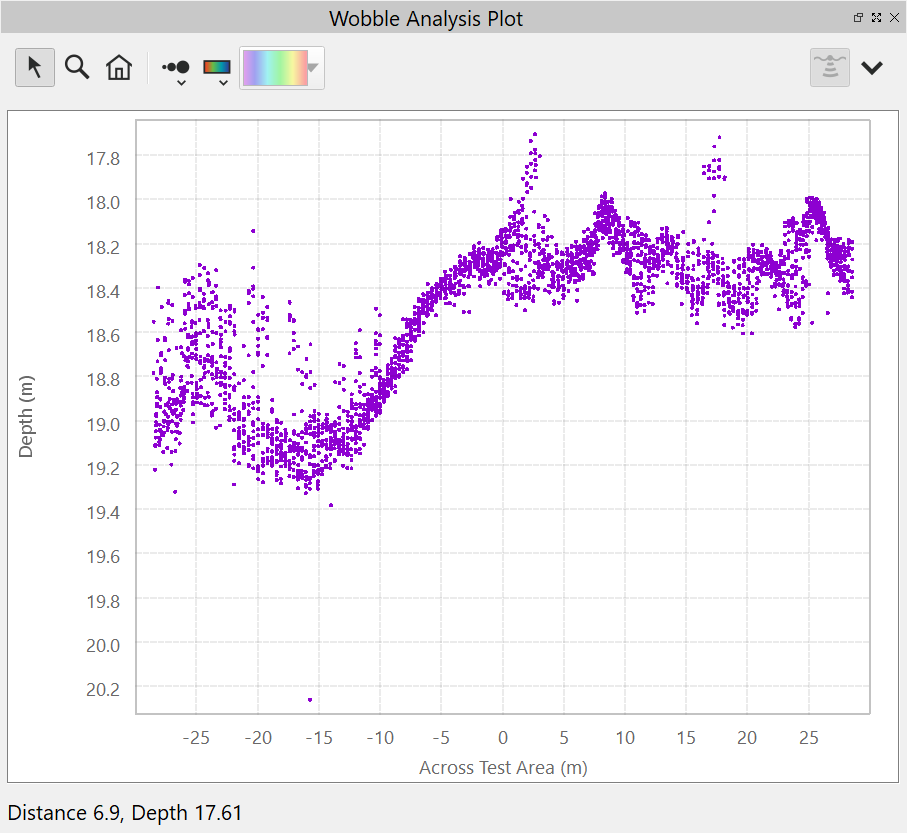
Wobble Analysis Plot Window
The plot window shows the footprint solutions for the spatial subset chosen in the Qimera 4D Scene for the selected line. Depth is on the y-axis and distance on the x-axis. The distance on the x-axis is along the long axis of the spatial selection box from the 4D Scene with zero being the center point along the long axis of the box.
Plot Window Toolbar
Explore Mode
This is the primary exploration mode of the tool. As you move your cursor over the plot, the label to the lower left of the sounding plot will update with the current depth/distance of the mouse position. The distance is the distance relative to the midpoint along the spatial selection box's long-axis.
Zoom Mode
When in zoom mode, simply click and drag an area of the plot to zoom into. Or single click a location to zoom in slightly. ALT-click a location to zoom out slightly. Or use the HOME button to return to the full extents of the data. At any time, you can SHIFT-Click to drag the plot to a new location. This is especially useful when you are zoomed in.
Plot Point Size
Clicking this button will incrementally change the size of the points and lines in your plot area. If you click and hold the button, it will display a menu where you can select point sizes between Small and XX-Large.
Plot Color By
Clicking the first of these icons will change theColor Bymode of the points drawn in the widget. If you click and hold the button, it will display a menu where you can select theColor Byoption directly. The options forColor ByareFile, System, Ping, Beam, and Intensity. When Color ByIntensityis used, the Colormap Settings button will be enabled to change and control the selected colormap.
Colormap Settings
This will allow you to select and adjust a colormap for the points drawn in the widget. This allows for the same controls as users would have over the coloration of a Dynamic Surface: selecting a colormap, adjusting the range and editing a colormap. Some settings for Plot Color By do not allow access to a colormap, e.g. color by File, System, Ping, and Beam.
Dock Options
The view options allow you to configure what you see and how you see it in the sounding plot.
Save to Image
Saves the plot area to an image file (JPEG or PNG).
Show Grid Lines
Show/Hide the grid lines in your plot surfaces.
Show Soundings
This sub-menu lets you change visibility of Rejected, Filtered, Edited, Normal and Additional soundings. For more information on these sounding flags, see either the Sliceor Swath Editor.