
3DEditor Control Bar
The Control Bar on the right side of the interface as shown below, is used for controlling the view, editing mode, sounding display, and for simple editing.

3DEditor Control Bar
The buttons located at the top of the Control Bar allow control of the Camera:


The Editing Mode area indicates whether the 3D Editor is editing soundings, CUBE Hypotheses, or Targets. The interface changes depending upon which editing mode is selected. When in either CUBE Editing or Target Editing mode, the color of the 3D grid and the color of the status panels will change to indicate that the editor is in a different mode.
The different cursor modes are described in the previous section on the Main Visualization Window. The four modes available modes, including their shortcut keys in brackets, are as follows:


The Display group controls which items are visible in the Main Visualization Window. If the Soundings toggle is enabled, all non-rejected soundings are displayed on the screen. If the Rejected toggle is set, all soundings that have been rejected are drawn (these soundings are usually drawn as red diamonds). The surface generated from the unrejected soundings can be displayed by clicking the Surface toggle, or lines connecting all soundings in a single record can be drawn by enabling the Connectors toggle. If the Targets toggle is enabled, any targets in the current area are displayed and if the Hypotheses toggle is enabled, any loaded CUBE Hypotheses are shown.
The Soundings group allows configuration of various properties of the displayed soundings in the Main Visualization Window. Use the Color By menu to control how non-rejected soundings are displayed on the screen as illustrated below.
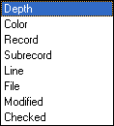
Color By Menu
If any custom flags or attributes exist in the PFM, they will also be available in the menu. For more information on coloring soundings see the Soundings Panel section. The Highlight By menu allows drawing all soundings that match a certain flag as a lighter color. Any available custom flags will also appear in this menu. If a dataset has a custom attribute, second depths can be drawn using the Sec. Depths menu. The Size slider controls how large the points are drawn on the screen.
The current selection can be cleared by clicking the Clear button. To invert the selection (deselect all selected points and select all previously unselected points), click the Invert button. Some extra options for selecting soundings can be accessed by clicking the Select By button, which will display the menu in the Select By Menu below. Selecting any of the menu options that correspond to flags (i.e. Modified, Suspect, Plotted, etc.), will select all soundings in the editor that have that flag set. Clicking the Manually Rejected option will select all soundings that have been rejected by an operator, and clicking the Filter Rejected option will select all soundings that have been rejected by an automated filter. The Rejected menu option will select both manual and filter rejected soundings at the same time. See Utlilities Panel in Editor Panel for more information on the Shoal, Deep, or Outliers options.
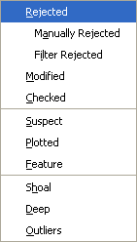
Select By Menu
Once a selection has been made with the mouse, the selected points can be marked as invalid by clicking the Reject button. Note that the rejected points are not actually removed from the file but a flag is set. To view the rejected points, click the Rejected toggle in the Mode group. The rejected soundings can then be selected with the mouse and undeleted by pressing the Unreject button.
Return to: Reference Manual