How-to Tide
This How-to describes step by step how to apply tide both online and offline in Qinsy.
If it's applied online, the tidal data will be stored in the databases.
Offline it can be applied in the Survey Manager, so the QPDs will be updated with tidal information.
Finally, we will explain how to apply tide to a survey that was done with RTK.
Info
It is also possible to apply the tide in Qimera, see for more information the document: 'How-to Qimera - Applying Tides' in the Qimera knowledge base.
On this page:
Tide options
During a recording session in the field there are five options for inputting tidal information into the raw database:
- Use GPS height as psuedo tide solution called RTK Tide. 'How-to RTK Height as Tide'
- Input data from a tide gauge (or multiple) that transmits data to the vessel. Go to (9.5) How-to Tide#Tidegauge(s). (See below.)
- Use one or two manual gauges. Go to (9.5) How-to Tide#Manual tide gauge. (See below.)
- Use predicted tide using Admiralty Tide Table (ATT) parameters. This is named Online prediction (ATT). (See below.)
- Input tidal information by creating a (predicted) tidal data file. Go to (9.5) How-to Tide#Tidefile. (See below.)
In four cases you will need to define a Tide Gauge system in your Template database; for RTK tide you won't need to.
The Online prediction also requires a fixed node to be set up as described in the Drivers Manual help.
The rest of the settings will be defined online in the Computation Setup.
- Database Setup
- (9.5) How-to Tide#Computation Setup
- (9.5) How-to Tide#Displays
- (9.5) How-to Tide#Tide Monitor
Database Setup
If a tide gauge, a manual tide setting or a 'predicted' tide file are going to be used during the online survey, a tide gauge must first be defined in the Database Setup:
- Define a new system.
- Select Tide Gauge as Type.
- Select the appropriate driver (select Manual Tide Gauge Input for manual input or for reading data from a file (not ATT)).
- In the Parameter screen select “Add Tide” and then “Add” to create a new Fixed Node.
- Enter the appropriate information for the node. This node is the location of the tide gauge.
- Highlight the fixed node to activate it and press OK to finish the setup.
- Highlight the created tidal observation. Edit the slot if multiple tidal observations exist.
- In the Observation Parameters screen, enter values for ‘A-priori SD’, ‘Fixed C-O’, ‘Variable C-O’, ‘Scale Factor’.
Press ‘Apply’ to activate the changes. - Click on Finish to finalize the setup.
- Repeat these steps if multiple tide gauges are used.
Use of one or multiple tide gauge(s)
When only one tide gauge is added as a system to the database, there is no need to enter the coordinates and height of the node.
When multiple tide gauges are used, the coordinates are important: in that case the tidal value is determined based upon a weighted distance from the gauges.
Drivers and Interfacing Manual
For more information about the different tide gauge drivers check the Drivers and Interfacing Manual: Tide Gauge.
Each driver has a description on how to create the selected tide gauge and how to read its data in the Controller.
Computation Setup
Applying or Storing tide
Tide will only be applied, if the height status of the used positioning system is set to Unreliable in the Computation Setup (e.g. for DGPS).
Tide will not be applied if the height status is set to Accurate (e.g. RTK DGPS), however the tidal information will be stored in the database.
This storage file will only be available when a tide system was added to Database Setup.
More information on Height settings can be found in the Knowledge Base document 'How-to Height - Tide and RTK'.
- In the Controller, open the Computation Setup from the Settings menu.
- Select the object from the tree and click on the 'Tide' tab.
- Click on 'Add' and choose from:
- New Tide Along Route
- New Tide File
- New Tide Gauge
- As you can see from the example below, it is possible to add multiple Tide Strategies. By giving each a priority you will be able to decide which Strategy is applied before another Strategy.
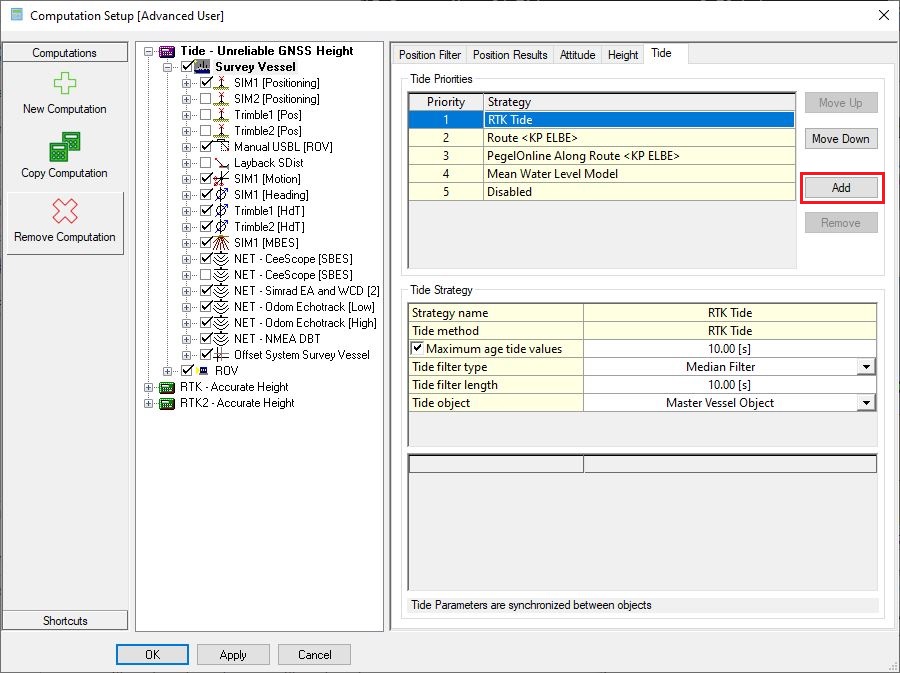
RTK Tide
Keep in mind that RTK tide has a different way of setting up things. Check the Knowledge Base document 'How-to RTK Height as Tide'
- There is no need to 'Add' RTK tide, MWLM or Disabled, these are available by default.
Tide strategies
Disabled
No tidal data is applied to the selected object.
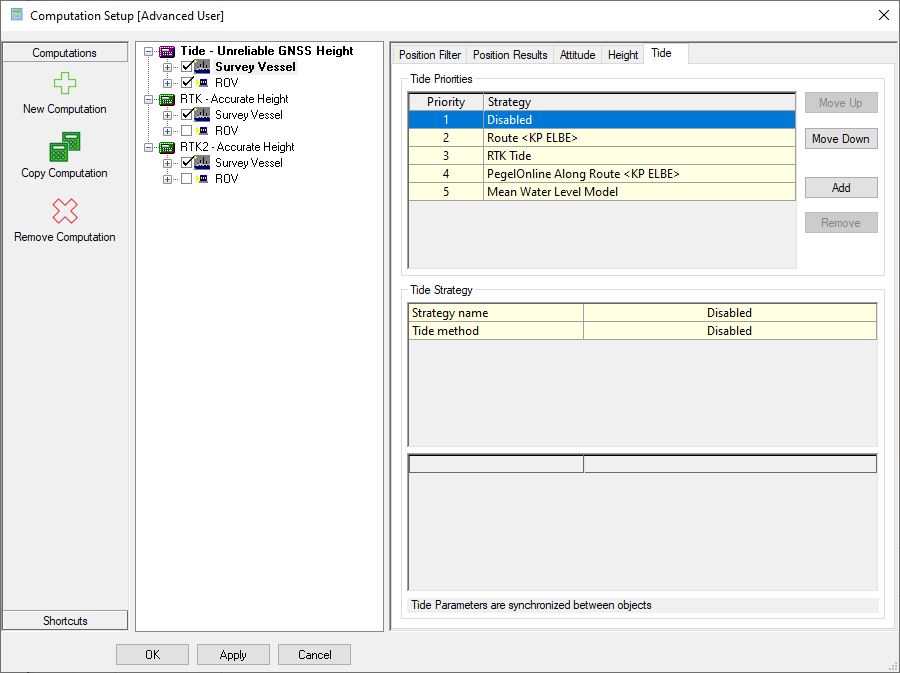
Disabled
Keep in mind that, if Disabled is the current selected Strategy, it will never fall through to the Priorities below Disabled.
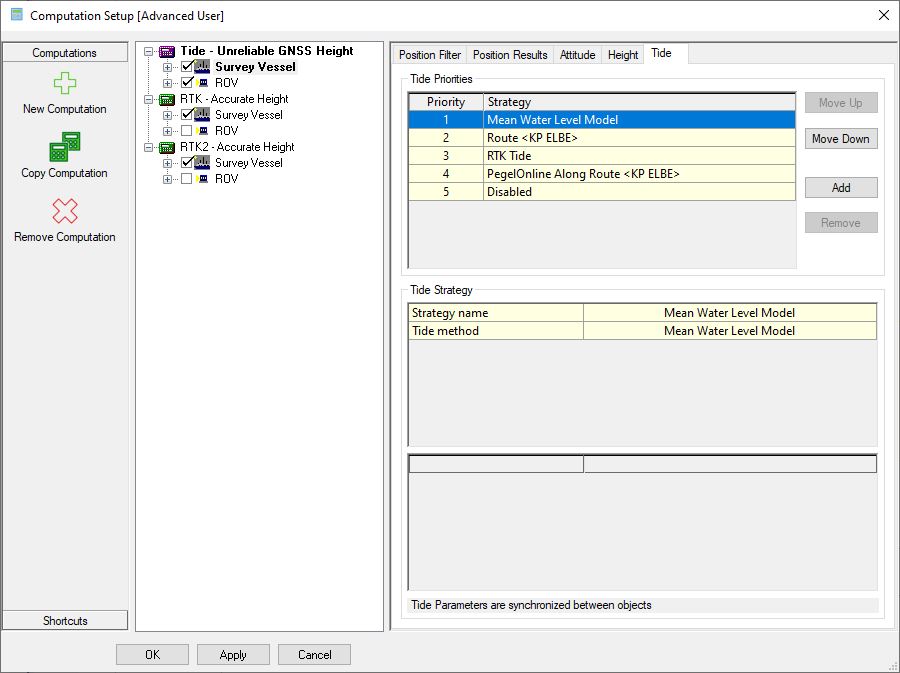
Mean Water Level Model
No tidal data is applied to the selected object in the survey.
Unreliable object heights are referenced to the Mean Water Level Model as defined in the Geodetic Setup, as opposed to the Actual Water Level as computed with the other Tide methods.
RTK Tide
- RTK Tide is available (but disabled) by default when opening Tide Priorities
- Follow 'How-to RTK Height as Tide' for a detailed description on how to set up RTK Tide properly.

RTK Tide pseudo-observation
An 'RTK Tide' observation, followed by the object name, is available for display purposes.
Its timetag is the last update time of the tide filter, so it can also be used to set up an alert.
Tide gauge(s)
- Select the added method Tide gauge
- Set the number of gauges to use.
Depending on the ones added to the template they could be:- Real time input
- Manual Tide Stations
- Tide Stations using ATT files
- Tide Stations using Tide files (e.g. predicted tide)
- Set the Maximum age of the tide values
- Select which tide gauges should be used
Maximum number of tide gauges
A maximum of two gauges or files can be used for the online computation of the tide.
If more gauges are needed then the Tidal Processor in the Survey Manager should be used instead of the online option.
Weighted values
When the Tide Gauge method is used with two tide gauges, the tidal value is determined based upon a weighted distance from the gauges in the area between the two tide gauges.
When outside this area only one tide gauge will be used.
Gauges at fixed positions/nodes
When tide gauges or tide files are used it is necessary to have Fixed Nodes defined in the Database Setup.
The fixed nodes give the positions of the gauges and the correct height reference system to be used.
Auto select
When Tide gauge (auto select) is used, the Controller will select the two nearest stations automatically. This is based on KP values along a route and the current vessel position.
For example: the route containing the tidal stations along a river axis should be selected as first Additional Mainline in the Session Setup.
When no additional mainline is selected, automatically the mainline will be used. Leave the fields Tide Gauge empty.
The nearest stations are automatically selected whilst online. If only one station is selected, the nearest is searched for every 60 seconds.
Display tide gauge info
Use the Generic Display to display the Tide results such as Closest Gauge and Second Gauge used.
Manual tide gauge
- Add the Tide method: Tide Gauge
- Set the number of gauges to use
- Select which tide gauges should be used
A Manual Input Driver is started automatically when going online: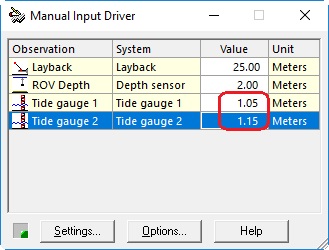
- Enter the value of the tide
- Click on 'Settings'
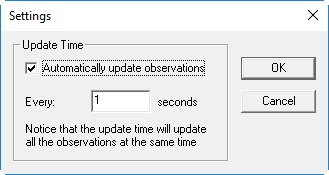
- Make sure that the option 'Automatically update observations' is enabled
- Set the required update rate.
ATT files as tide gauges
- Add the Tide method 'Tide Gauge'
- Set the number of gauges to use
- Select which tide gauges should be used
- To set up the Admiralty Tide Tables as online tide gauges see the Driver and Interfacing manual 'Admiralty Tide Table (ATT) - 22' for an explanation.
Tide file
- Add the Tide method 'Tide File'
- Set the number of gauges to use
- Select which Tide gauges should be used and browse for the corresponding Tide files.
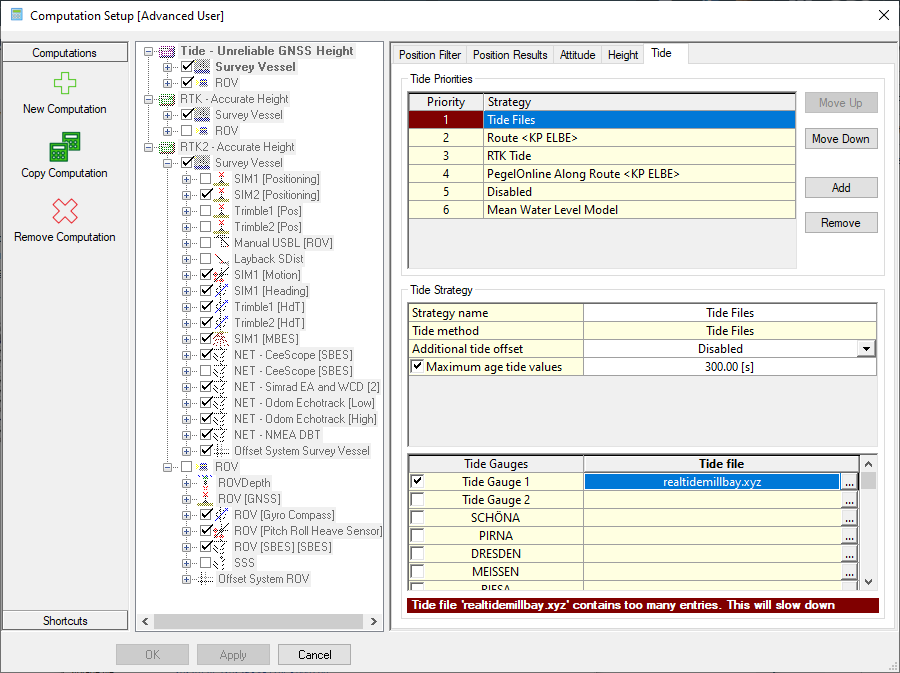
Too many entries
If the imported file contains too many entries (e.g. values over multiple days/weeks), it could potentially slow down the computation.
Qinsy will show a warning if that is the case, see image above for an example.
Types of tide files
Two types of tide files are supported: (9.5) How-to Tide#tidal data files and regular tide files. (ATT predictions are used as tide gauges, not as tide files.)
The first has extension .qtd and is also used offline. See (9.5) How-to Tide#Processing below.
The second has extension .txt and should have the following format:
24/10/2020 10:10 1.24
24/10/2020 10:20 1.10
24/10/2020 10:30 0.98
(no headers, no extra text to be added)
Tide File
Online this option can be used as a 'predicted' tide file.
It is also possible to use this option during Replay with real tidal values.
Tide Along Route
- Add the Tide method to 'Tide Along Route'
- Check the number of Tide Gauges to be used 2 or more
- Set Tide gauge selection to either:
- Take single closest
- Interpolate between 2 closest
- Set maximum age of tide validity
The two nearest stations or single closest station (depending on your tide gauge selection), along a selected route will automatically be selected, based on KP values along the route and the current vessel position.
If only one station is selected then the nearest one is searched for continuously.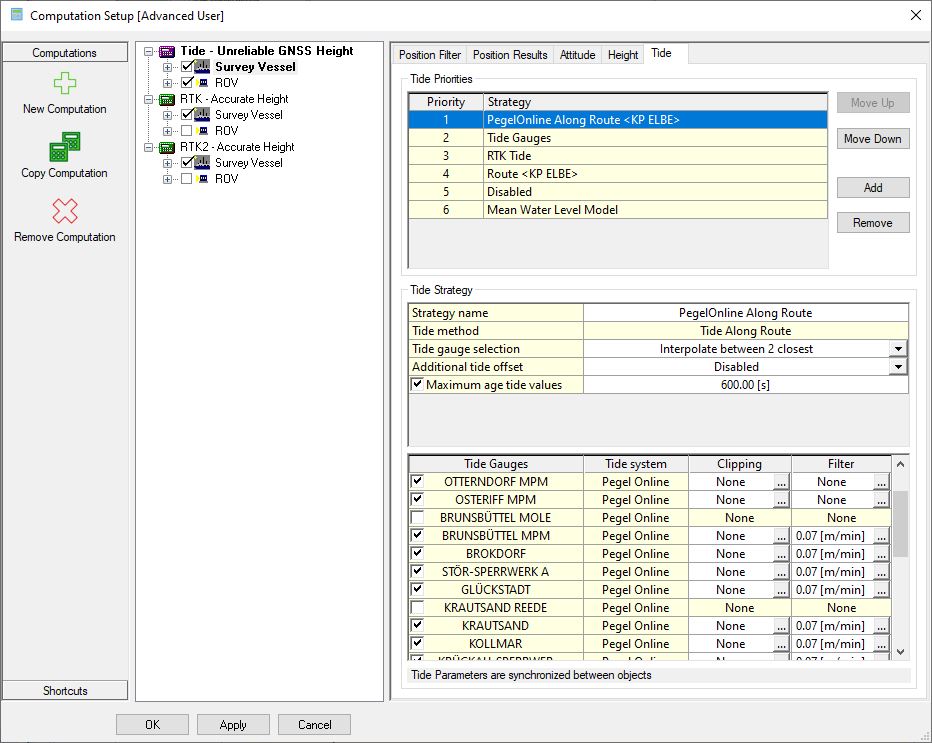
Tidal stations route
When sailing along a river axis, the route along the tidal stations should be selected in the Additional Mainlines menu in the Session Setup's Planning menu as first additional mainline.
'Just' calculating the shortest horizontal distance is not enough, because a river can be curved.
If the first additional mainline entry is empty then the current mainline will be used for the route representing the river axis.
Displays
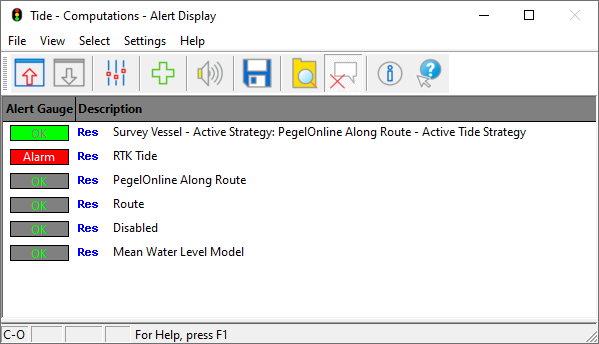
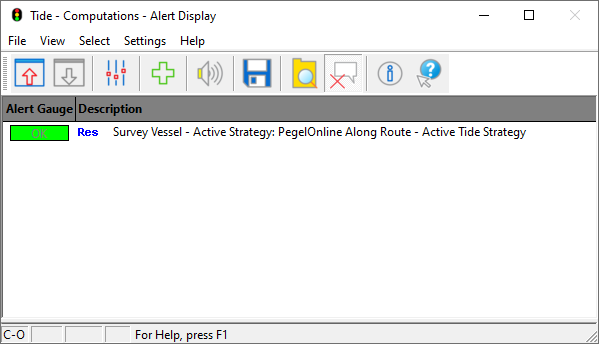
After setting up the tide priorities accordingly, the easiest way to monitor them are by using the Alert Display.
Alert Display
It is possible to visualize in the Alert display which Tide Strategy is currently being applied
- Open the Display manager & add an 'Alert Display'
- Setup Alerts

- Click on Add and select the 'Computation Results' Category
- Add 'Active Tide Strategy'
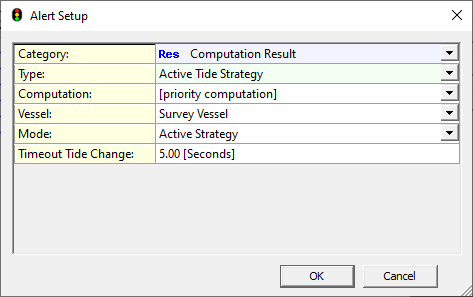
- Click on Ok, this will now show the Tide strategy which is being used.
However if you'd like to display each individual strategy and if they are still OK, we have to select a different Type:
- Setup Alerts
- Click on Add and select the 'Computation Results' Category
- Add 'Tide Strategy' & Select 'All Strategies':
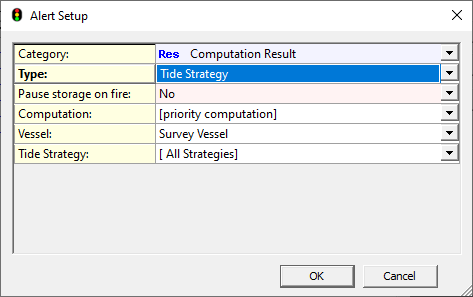
- After clicking OK, you will notice that in this particular example the RTK Tide strategy is not valid.