The Swath Editor allows you to edit soundings directly from a specific processed raw sonar file. After editing is complete, the saved edits will automatically update any associated Dynamic Surface. To start, select a raw sonar file that has been processed from your project. Click on the button from the Bathymetry Toolbar. For information on plot surface navigation and editing, see the manual on Qimera Plotting Surfaces.
Toolbar
Save Edits
This button will save any edits that have been completed.
Explore
This button places the window in Explore mode. Please see the section on Plotting Surfaces for more information on plot surface navigation and control.
Zoom In
This button places the cursor in Zoom mode. Please see the section on Plotting Surfaces for more information on plot surface navigation and control.
Reset Zoom
This button zooms out the plot window to the extents of the data. Please see the section on Plotting Surfaces for more information on plot surface navigation and control.
Reject Selection
This button places the cursor in Reject/Delete Selection mode. Holding down the CTRL key will invert the mode between Reject and Accept. Use the selection style and selection area drop down buttons to modify the selection style.
Accept Selection
This button places the cursor in Reject Selection mode. Holding down the CTRL key will invert the mode between Reject and Accept. Use the selection style and selection area drop down buttons to modify the selection style.
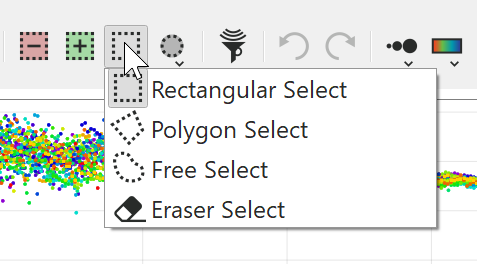
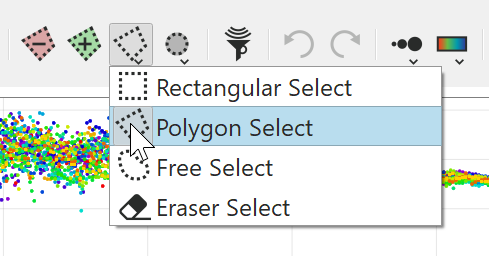
Selection Style
This button changes the selection style of both the Reject and Accept buttons. Clicking this will rotate through each of the styles, or long pressing will give you a drop down menu to select the style.
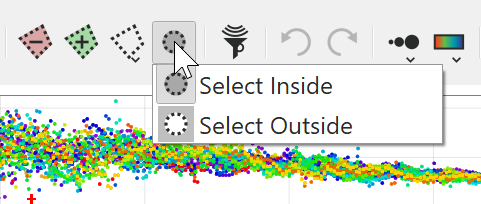
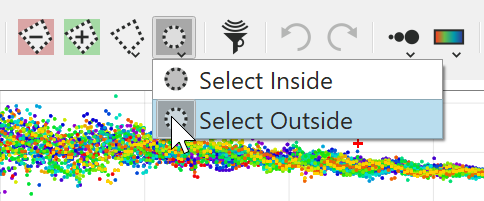
Selection Area
This button changes the selection area of both the Reject and Accept buttons. Clicking this will rotate through each of the areas, or long pressing will give you a drop down menu to select the area.
See the section on Plot Surface Editing for more information about editing with these tools.
Blocking Settings
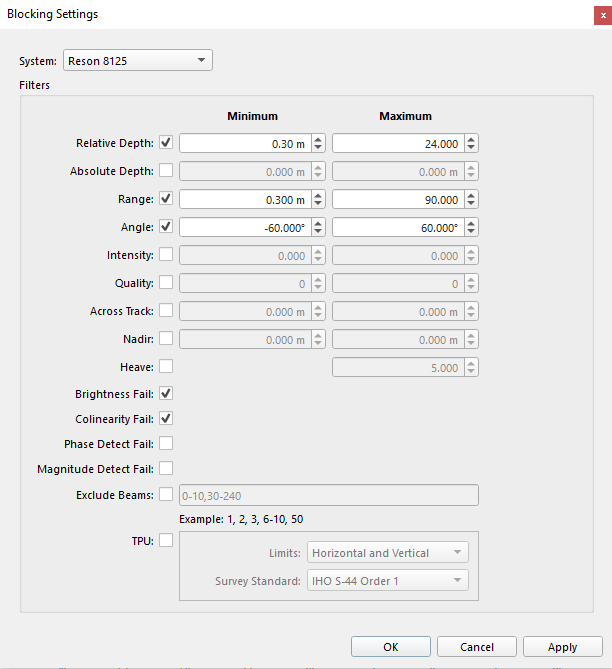
This button launches the Blocking Settings dialog shown below which allows you to adjust blocking filter settings for the loaded file. When you click Apply or Ok,you will see the effects immediately in the Swath Editor and in the 4D Scene (rejected/accepted points will have color coding changed accordingly). Note that Dynamic Surfaces will NOT update until the session edits are Saved. This has the same operational capability as the Blocking tab in the Processing Settingsdialog but allows you to preview what effect a particular filter settings will have on the data.
Blocking Settings Dialog
Undo
This will undo the last operation. The undo buffer is pseudo-infinite and limited only by memory. So it will undo each edit in sequence.
Redo
This will redo the last undo operation. The undo buffer is pseudo-infinite and limited only by memory. So it will redo each undo edit in sequence.
Plot Point Size
Clicking the first of these icons will change the point and line size draw in the swath views of the widget. If you click and hold the button, it will display a menu where you can select point sizes between Small and XX-Large.
Plot Color By
Clicking the first of these icons will change the Color By mode of the points drawn in the swath views of the widget. If you click and hold the button, it will display a menu where you can select the Color By option directly. The options for color by are Vessel (shows default Port/STBD color), File, System, Ping, Beam, Selection Depth (scaled to depth range of the pings in the plot), Surface Color Map (depths colored by the color map of the currently selected Dynamic Surface) , Intensity, Horizontal TPU, Vertical TPU and Solid Color. When Color By Solid Color is used, the Colormap Settings will be replaced by the Color Button.
Colormap Settings
This will allow you to select and adjust a colormap for the points drawn in the widget. This allows for the same controls as users would have over the coloration of a Dynamic Surface: selecting a colormap, adjusting the range and editing a colormap. Some settings for Plot Color By do not allow access to a colormap, e.g. color by Vessel, File, System, Ping, Beam and Surface Colormap.
Color Button.
This will allow you to select a color for the points drawn in the widget. The color button is used for selecting a color for Color By Solid Color.
Swath Buffer
Click and hold this button to get a spin box allowing you to change the size of the buffer. Currently, the buffer is limited to a maximum buffer width of 201 pings.
Select Info
This button places the cursor into Select Info selection mode. When you click on a sounding in the plot window, it is highlighted as a white sphere in the scene. It will persist until you either change your selection or pick a new sounding. This way you can correlate what you see in the plot window to what you see in the 4D Scene. If you have the Sounding Properties window open, it will also fill in information about the sounding.
Geo Pick
This button places the cursor into a Geo-Pick selection mode. When you click on a sounding in the plot window, a position entry is added to the Qimera Geo Pick Dock.
Add ENC Point Object
This button places the cursor in ENC Point Creation mode. Each time you click a sounding in the view, the Create ENC Object dialog will raise. To learn more about creating ENC objects, see the section on the Qimera ENC Editor Dock. Creating ENC point objects from soundings results in the VALSOU attribute of the feature being automatically assigned to the processed depth of the sounding.
Snapshot
This button will save a Point SD object for the currently selected soundings in the scene and will appear under the SD Objects tree on the Project Layers widget. The snapshot SD will get the name 'Swath_Snapshot_##### '. If you wish to use a specific name for the snapshot, use the Swath Editor Menu option Save Snapshot or hold down the CTRL key while you click the button. This will bring up a Save File dialog that will allow you to name the object. Snapshots are meant to be used as simple visual mark up cues in the working area to give you a method to easily keep track of items that you have reviewed, or to perhaps capture objects of interest that require further examination or analysis. You can use these objects as "bookmarks" in your data. To quickly navigate to their location, select them in the SD Objects tree and click the Z key or use the Zoom to Object button of the 4D Toolbar .
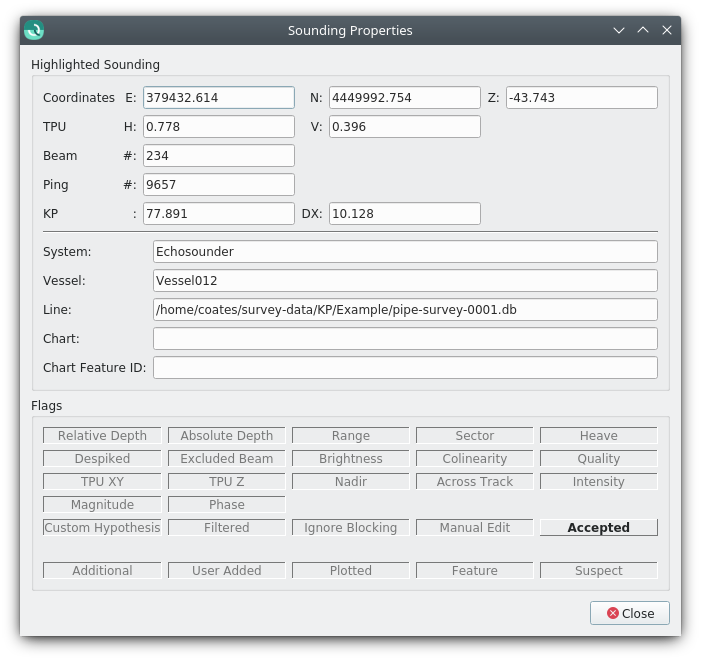
Show Sounding Properties
This button will show the Sounding Properties Dialog shown below. As you move your cursor over the soundings in the plot view, the information in the dialog will update accordingly. The Flags Section shows the detailed information about the QPD status flags for each sounding. If the button is bold and raised, the flag is set.
Head Visibility
With multi-head data, Qimera will allow you to individually turn heads on or off during swath editing. The icon displays the vessels relative direction of the heads in the file. The tool tip for these buttons will display the name of the head assigned to the button. There are 3 potential representations of these buttons. Port facing, down facing and starboard facing. You will only see these buttons when you have more than 1 head in your data.
Port/Starboard Visibility
This button is a multi-state button control which soundings are visible relative to the vessel. You can cycle options by clicking, or, if you click and hold, a drop down menu appears with the options and their descriptions. The options are full swath, port swath or starboard swath.
Menu Options
This button brings up the drop down menu. Description of these options follows.
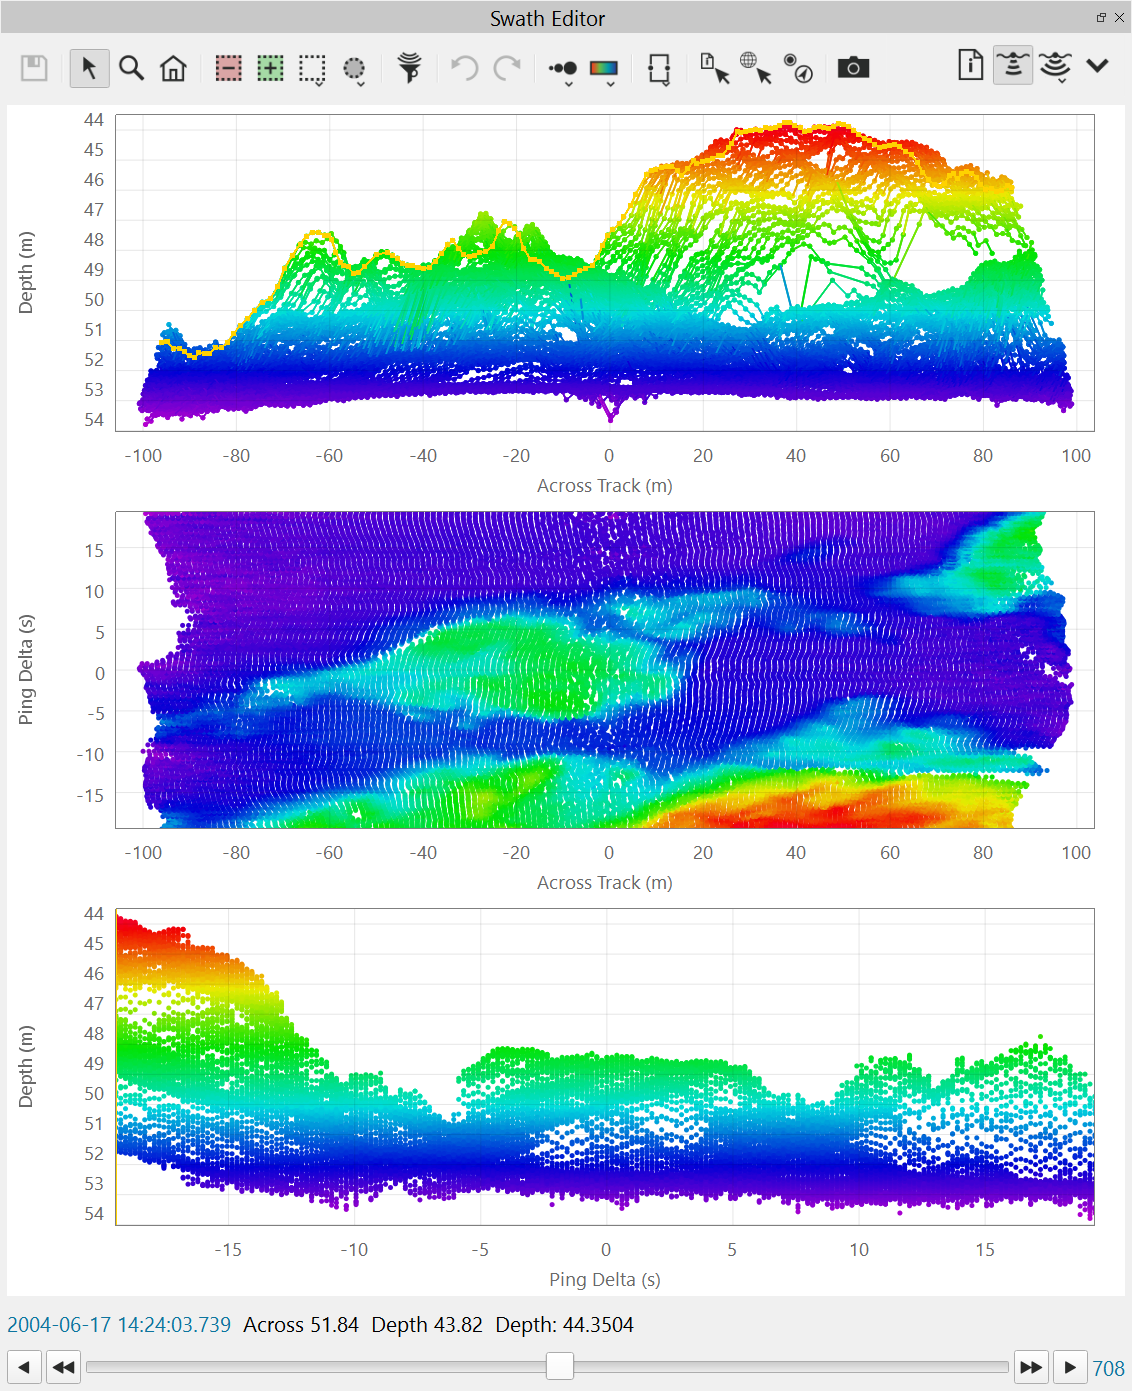
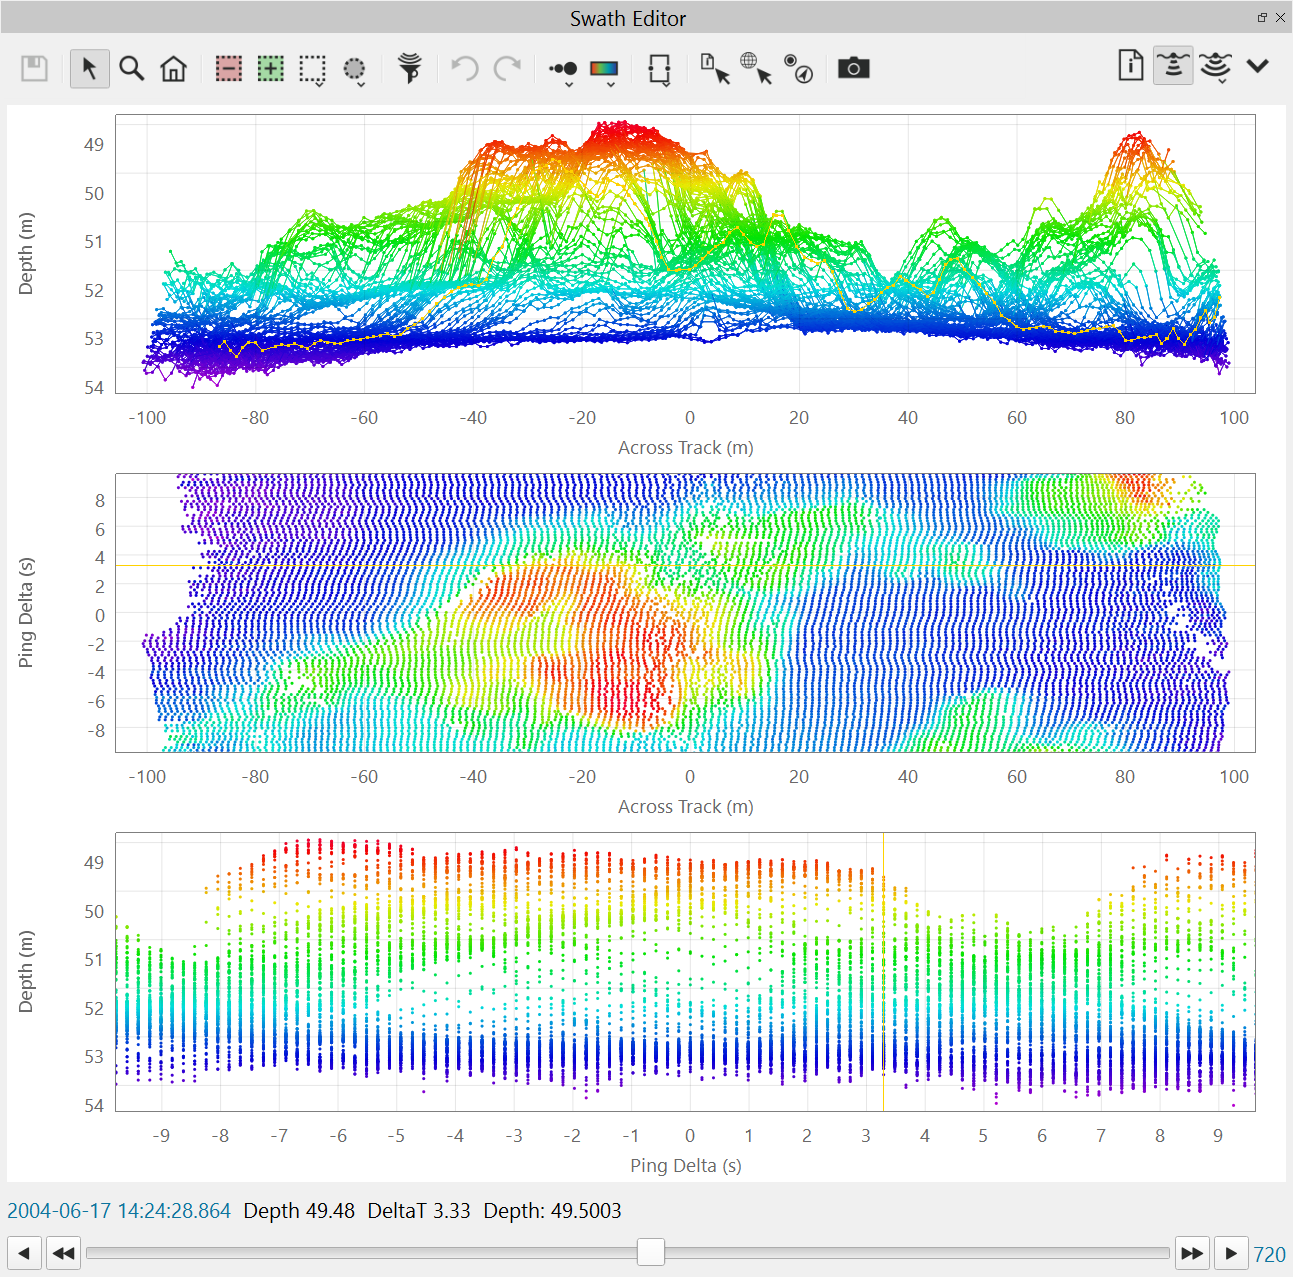
There are 3 synchronized swath modes that can be shown or hidden. Editing can occur in any of these views. When the mouse moves over the Above or Side views, the current ping is rendered in yellow and you will see synchronized views of the data in the Qimera 4D Scene, Time Series Plot window and Water Column window.
Behind
This option shows the view of the swath from behind the vessel. This is the top panel shown above.
Above
This option shows the view of the swath from above the surface. This is the middle panel shown above.
Side
This option shows an oblique view of the swath. This is the bottom panel shown above.
Auto Zoom
This option automatically keeps the bounds of the plot around the current swath buffer. If Show Rejected is unselected, the plot will zoom after each edit.
Auto Track
This option automatically keeps the swath centered in the 4D Scene.
Draw Lines
This option controls the visibility of lines connecting the soundings in the Behind view.
Auto Contrast
When Color By is intensity, Qimera will automatically adjust the grey-scale to maximize the contrast of the imagery data. This is done uniquely for each ping buffer currently in the view and will thus adjust dynamically as you progress through the file encounter different seabed types.
Show Grid Lines
This option will show/hide grid lines in the plot.
Show Soundings Options
Show Rejected
This option controls visibility of rejected points in both the Swath Editor and 4D Scene. Rejected points could have been rejected by the sonar manufacturer, a blocking filter, or through a manual editing operation. Rejected soundings are dark or light gray. Light gray specify soundings rejected via blocking filters. Other system or manually edited rejected soundings are dark gray.
Show Filtered
This option controls visibility of filtered soundings in both the Swath Editor and 4D Scene. If Show Rejected is on, you can decide to separately show/hide soundings that were rejected by a blocking filter. These soundings show up as light gray.
Show Edited
This option controls visibility of soundings that have been manually edited by the user. Editing covers both cases where the user manually rejects or accepts soundings. Once a sounding receives the Edit flag, no filter or reprocessing operation will change the sounding's accepted or rejected state. The Edit (rejected) flag is also set for Additional soundings during raw sonar file import. Qimera pays attention to the specific sonar topside settings (i.e. class types for Kongsberg files) to determine which to reject. The Edit (rejected) flag is also set for any interpolated soundings found during raw sonar file import. Remember that the user can always perform a manual edit operation to un-reject any soundings marked by Qimera as Edit (rejected) during import. See the description below about Restoring soundings.
Show Normal
This option controls visibility of normal soundings. These are soundings that are neither interpolated or considered as additional.
Show Additional
This option controls visibility of additional soundings. Teledyne Reson calls these "multi detect" soundings while Kongsberg calls these "extra" soundings. For Reson, all additional soundings are automatically accepted during import and the user must remove those that are not desired. For Kongsberg, only the classes that have been configured as visible in SIS during acquisition are accepted at the import stage. The other classes (including class 8) are marked as rejected by Qimera upon import, however, they are still imported can be reclaimed by the user by viewing the rejected soundings and re-accepting the desired soundings.
Show Interpolated
This option controls visibility interpolated soundings. These soundings are created only by Kongsberg multibeam echosounders. By default, these are automatically rejected by Qimera during import.
Jump to Ping
This option will launch a dialog that allows jumping to a specified ping on the current selected line in the Swath Editor.
Jump to Timestamp
This option will launch a dialog that allows jumping the swath editor to a desired timestamp relative ping. This method of jumping is not constrained by the current selected line loaded into the swath editor but is constrained to files with the same 'Vessel Name' or 'Vessel ID'. If the selected timestamp is not within the time bounds of the relative files, an informational dialog will be displayed.
Save to Image
This option will save the plots to disk as separate filenames with the format
filename_Above.format or filename_Behind.format or filename_Side.format
where format is your chosen image format (JPEG or PNG).
Save Snapshot
This does the same operation as the Snapshot button on the toolbar with the exception that you can explicitly name the SD file that is created.
Slider Bar
The slider bar is used to navigation the swath buffer along the current track line. As you move the slider, all plot views update in the Swath Editor as well as the temporally synchronized views in the Water Column window, Time Series Plot windows and the Qimera 4D Scene. The current ping number at the center of the buffer is displayed in the label at the right of the widget. You can also use the shortcut keys W and S to move forward or back 1 full buffer.
This button will move the swath back 1 full buffer length.
This button will move the swath back 1 ping.
This button will move the swath forward 1 full buffer length.