
This workflow utilizes the Fledermaus PFM data structure to create an editable surface for processing in Fledermaus as an alternative to directly reading and editing the Dynamic Surface of the Qinsy project in Fledermaus.
This editable surface is generally referred to as a "PFM".
This workflow currently provides some benefits:
-
It allows you to use the custom filtering options available in the PFM Build Wizard,
-
It allows you to control the application of Online Flags set in Qinsy to the PFM during the PFM build (you can choose which flags to apply),
-
It allows you to use functionality such as color by line,Target Editing, and Create Surface Object in Fledermaus that is not yet available for the Dynamic Surface.
-
It allows you to visualize Plotted and Feature flags in Fledermaus, however this flagging can be done on either the PFM or the Dynamic Surface and for either option these flags can only be utilized as part of a sounding export (to ASCII XYZ or ASCII XYZ+Attributes) they can't be unloaded back to the QPDs or updated to the Dynamic Surface as equivalent flags do not currently exist in Qinsy.
However, this workflow does require building a PFM from your QPD files and unloading the changes back to the QPD files once you are finished, which can be a time intensive process. In the near future, QPS plans to make all of the benefits above available when loading a Qinsy project directly in Fledermaus, and at that point the workflow outlined below will become obsolete.
Table of contents:
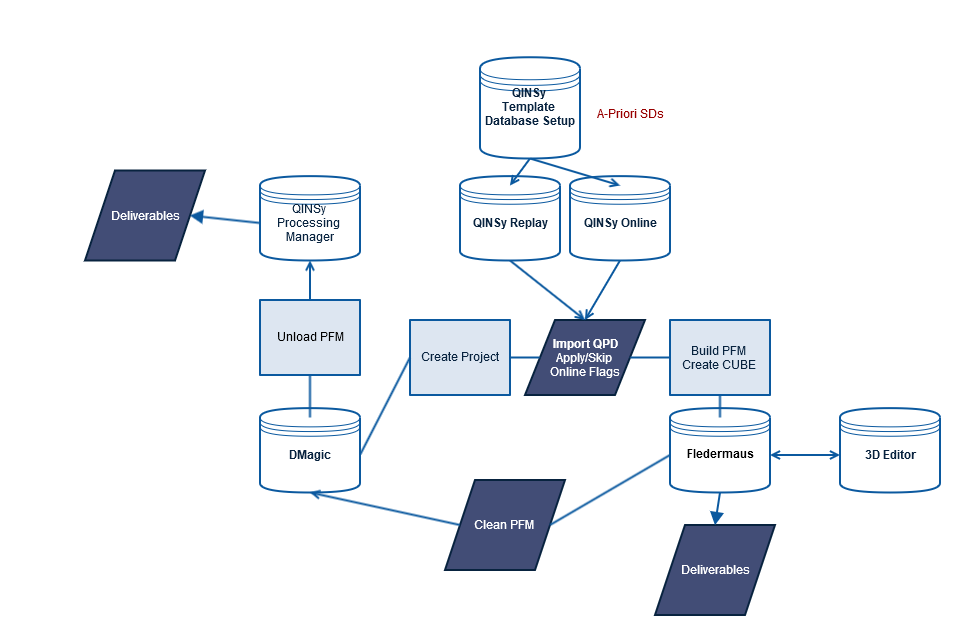
Step-by-step guide Workflow via the PFM Build Wizard (apply custom filters and flags)
To build a PFM, you need to have QPD files in your Qinsy project. You can use the full QPD set, or Reduced QPDs. With the full QPDs, all of the soundings are present and any Online Filters that were applied are stored as Flags; in the Fledermaus 3D Editor, these soundings will be visible when you turn on Rejected and will have an attribute marking them as Filter Rejected. With the Reduced QPDs, these Flagged soundings have already been rejected and removed and are no longer part of the dataset. This provides a smaller dataset and saves disk space, however you won't be able to view the rejected soundings in Fledermaus – they will not be part of the PFM build.
The steps below describe the workflow for creating a PFM from QPD files and processing the files in Fledermaus. This workflow utilizes the full QPDs; the same process can be used for Reduced QPD files, however the option to Apply Online Flags (Step 8, below) won't have any effect on the reduced QPD files (as the flagged soundings have already been removed).
-
Ensure you have QPD Files and the Qinsy project template database. The template database must be double checked for the project geodetic settings that were used on line.
-
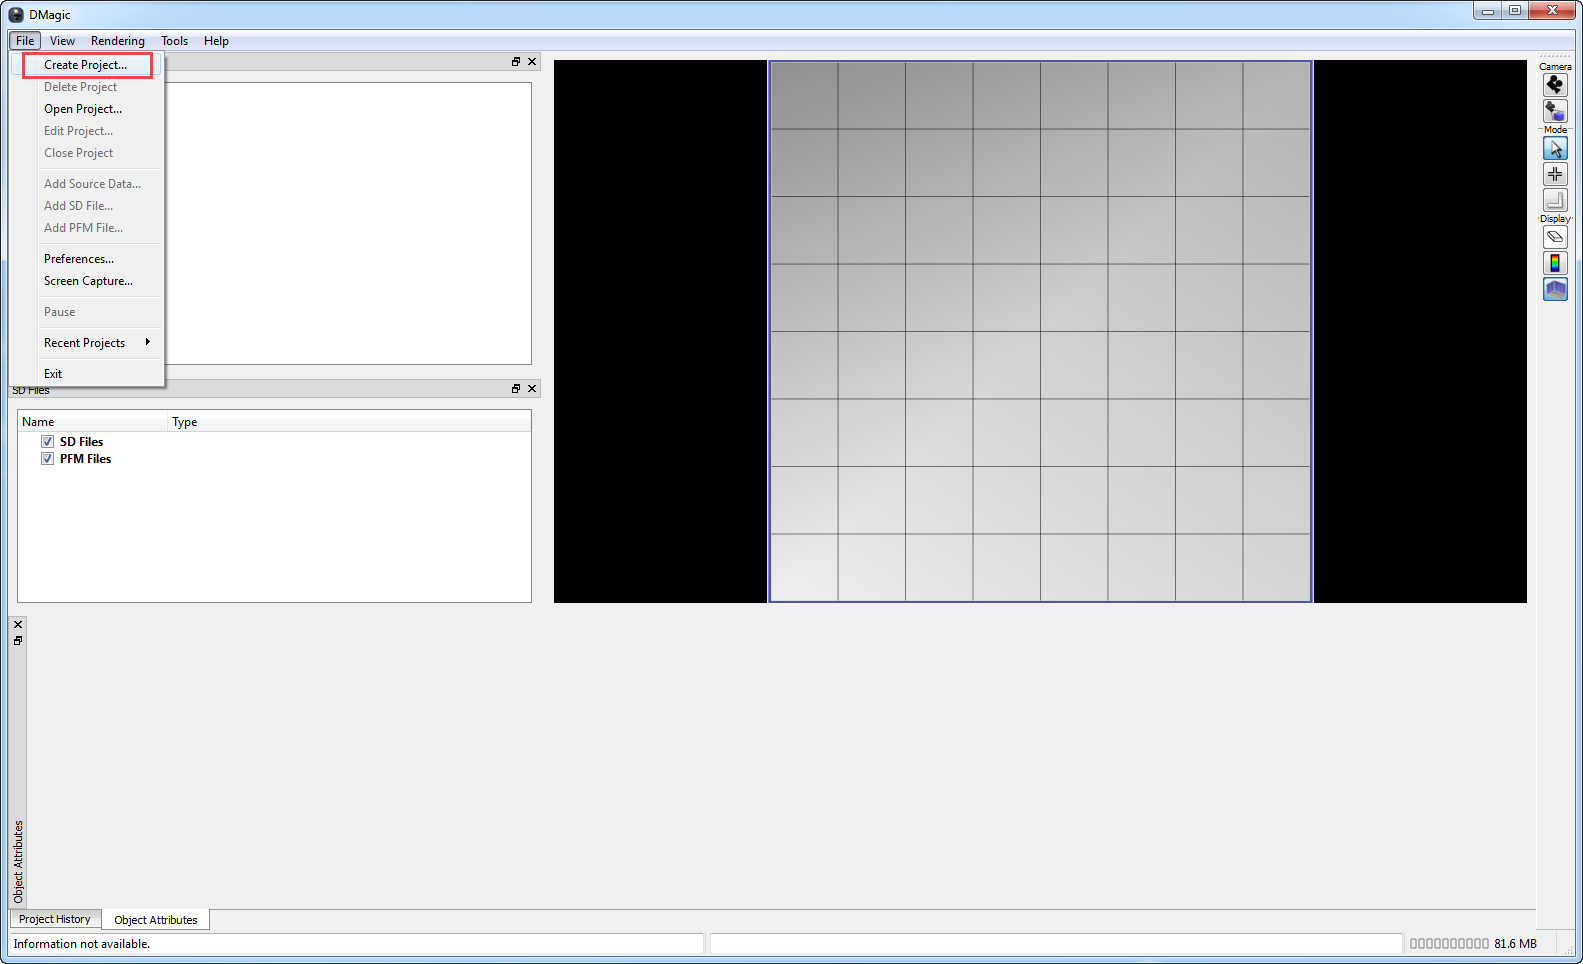
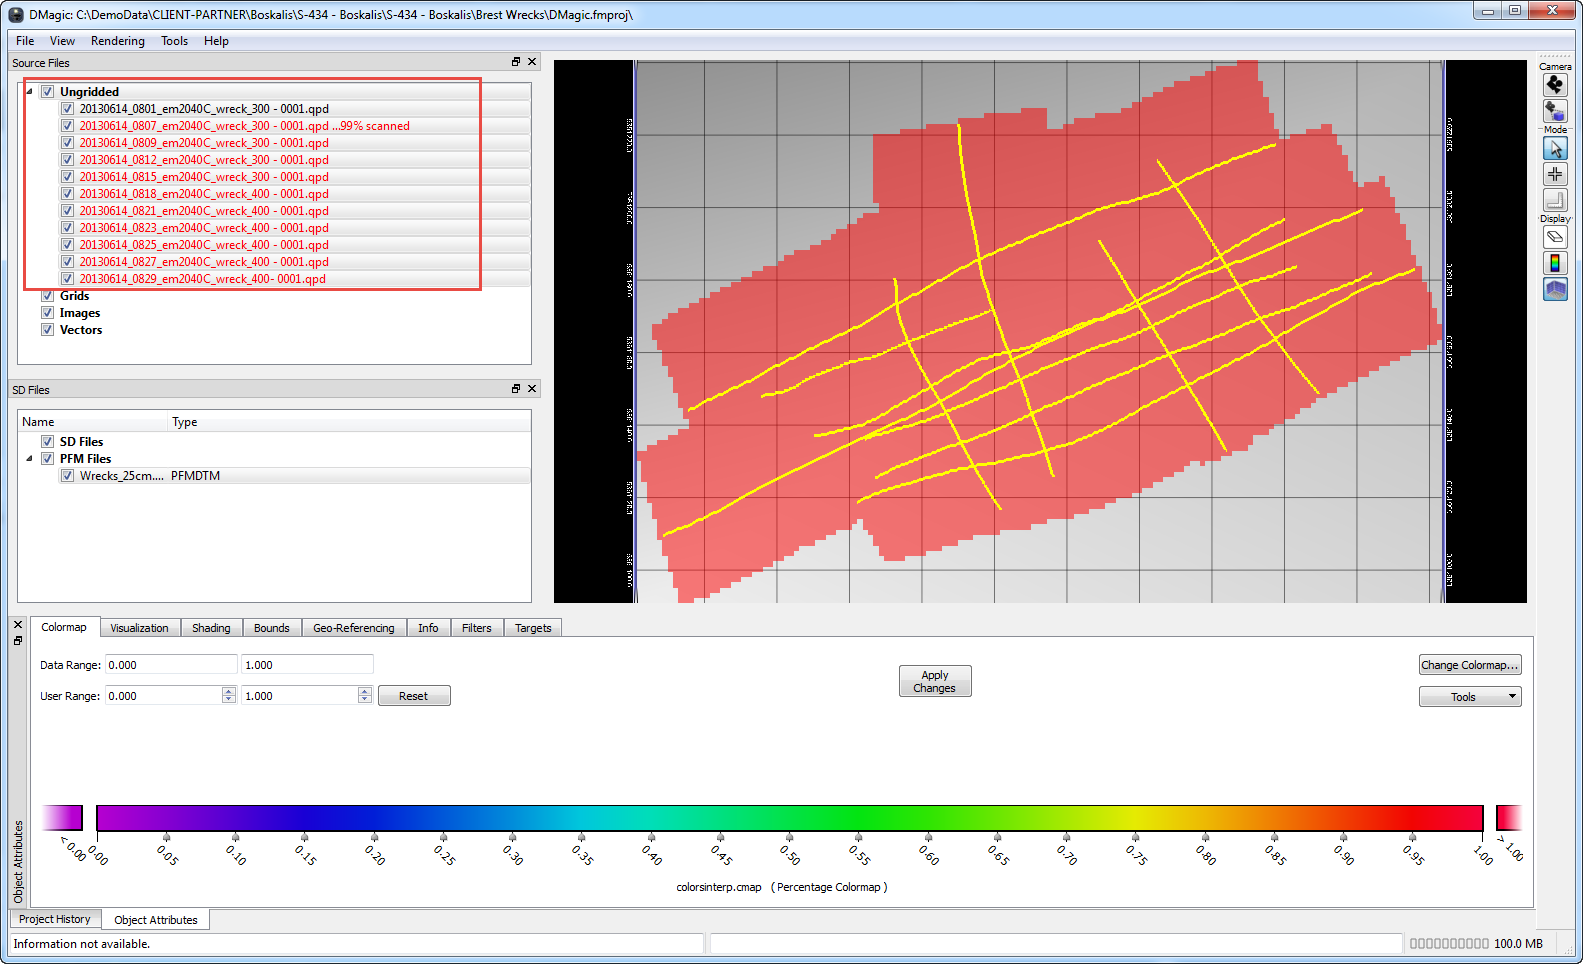
Launch the DMagic module by double clicking on the DMagic icon:

Or by going to Start > All Programs > Fledermaus (32 bit or 64 bit) > DMagic. -
Go to File > Create Project.
-
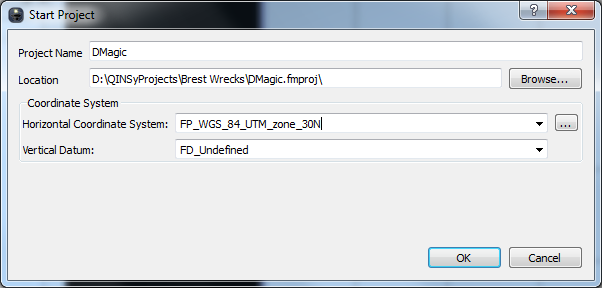
Give the project a name, set the Location, and choose the Horizontal Coordinate System. Click OK.
-
You may choose to create your DMagic project within your Qinsy project folder, though this is not required.
-
The project Horizontal Coordinate System defines the output projection of the PFM file (and any other files you generate in DMagic) and does not have to match the coordinate system of your input data (the coordinate system used for online survey), though most people choose to keep it the same for consistency. If you choose to use the same coordinate system, check Qinsy db setup for the geodetic settings. Note that "FP" and "FG" in the coordinate system name stands for "Fledermaus Projected" and "Fledermaus Geographic"; this is just general notation and doesn't effect the projection information.
-
Vertical Datums are generally not used by DMagic or Fledermaus at this time, and most people leave this set to FD_Undefined.
-
-
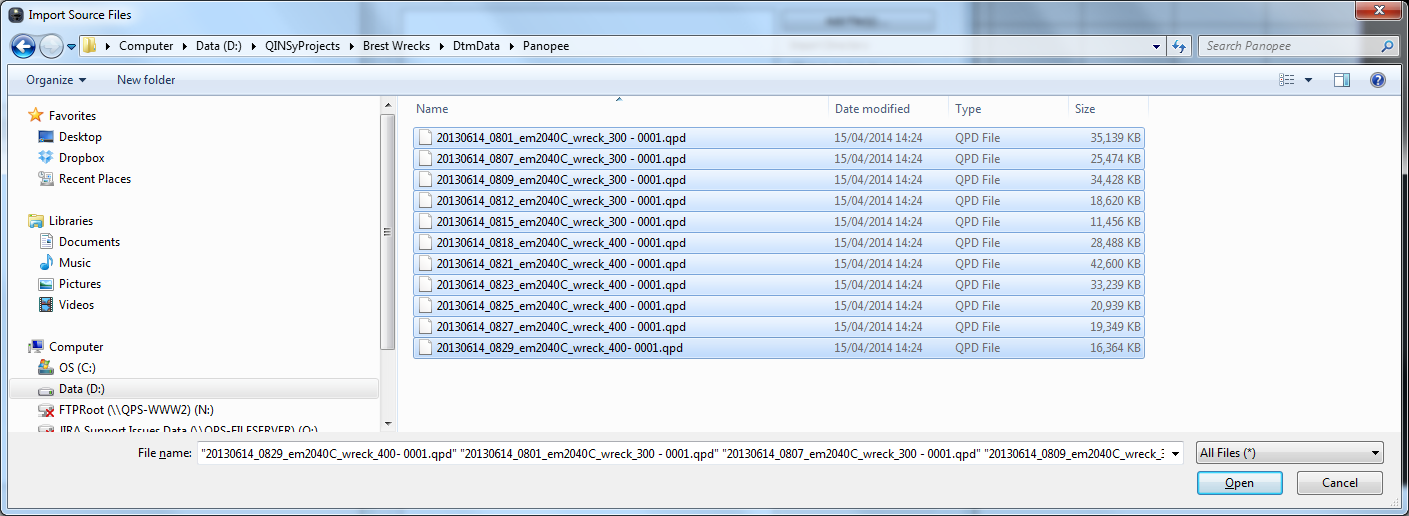
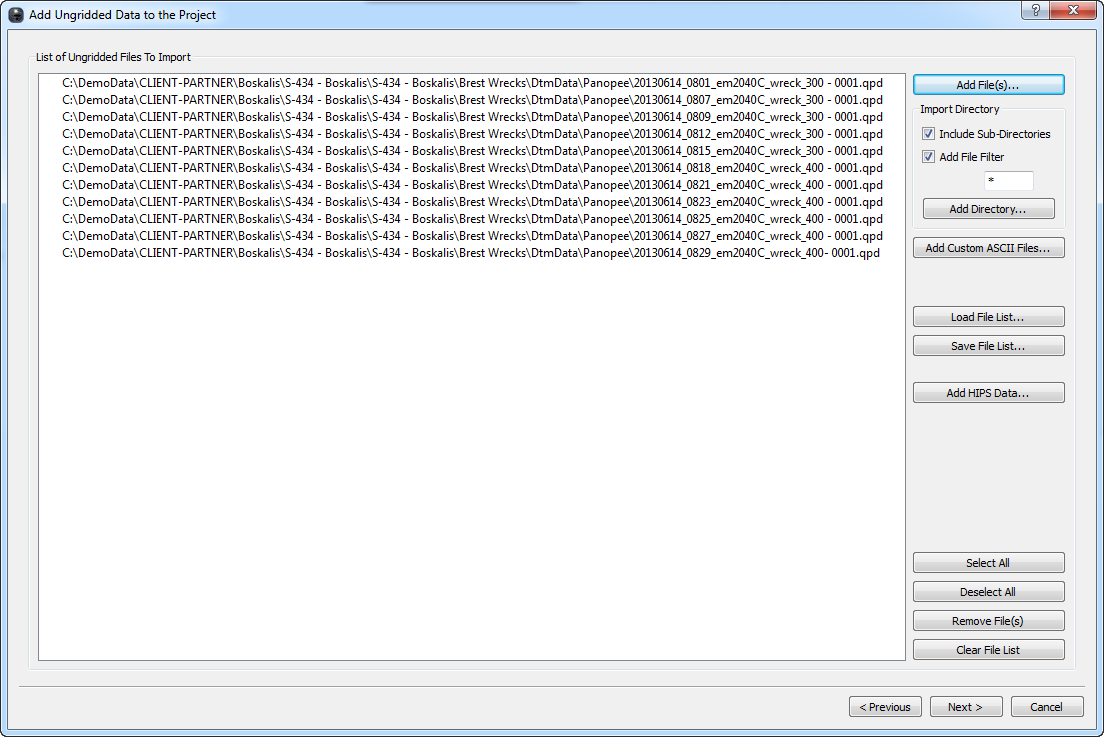
From the File menu, select Add Source Data; click the radio button next to Ungridded Data. Click Add File(s), then navigate to the Qinsy project folder, DtmData folder and select the QPD files. Click Open
-
The files will load under the List of Ungridded Files to Import. Click Next.
-
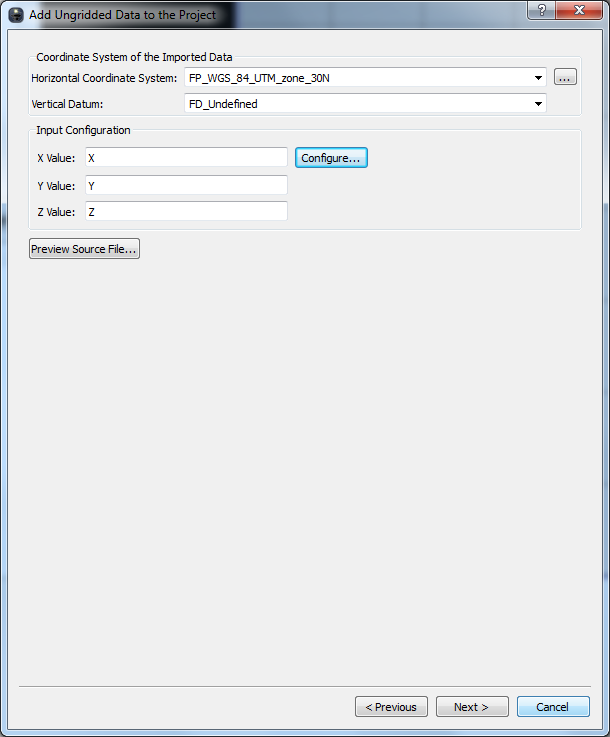
Set the Horizontal Coordinate System for the files you are importing – this should match the coordinate system you used for online survey. Again, most people choose to leave the Vertical Datum as FD_Undefined and if you did not define it for the project, you definitely should not define it here. Click Next.
-
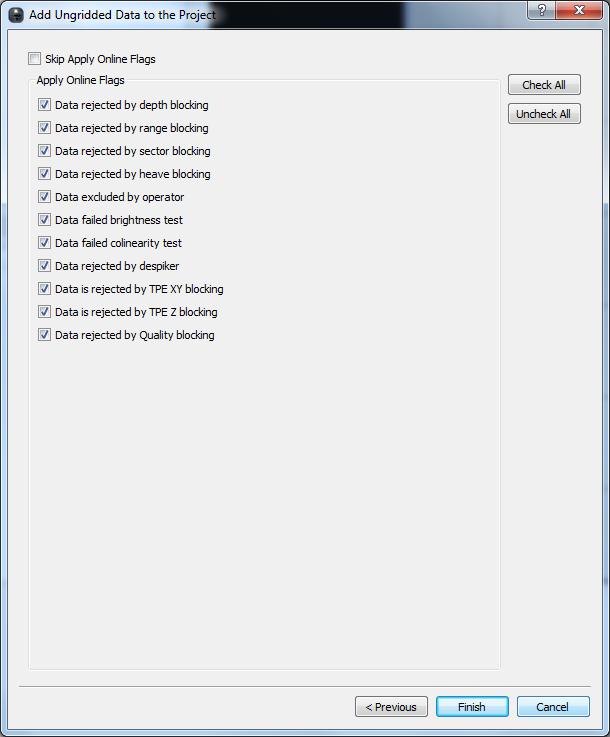
If you would like to use the flags that were set online, check them on. When Online Flags are applied, all soundings flagged in Qinsy will be marked as rejected and you will be able to see the soundings in the 3D Editor if you turn on the Rejected Soundings. If you don't want to apply the online flagging, then "Skip Apply Online Flags". Click Finish.
-
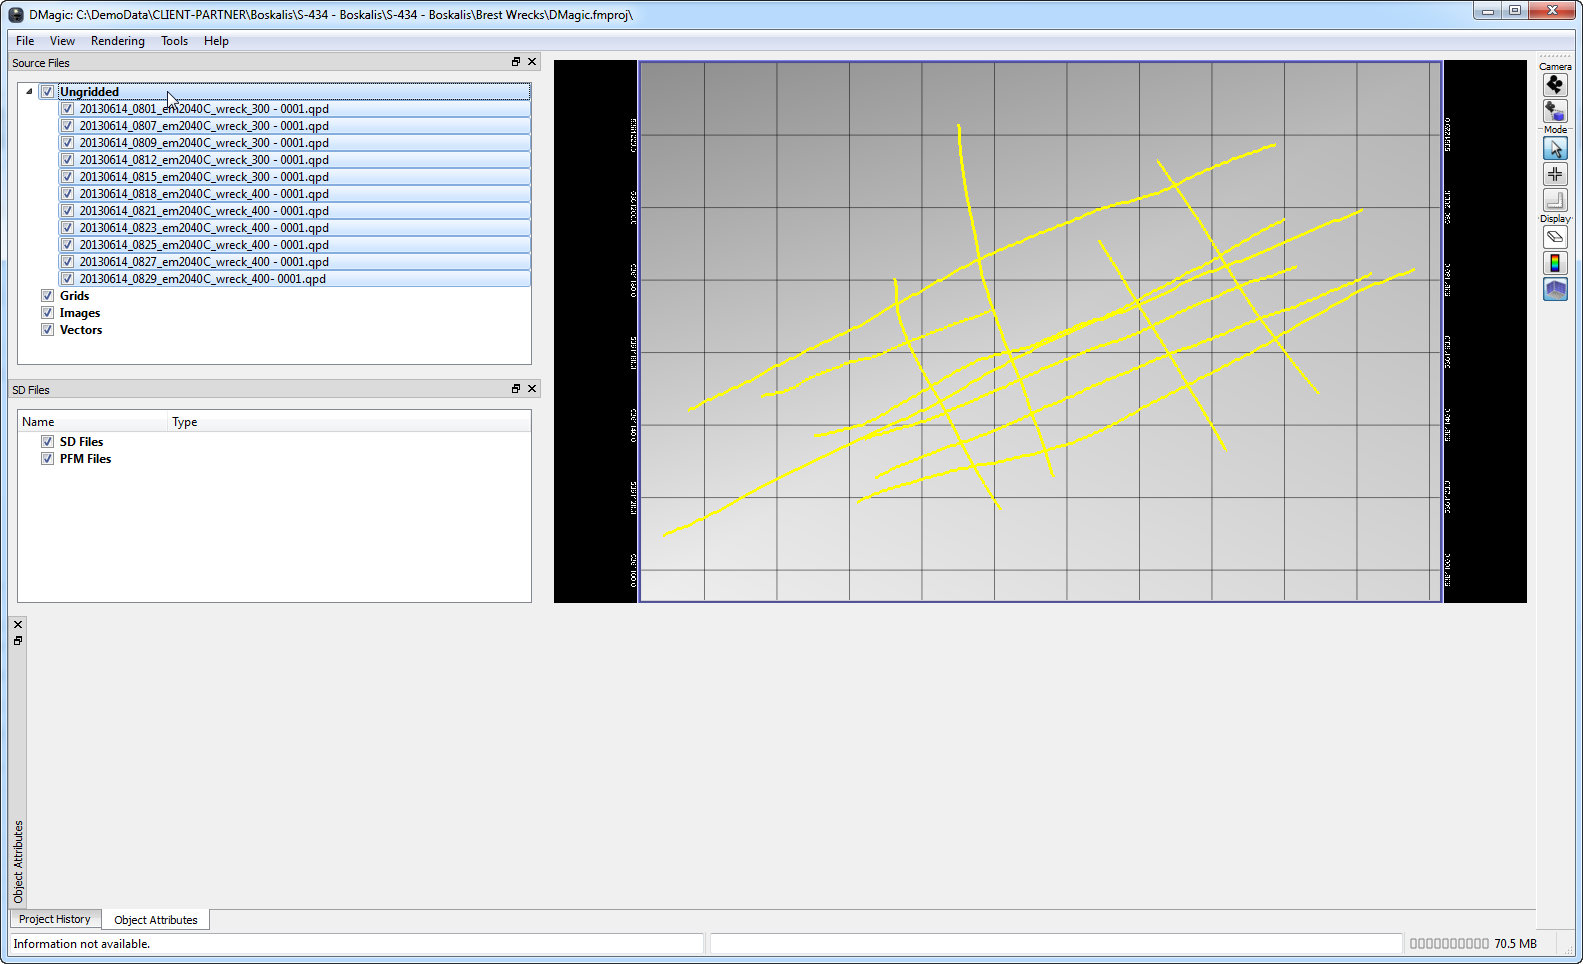
Ensure all selected QPD files have loaded into DMagic
-
Select the QPD files that you want to be added to the PFM. To select the files, you can use the Select Mode by selecting the following icon:

In order to draw a box around the lines of interest in the visualization area, you can click on individual lines of interest (hold CTRL to select multiple lines), or you can click on the word Ungridded in the Source Files are to select all files listed under that node.
-
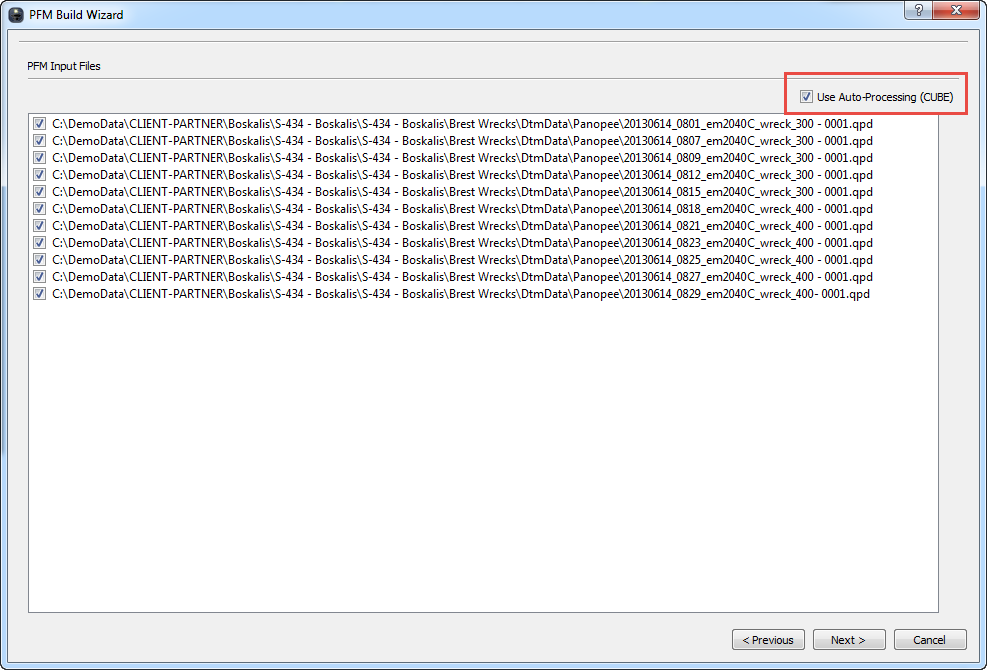
Once the files are selected, right click and choose Build PFM from Selected Data. This opens the PFM Build Wizard.
-
The selected files will be listed. If you would like to build a CUBE surface, check the "Use Auto-Processing CUBE" box. Click Next
-
The next page of the wizard is the Projections Setup. The Input Data Files projection will be automatically set to the projection you set when you loaded your input files.
The Output PFM Geospatial Coordinate System projection will be automatically set to that of your project. No changes should be made here.
No changes should be made to the File Configuration regarding the Mapping of the flagged soundings, the default "Data rejected in validation => Filter invalidated" means the rejected flags are being applied to the PFM.
In case you want to apply other mapping, then you would have to change the mapping settings. Please contact Support should you have questions regarding the mapping settings . Click Next. -
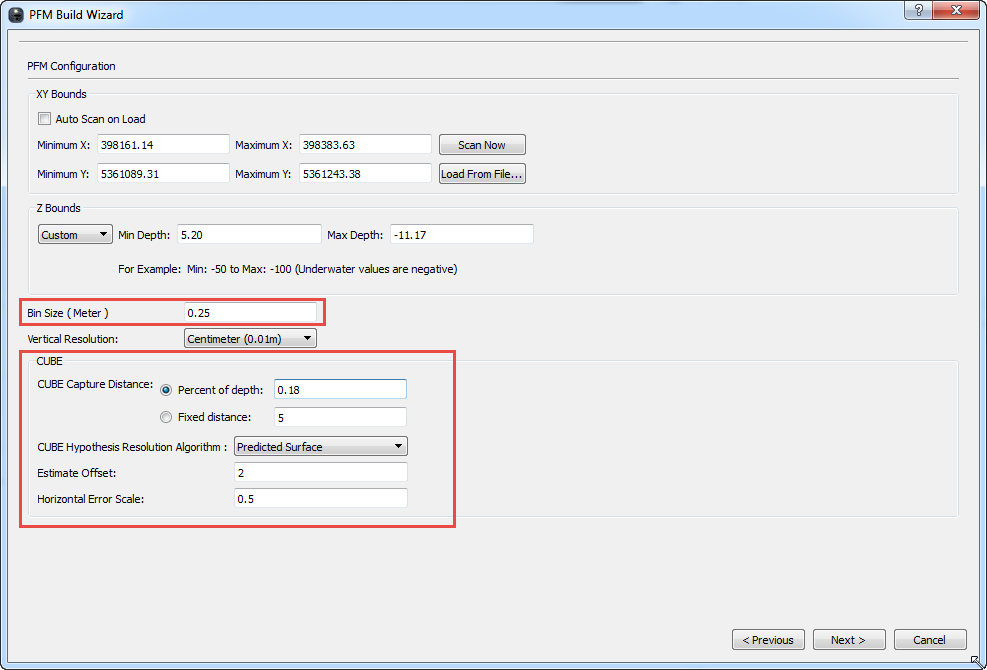
Set the Bin Size for your data. If you chose to use CUBE, you will also set the CUBE Capture Distance, CUBE Hypothesis Resolution Algorithm, Estimate Offset, and Horizontal Error Scale on this page of the wizard (if you did not check on the "Use Auto-Processing CUBE" box, the CUBE options will be greyed out and you will only have to set the Bin Size).
Please note using CUBE and understanding the CUBE options requires user experience.
Please note the CUBE algoritm uses TPU for calculating the CUBE surface, please check How-to Total Propagated Uncertainty - TPU for detailed information on TPU calculations in Qinsy.
-
-
If using CUBE, assign the error source for calculating the TPU values required to generate the CUBE surface.
Vertical Error and Horizontal Error are typically computed online in Qinsy; if this is the case, choose the option to "Use pre-computed errors from the input files".
The error values will be taken from the "Vertical Error" and " Horizontal Error" fields in the QPD (if this needs to be changed for any reason, click Configure to view the available files and choose the error source fields). Note that if you did not choose to "Use Auto-Processing CUBE", you will not see this page of the wizard.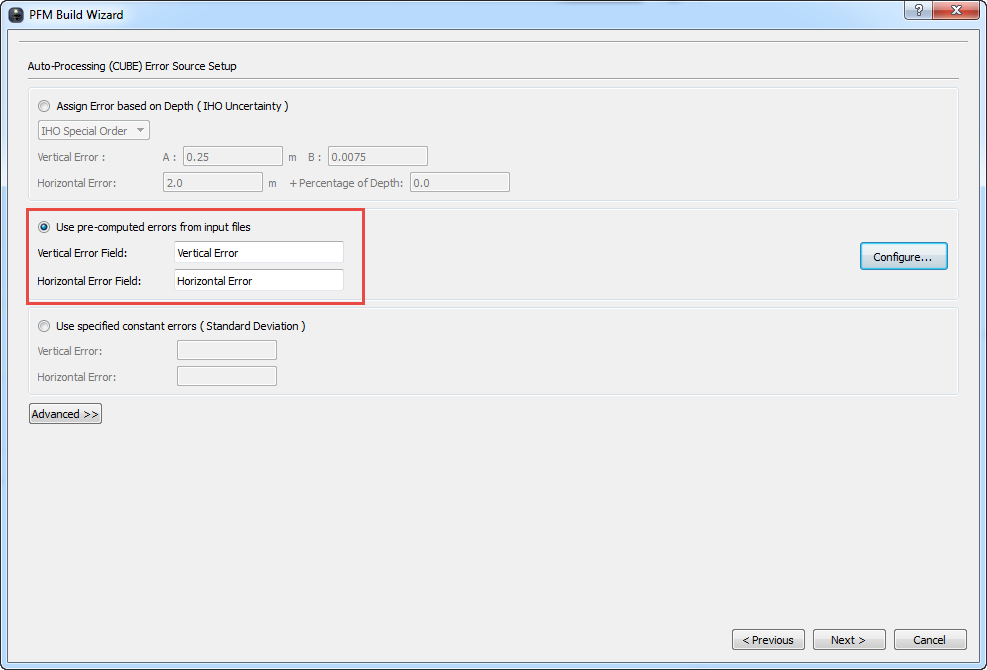
-
Create and apply additional filters if desired. Please note that only the Rejected flag will propagate back to the QPDs when the PFM is unloaded after processing;
Suspect and Feature flags will be visible in Fledermaus, they will be brought into the QPD, but do not have an equivalent in Qinsy to QC the QPD .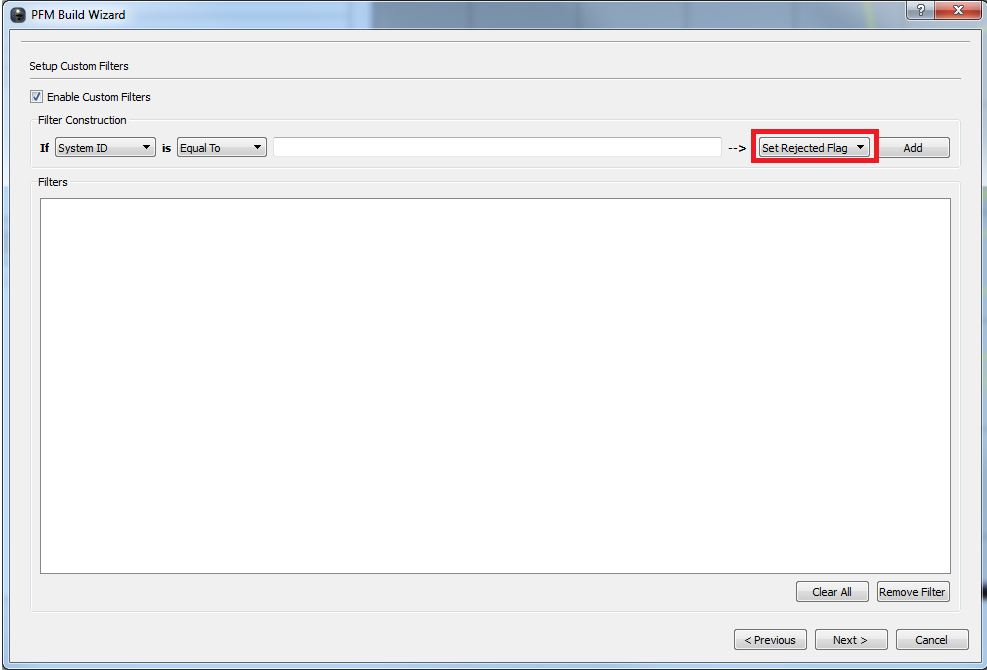
-
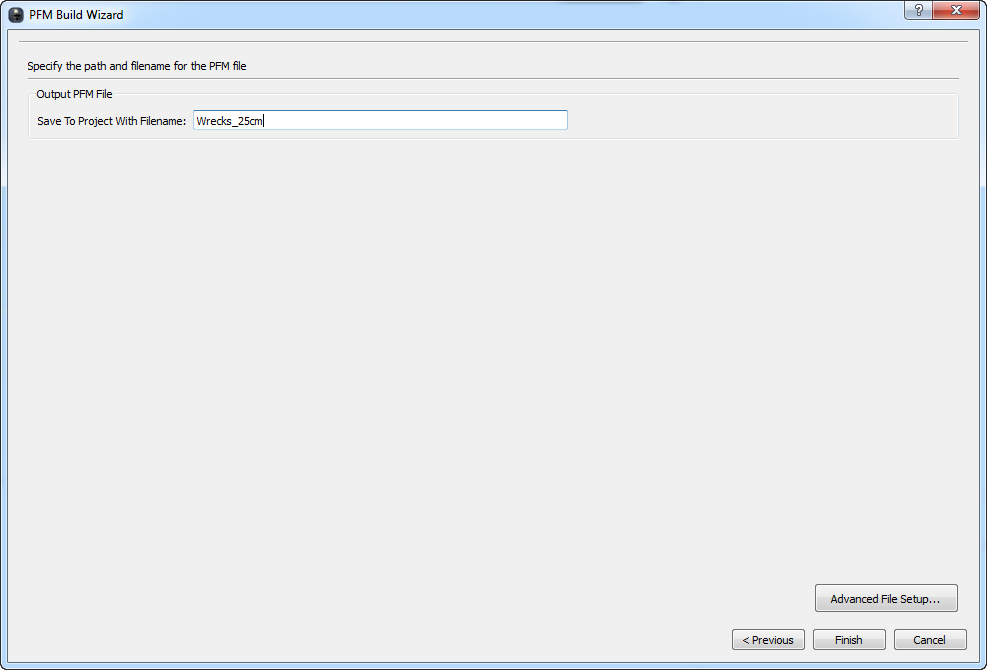
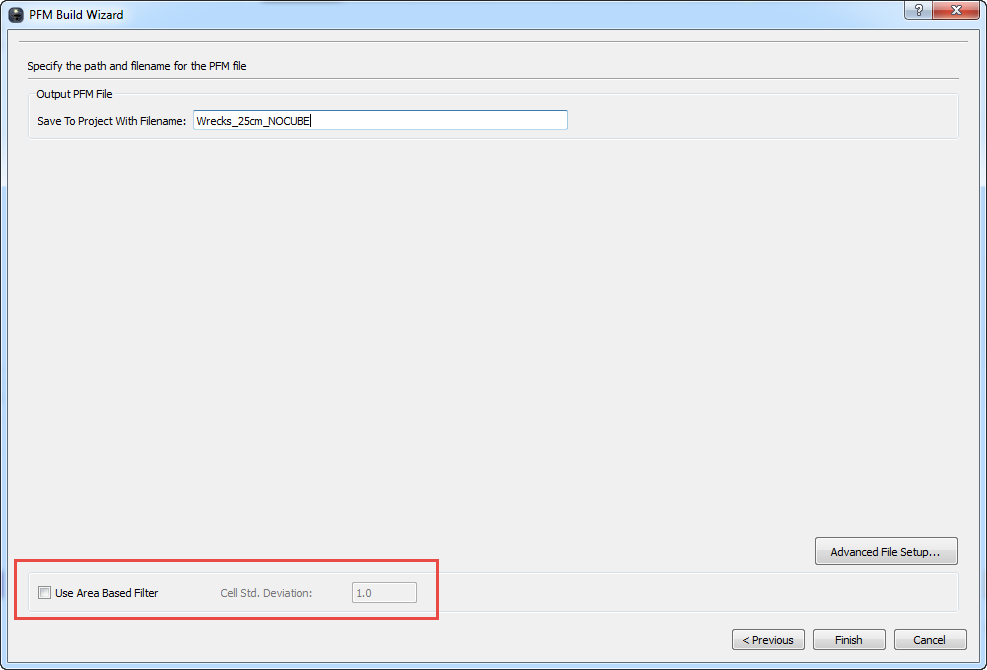
Name your PFM. If you did not use CUBE, you will have the option to check on the Area Based Filter. Click Finish to start the PFM build process
-
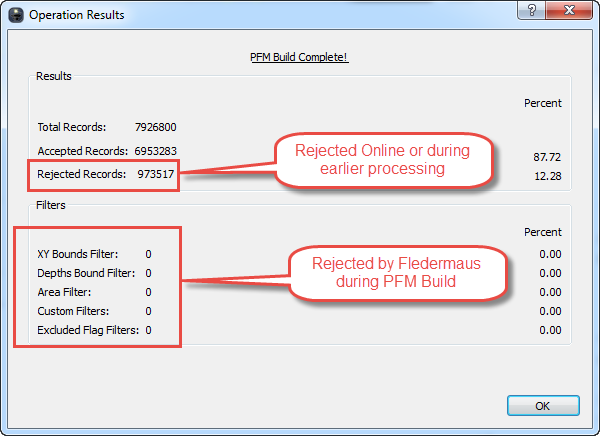
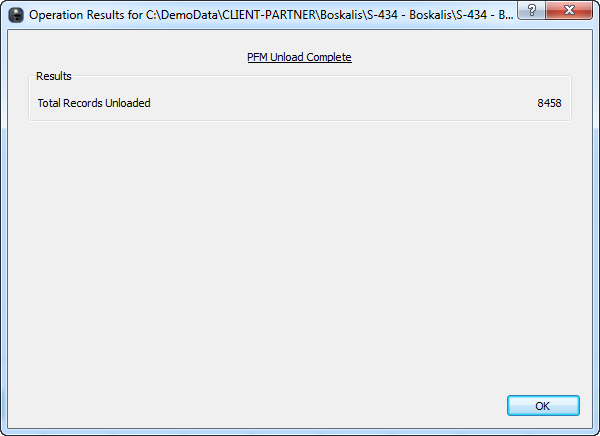
After the PFM Build completes, you will see the Operation Results screen. Note that any Rejected Records are points that were marked as rejected by the online filters. Review, then click OK to clos
-
The PFM will be listed in the SD Files Area under PFM Files. The PFM Coverage map will be visible in the visualization area

-
Double-click on the PFM name to automatically open Fledermaus and load the PFM (or right-click on the PFM name and choose Launch Fledermaus).
Alternatively, Open Fledermaus by clicking on the Fledermaus icon, go to File > Open data Object/Scene, and naviagate to and select your PFM SD. The PFM file will be in your DMagic project folder under Output > PFM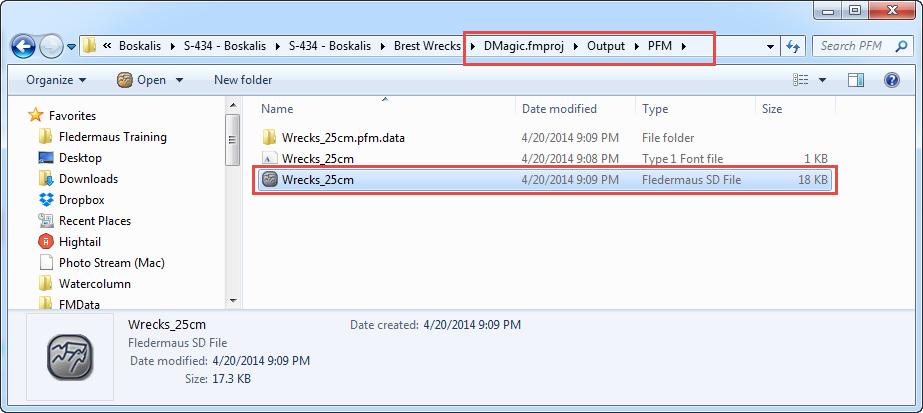
-
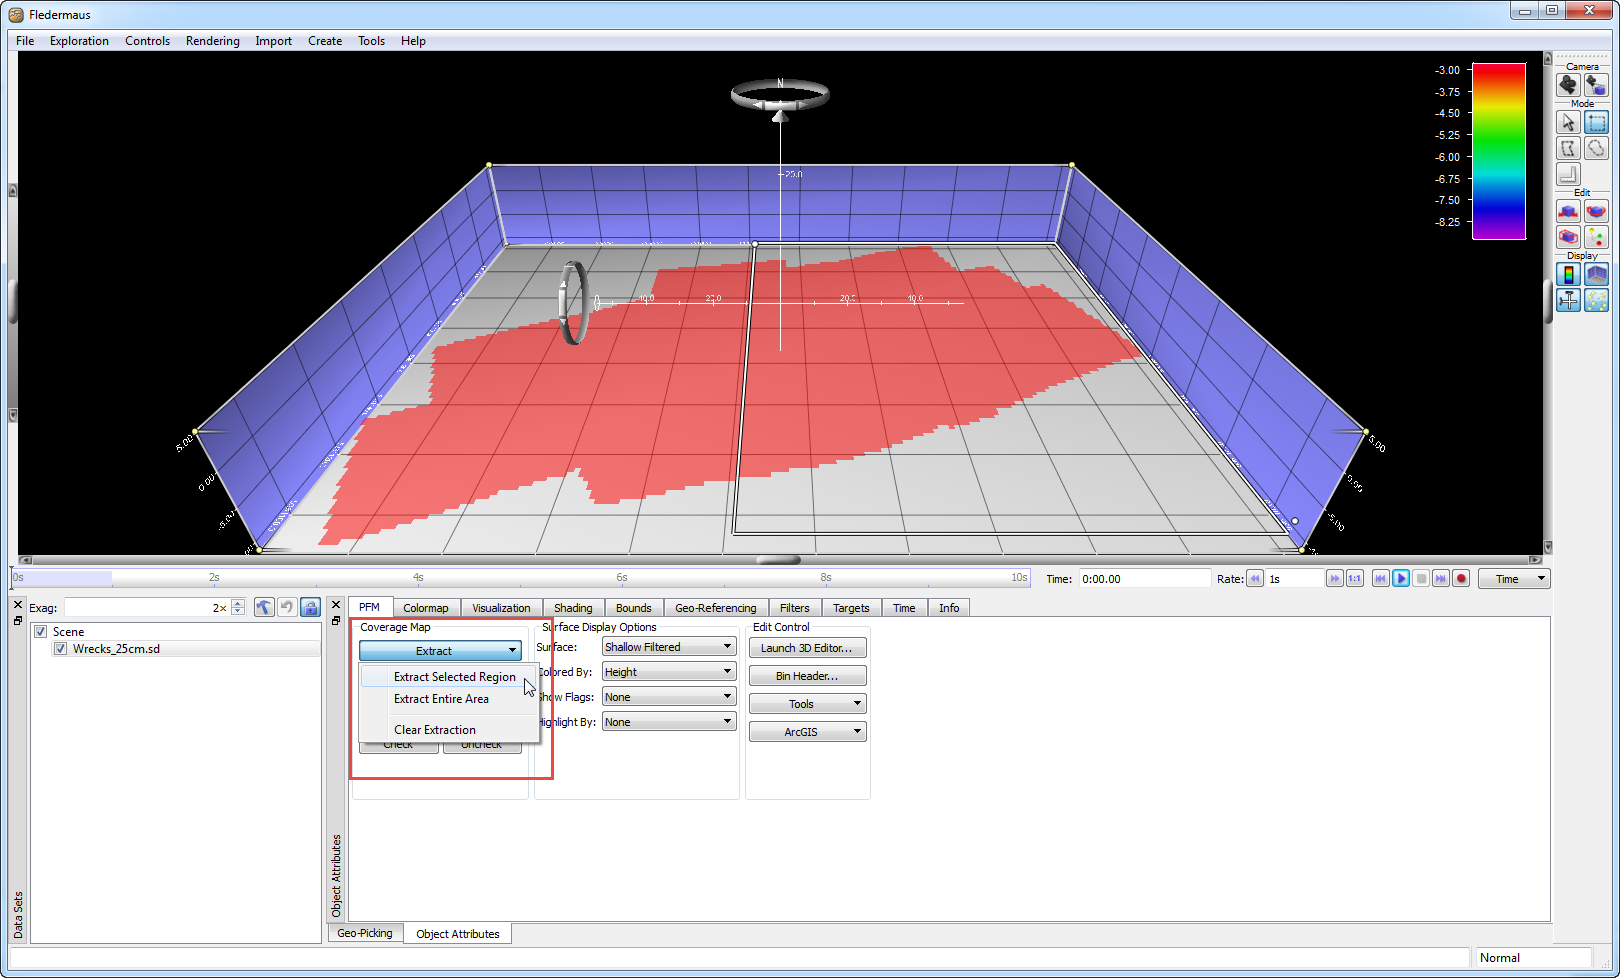
Fledermaus will launch, and the coverage map for your survey will be visible. Use the Select Mode by selecting the following icon:

In order to select a portion of the survey.Go to Extract > Extract Selected Region to load that portion of the surface. If the survey area is not very large, you can skip selecting and just choose Extract > Extract Entire Area.
-
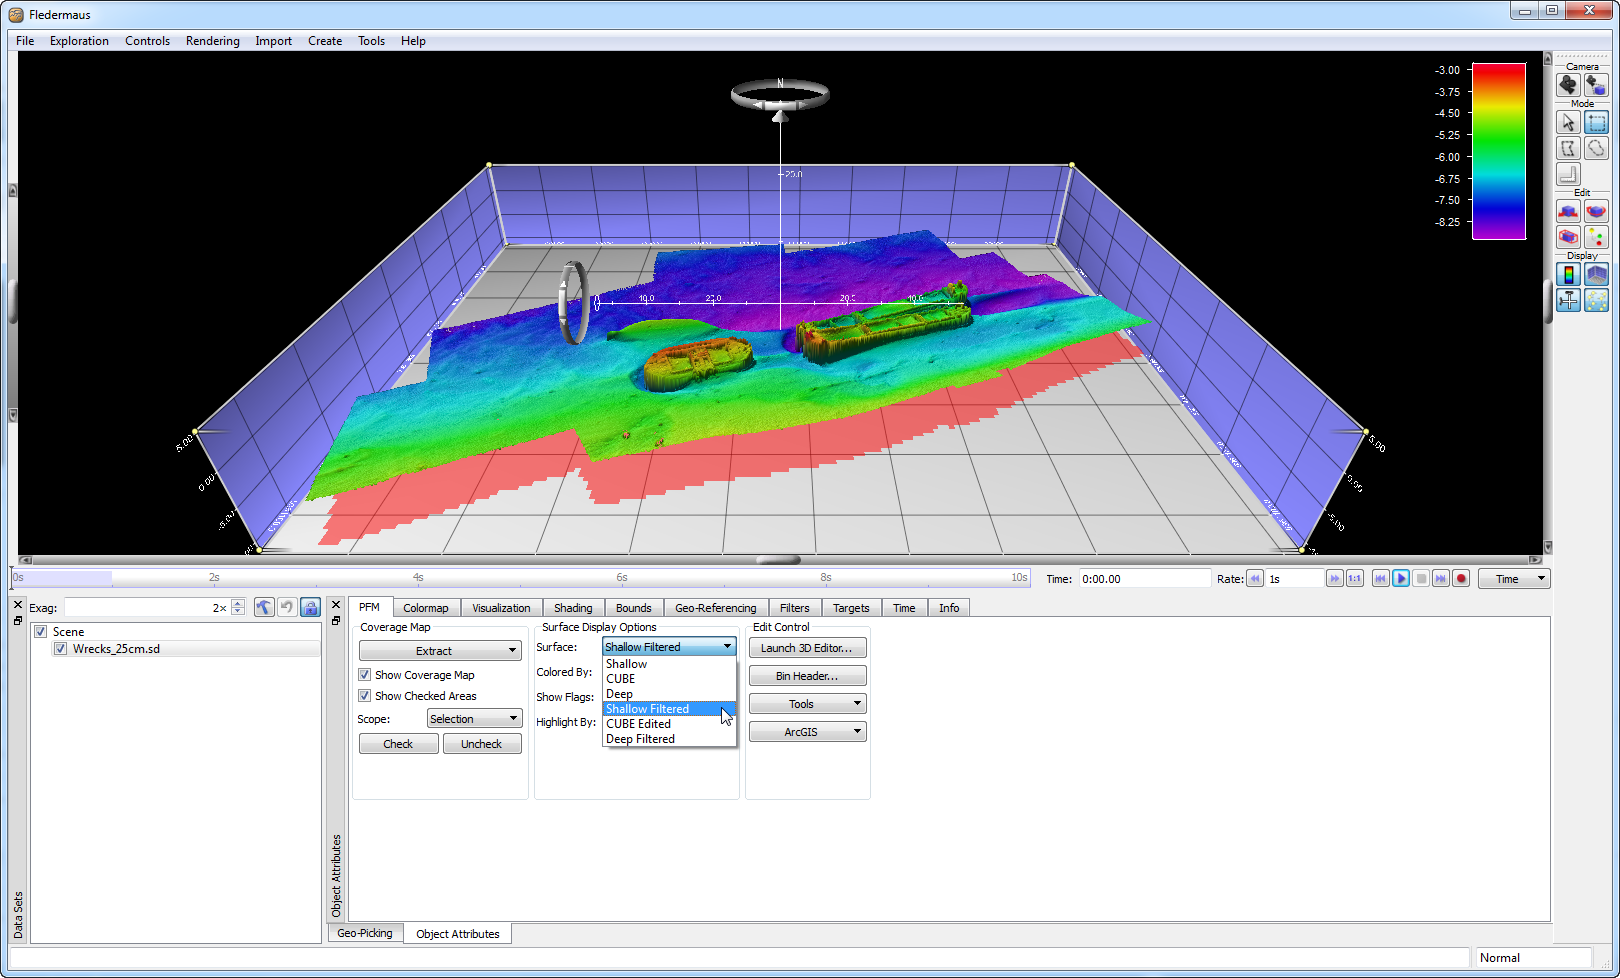
Under Surface Display Options, six surfaces are available to visualize the surface. Shallow Filtered will show a surface generated from the shoalest point per bin with any filtering/edits taken in to account, Deep Filtered will show a surface generated from the deepest point per bin with any filtering/edits taken in to account, and CUBE Edited will show the CUBE surface with any filtering/edits taken in to account. The Shallow, Deep, and CUBE surface with out the "filtered" or "edited" connotation will always show surfaces generated using all of the points, even if they have been rejected – you will not use these during processing as they never update to reflect your changes. The surface you view will depend on the type of processing you want to do
-
Process the data using Manual Processing, CUBE Processing, or a combination of both
Processing Steps
For further information on processing using Manual Editing or CUBE Editing, please see this pageBasic Qinsy-Fledermaus Workflow Bathymetric Data Processing
-
Once you have completed your processing, you will need to "unload" the changes from the PFM back to the original QPD files. Open DMagic and load your project.
-
From the Tools menu option, select Unload PFM.

-
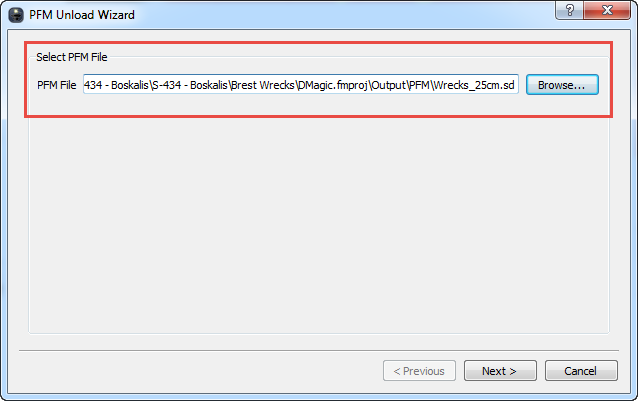
If necessary, Browse to and select the PFM SD file in your project Output > PFM folder. Click Next
-
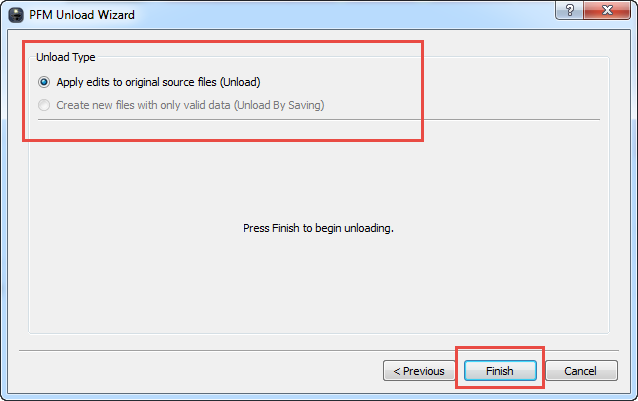
The only option for PFM files generated from QPDs is to Apply Edits to Original Source Files (Unload). Click Finish to start the Unload process.
-
When the Unload completes, you will see the Unload Complete screen with an indication of how many records were changed in the QPD files. Click OK
-
The Source Files in DMagic will rescan and the metadata will be adjusted to reflect the changes to the source QPD files.
The PFM Build Wizard Flags currently being applied when unloading the PFM to QPD are:
-
Manually Invalidated
-
Filter Invalidated
-
Manually Invalidated & Modified
-
Filter Invalidated & Modified
Please note the other Flags (like "Suspect") are not being set when unloading the PFM to QPD.
The rejected flags being set when building the PFM, are the flags as per selected when generating the full QPD (online or in replay).
QC
How can you check if the Fledermaus changes came through to the QPD?
In Fledermaus, select an area that contained many spikes before editing and of which you are confident this area is now clean.
-
When closing Fledermaus, check the DtmData folder of the active Qinsy project in Windows Explorer, to check the update time of the QPD files. Ensure the "date modified" of the QPD files has been updated.
-
Launch Survey Manager and the Dynamic Surface should look clean for this area, when using attribute "Mean" or when looking at the "95% confidence level" in the grid, the cleaned area should display low values for this attribute on flat surfaces.
-
When opening a QPD file in Qloud or in Validator, it's proven that the data has been de-spiked and filtered.
See Fledermaus HELP menu (PDF) for more information on the PFM Build settings and CUBE editing.
Related articles
(Only available when logged in to the QPS website.)