Description
This driver with user-interface can be used to:
-
Control one or more digital single-lens reflex (DSLR) cameras.
-
Capture images automatically.
-
Update on-the-fly the captured images with exact GPS co-ordinates and time.

These captured and geo-tagged images (jpg format) can be viewed using a Navigation Display or inside the Processing Manager.
A digital camera is mounted on a vehicle (e.g. a car) and is interfaced to Qinsy, together with GPS, a heading sensor and perhaps a motion sensor. The Controller may generate e.g. a fix every 100 meters, triggering the camera to capture an image.
All images are automatically stored in a user-defined folder on the Qinsy computer, updated with the exact location at time of capturing. The image filename may also contain user-defined name specifiers, like project name, line-name, position co-ordinates, sequence number, etc., in order to make further processing and archiving easy.
Features
-
Camera type independent (Nikon, Sony, Pentax, etc.)
-
Support for multiple connected digital cameras
-
Each connected camera is controlled individually
-
All images updated with exact GPS co-ordinates and UTC time
-
Automatic creation of Camera Trajectory Log file (qct)
Driver Information
|
Driver |
DSLR Camera - WIA Compatible |
Interface Type |
USB |
Driver class type |
.NET |
|---|---|---|---|---|---|
|
No |
Input / Output |
Input and Output |
Executable |
DrvWIA.exe |
|
|
Related Systems |
|||||
|
Related Pages |
|
||||
Interfacing Notes
This driver controls one or more digital cameras, connected to your computer via USB, using the so-called Windows Image Acquisition interface.
This means that the driver is camera type independent, as long as your camera supports Windows WIA and has capture command capabilities.
In general, if you can see your camera in the Windows Explorer when connected using USB, it almost certainly means that it is WIA compliant. Whether your camera also supports capture commands depends on the camera type. Most (expensive) DSLR cameras will have this capability.
Multiple cameras are supported simultaneously, so you only have to define one driver in your template setup. If you connect two or even three digital cameras to your computer, they all will be recognized automatically, and can be controlled individually.
CANON cameras
We regret to inform you that the CANON SLR cameras are not seen as WIA devices but as PTP (Picture Transfer Protocol) or MTP (Media Transfer Protocol) devices and therefore do not support remote control commands over WIA. We apologize for not supporting CANON cameras.
Supported cameras
A list of tested cameras can be found in our FAQ on the QPS web site.
Database Setup
Add an AIS System and select driver "DSLR Camera - WIA Compatible" from the list. No other interfacing settings are required.
Although this driver is handled internally as an AIS system, no extra data is stored in the database during recording. All on-line acquired images are stored as *.jpg files in a separate folder.
Important
Add only one instance of this driver, even when multiple cameras are connected. All cameras will be controlled by the one driver.
Qinsy Online
The driver has user-interface and therefore will always be present in the Windows task-bar.
When going on-line for the first time, locate the driver, and check that your connected camera is recognized.
|
The driver has an upper, middle and a lower pane. These panes are re-sizable. |
|
The upper pane shows a list with all connected cameras and their status. |
|
The middle pane shows all kinds of Controller information (like recording status, steered node updates, current mainline, etc.) |
|
The bottom pane shows a tab page for each connected camera, and a tab page with possible info, debug and error messages. |
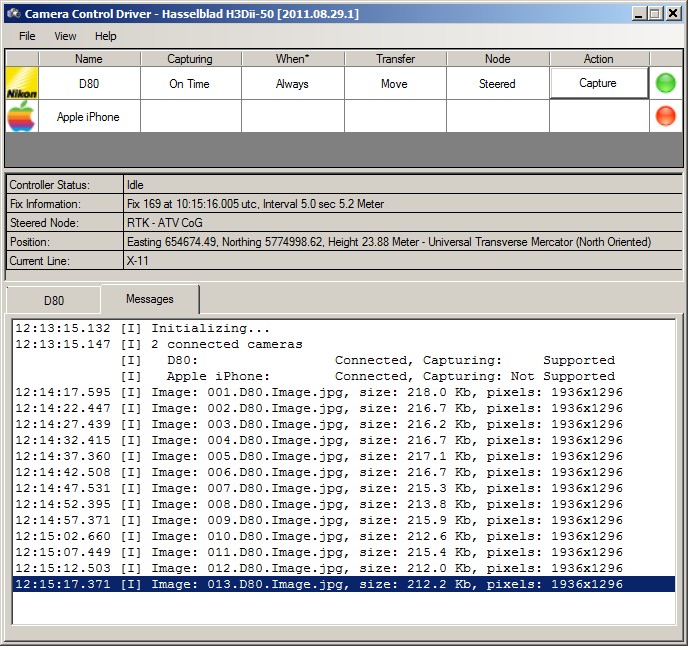
Connect or disconnect your camera anytime to or from the PC, you don't have to be specifically on- or offline. The driver will automatically detect the connection status of the camera. Please monitor the status information in the Message tab page of the bottom pane, while connecting your camera.
Notice that it may take several seconds before the driver detects a newly connected camera.
Especially the very first time it may take longer than normal before the driver reports a connected camera.
As soon as the camera is recognized, it will be displayed in the upper pane. Further, it will also appear in the bottom pane as a tab page when it has capture capabilities.
Upper Pane
The columns in the upper pane show some of the camera control settings, the last column is its status:
The camera is connected, it has capture capabilities and is ready to use

The camera is connected, but no capture capabilities are detected. It is therefore of no use for this driver

The camera has been connected before, but is currently not connected or switched off
Middle Pane
Controller status information. Most information can be used to format the image filename when the correct format specifier is used. See also setting Image Filename under Camera Control Settings below.
Bottom Pane
The Messages tab page is always visible, showing additional information about all the events happening. Notice that this pane will get the focus automatically when an error occurs.
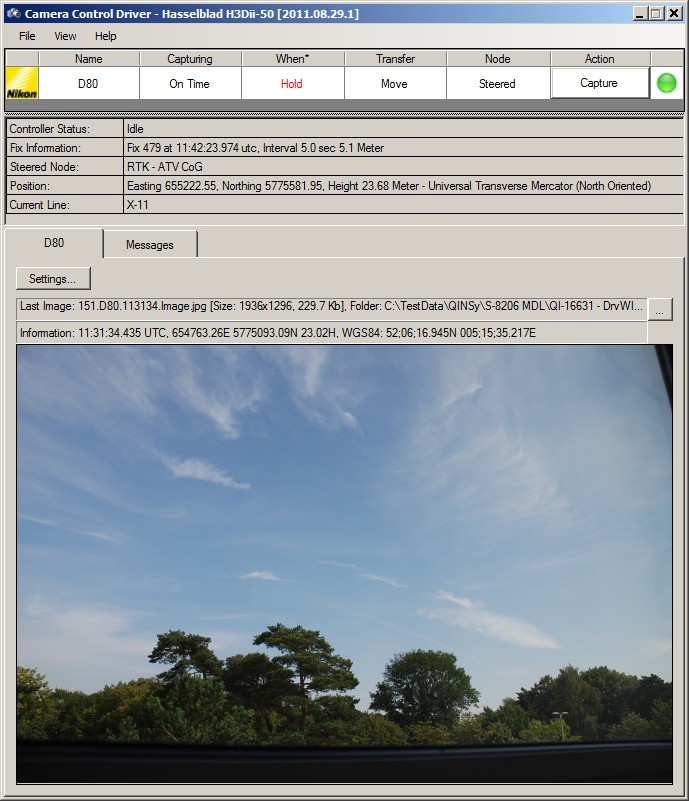
Each camera with capture capabilities has its own tab page. Here you will find information about the last captured image.
You may also use the Settings button to view and modify the Camera Control Settings.
Camera Control Settings
Each camera with capture capabilities can be controlled individually and therefore has its own specific settings.
To access these camera control settings, activate in the bottom pane the camera tab page and select the Settings button.
Alternatively you may also right-mouse-click in the upper pane on the specific camera, and then select Camera Control Setting from the popup menu.
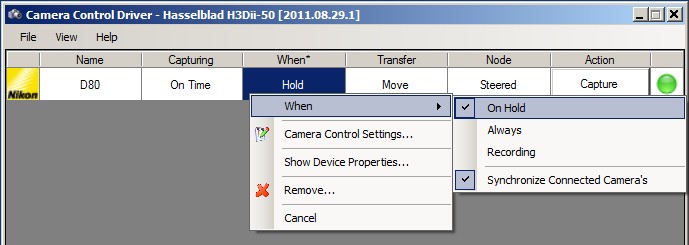
All settings are saved and restored every time you start the Controller, except for one: the When setting. This one will always be set to Hold when you come online.
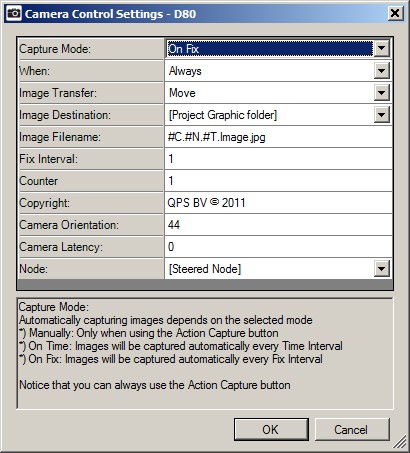
|
Capture Mode: |
Notice that you can always use the Action Capture button, regardless of the current Capture Mode
|
|
When: |
This setting is not restored when you come online. It will always be On Hold, to prevent capturing images immediately
|
|
Image Transfer: |
|
|
Image Destination: |
|
|
Image Folder: |
This setting is only visible when Image Destination is set to [User Defined folder].
|
|
Image Filename: |
Enter your own free text, plus one or more of the following format specifiers:
|
|
Create KML: |
Enable to create a kml file with every captured image, in the same folder, with the same filename.
|
|
Time Interval: |
Enter the time interval in seconds, when Capture Mode is set to On Time.
|
|
Fix Interval: |
Enter the fix interval, when Capture Mode is set to On Fix.
|
|
Counter: |
Only used when format specifier #C is used inside the filename. It is an unique counter and incremented automatically on every capture command.
|
|
Copyright: |
You can enter your own free text.
|
|
Camera Orientation: |
Enter the camera orientation in degrees, relative to the vehicle's heading.
|
|
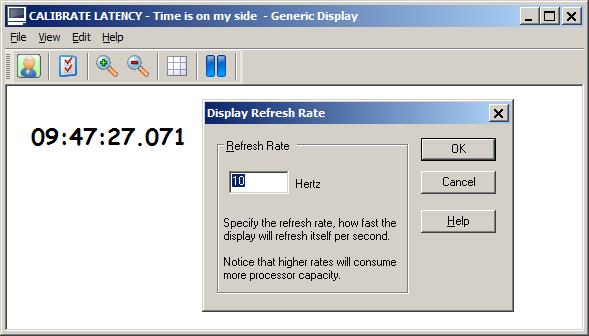
Camera Latency: |
Enter the latency in milliseconds.
|
|
Node: |
Select here the node location of the camera
|
|
Latitude: |
When Node selection is set to [Manual], enter here the latitude in decimal degrees (+/-dd.dddddd) on WGS84
|
|
Longitude: |
When Node selection is set to [Manual], enter here the longitude in decimal degrees (+/-dd.dddddd) on WGS84
|
|
Height: |
When Node selection is set to [Manual], enter here the height above vertical datum
|
Additional Information
|
Error Message |
Description and possible solution |
|---|---|
|
[E] Could not instantiate WIA Manager |
Your Windows operating system does not support Windows Image Acquisition Automation. This will most likely happen when using Windows XP. In that case you should download the necessary library from the Microsoft Download Center:
|
|
[E] Another instance of this driver is already running |
This driver will recognize all cameras connected to your computer. There is no need to start more than one driver. |
|
[E] Camera D90 not ready yet to receive new Capture command |
This may happen when the capture command is send too soon to the camera, while it is still busy processing the previous received command.
|
|
[E] Could not remove image IMG_001.JPG from D90 |
Your camera control setting Image Transfer is set to Move or Copy, but the camera storage card did not allow to remove the image after sending a capture command successfully.
|
|
[E] Could not transfer image from camera to computer |
A successful capture command has been sent, but the image could not be moved or copied from the camera storage card to the computer.
|
|
[E] Could not store image to disk |
The acquired image could not be move or copied to the selected destination folder.
|
|
[E] Could not open QCT Trajectory file |
For each connected camera every day a trajectory file will be created in the project's LogFiles folder.
|
Tips and Tricks
|
Performance |
Connect the camera with Power DC in, instead of running on batteries. This will normally also prevent the camera from going into sleep mode. |
|
Performance |
Use a solid state drive (SSD) as location for the image destination folder. |
|
Performance |
For Image Transfer use Move instead of Copy. |
|
Troubleshooting |
Always check that the camera, when connected via USB to your computer, is recognized by the Windows Operating system.
|
|
Troubleshooting |
When the camera is disconnected or switched off while on-line, you must go off-line and on-line again in order to re-establish a connection. |
|
Troubleshooting / Performance |
Capturing interval is too short in order for Qinsy to store the images to disk and trigger the next photo which results in missing photos.
|
|
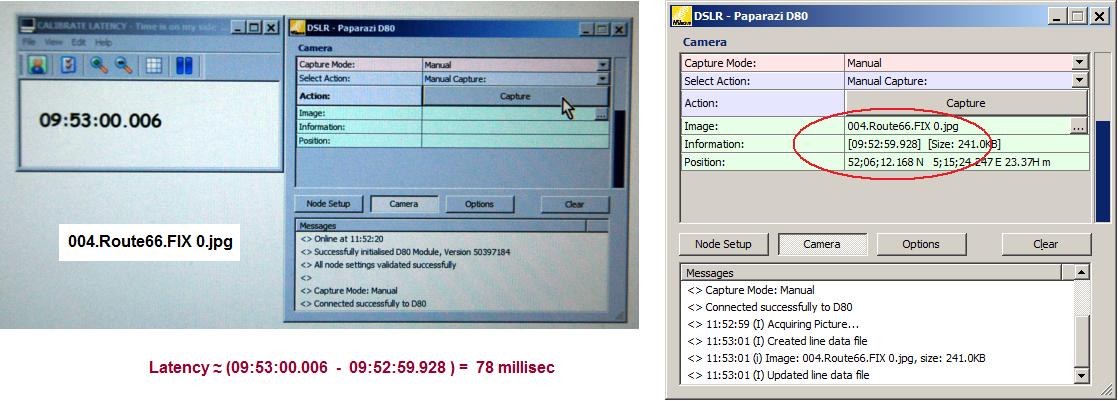
Calibrate Latency |
Notice that, due to the characteristics of digital cameras, there will always be a latency. This is the time difference between the moment of the capture command, and the timestamp of the captured image. The latency is often variable and depends on camera settings. E.g. if the camera is auto focusing, the latency can be up to 800 milliseconds! Under normal conditions the latency is small, around 100ms.
|
|
Camera Settings |
|
|
Shortcuts |
Instead of opening the Camera Control Settings dialog every time, you may use a pop-up menu in order to change the Capturing, When and/or Transfer setting.
|
|
Trajectory |
A daily camera trajectory file (qct) is always created for each connected and active camera.
|