How-to Use the Geoid Model Migration Tool
This page explains how and why to use the Geoid Model Migration Tool.
Questions & Answers
The Geoid Model Migration Tool is used to update user created geoid models so they can be used in Qinsy 9.
Why is this update needed?
In QINSy 8 the models were all listed in the Geoidmodels.xml file. In Qinsy 9 we started working with EPSG and WKT files.
Because of this, the information for the Geoidmodels.xml is now also moved to WKT.
Each geoid model file (this can be *.bin, *.gtx, *.grd, etc.) will have to be accompanied by a WKT file.
Why is this tool needed?
You may ask why we don't do this automatically?
This is because we have seen many customers updating the Geoidmodels.xml manually.
Since there are some differences in how we use the Geoidmodels.xml and WKT, we want to make sure these are created correctly.
When do I need to use this tool?
When you have files listed in the following folder that don't have a WKT yet but are included in the Geoidmodels.xml:
C:\Users\Public\Documents\QPS\Shared\Geo\Geoid
This may look like shown in the picture below:

Do I need to use this tool if I use QGFVOM files?
No, these files do not need to be updated and can be used directly in Qinsy 9 and Qimera 2.
Workflow overview
Below you will find the steps in more detail. This is just to give you a general idea of the workflow.
Open any Qinsy project;
Open the Geoid Model Migration Tool;
Update the models in order to create WKT files;
Once all the models are updated, you need to restart Qinsy;
Then open the project dialog to create a new project;
Setup your geodetics and select the user created model.
Open the Test tool to confirm a test coordinate.
How do I use this tool?
In this part you can find the following items.
General
Finding the tool in Qinsy
The tool can be opened in the Qinsy Console.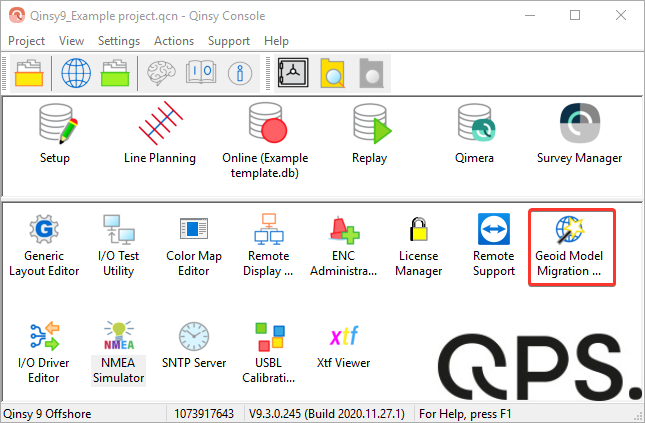
If it is not there you can add it like shown below.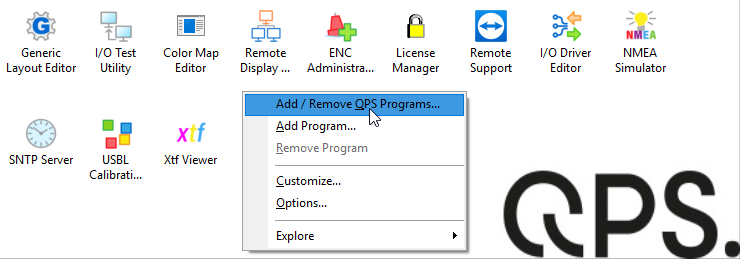
Updating models
The following dialog will appear.
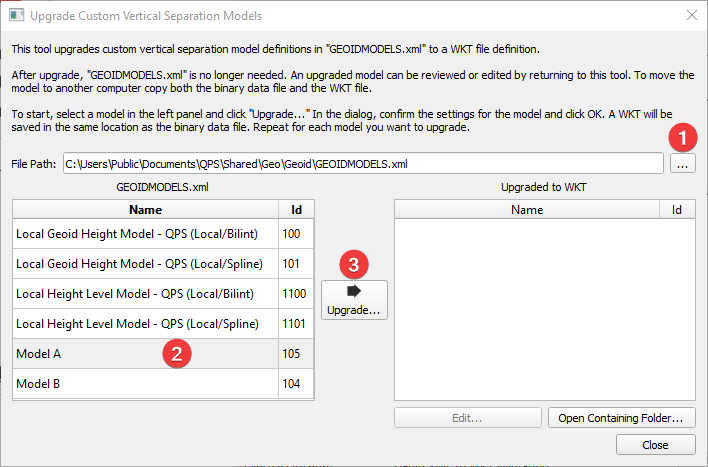
Select the Geoidmodels.xml files from which you would like to update the models.
By default this will be the location of the user created models.Select the model for which you would like to create a WKT.
Make sure to check the ID numbers so that they are all unique.Click 'Upgrade'.
Updating geographic models
Some models have Latitude/Longitude coordinates with a separation value.
The dialog will then look like this: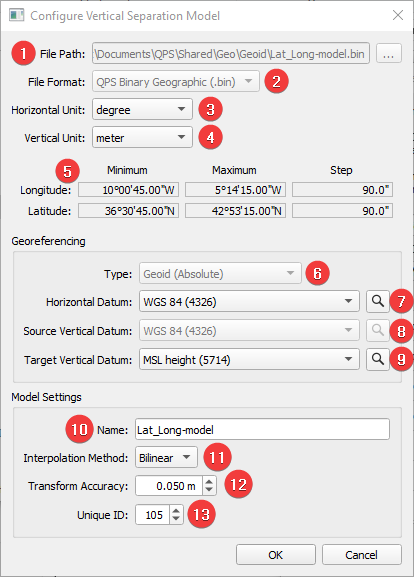
This is the path where the geoid model file is located;
Shows you the file format which in this case is Geographic;
Horizontal unit for the Latitude and Longitude;
Vertical unit for the separation values;
Extents of the area and the step size;
This shows you if a model is Absolute or Relative:
Absolute - separation values are referenced to a Datum (for example ETRS '89 or NAD '83 (2011));
Relative - separation values are referenced to another offset model (which is Absolute).
Select the datum on which the separation model was created.
So in this case the Latitude and Longitude were defined on WGS '84.This is the datum to which the separation value is linked.
So in this case the value will be applied to WGS '84.Here you can select what you target vertical datum can be;
This is more administrative. This can be a model for which an EPSG code is defined.
Or, like in this case, MSL, for example.Here you can edit the name of the model that will be shown in the Geodetic User Interface;
Select you Interpolation method:
Spline - spline interpolation using 16 points (4 by 4 window around the current position);
Bilinear - linear interpolation using 4 points around the current position.
A fixed Transform accuracy can be edited here;
Model ID that is extracted from the Geoidmodels.xml:
Make sure the ID is unique to prevent conflicts;
TIP - If you hover you mouse over it, a range for ID numbers will be shown.
Updating projected models
Some models have Easting/Northing coordinates with a separation value.
QGFVOM
Please be aware that you can also use QGFVOM files for this purpose.
The dialog will then look like this: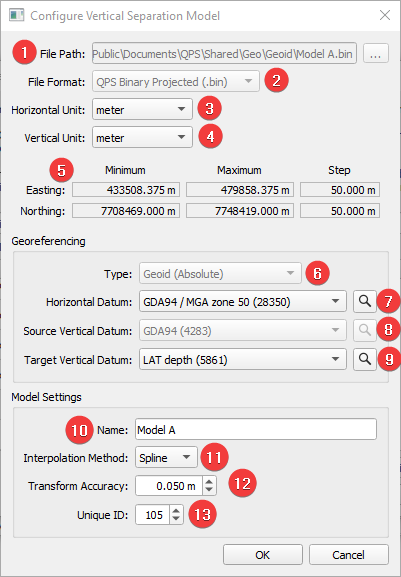
This is the path where the geoid model file is located;
Shows you the file format which in this case is Projected;
Horizontal unit for the Easting and Northing;
Vertical unit for the separation values;
Extents of the area and the step size;
This shows you if a model is Absolute or Relative:
Absolute - separation values are referenced to a Datum (for example ETRS '89 or NAD '83 (2011));
Relative - separation values are referenced to another offset model (which is Absolute).
Select which datum and projection on which the separation model was created.
This is the datum to which the separation value is linked.
So in this case the value will be applied to GDA94.Here you can select what you target vertical datum can be;
This is more administrative. This can be a model for which an EPSG code is defined.
Or, like in this case, LAT, for example.Here you can edit the name of the model that is shown in the Geodetic User Interface;
Select you Interpolation method:
Spline - spline interpolation using 16 points (4 by 4 window around the current position);
Bilinear - linear interpolation using 4 points around the current position.
A fixed Transform accuracy can be edited here;
Model ID that is extracted from the Geoidmodels.xml:
Make sure the ID is unique to prevent conflicts;
TIP - If you hover you mouse over it, a range for ID numbers will be shown.
Verification
In the tool
Once it is upgraded you can check the following from the tool:
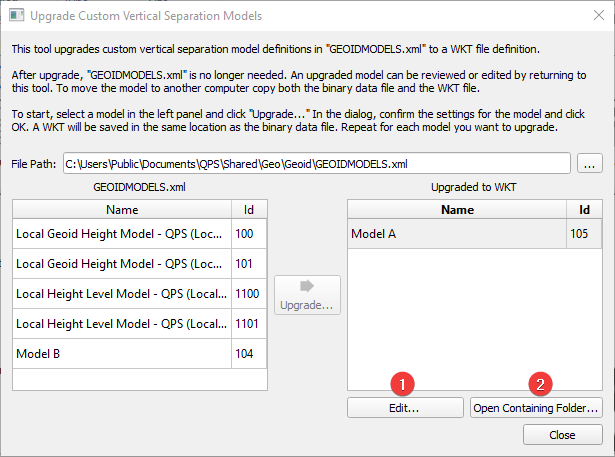
You can select Edit if you want to make any additional changes;
Open the containing folder to check if the WKT was created.
In the Geodetic UI
Close the tool;
Restart Qinsy;
Set up your geodetics. More info on how to set this up can be found here:
Open the geodetic test tool to confirm if the model is working.
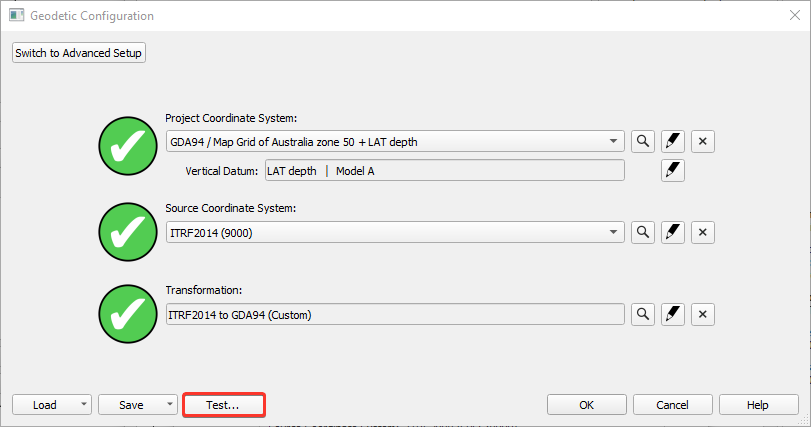
The following example shows what you can expect:
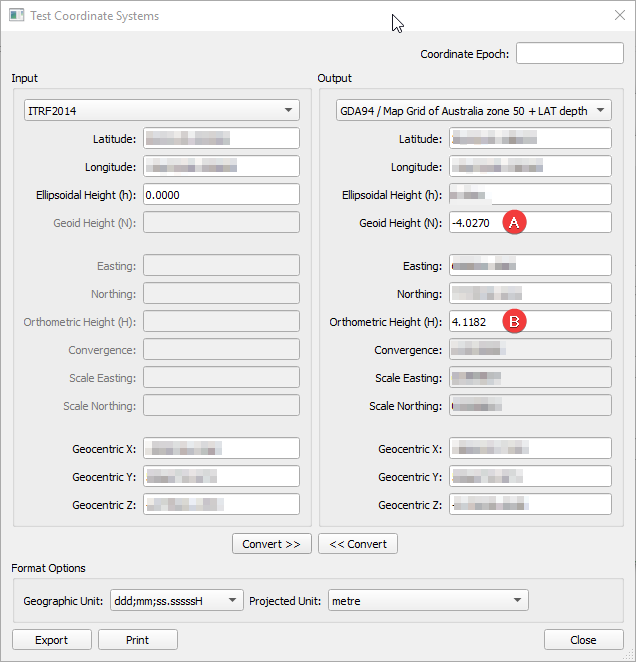
The separation value from the model applied on that location;
The resulting height relative to LAT in this example.
Some people might see this as a chart datum.
If this does not work
It could be that the test coordinate is outside the model;
Maybe the model was not recognized properly by Qinsy.
In that case try the following:Restart Qinsy;
Open the Geodetic UI;
Select another vertical model and then select you user defined model again.
Try the test tool again.
It could be that the model was not updated properly.
In that case:Open the Geoid Model Migration Tool again;
Select you model on the right side;
Click 'Edit' and check the settings.
