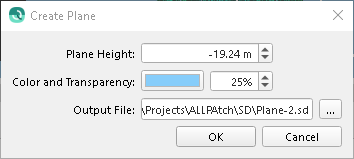
Qimera Create Plane Dialog

How to Start
Create Plane... option of the Layer menu of the Main Menu toolbar.
What it Does
This dialog will allow the user to create a 2D plane encompassing the full area of the current project extents. The created plane will be automatically loaded into your current Qimera project as an SD Object and its setting can be modified using the Qimera Project Layers Dock.
General Description
Plane Height
This is the height where the plane will be created. The default value will be the lowest point in the project dataset.
Color and Transparency
Selecting the 'Color' button will launch a system specific dialog allowing selection of the plane colour.
Adjusting the transparency will adjust the percieved visibility of the plane and therefore any object above and below the plane. 100% transparency will create an invisible plane.
Output File
This is the location where the plane will be saved. The default location will be the current projects SD directory. The folder path and name can be changed by manually editing the path or selecting the '...' button which will launch a system specific file manager dialog.
Return to: Qimera Interface
Return to: Wizards and Dialogs
