How-to Work with Additional Soundings
There are scenarios where multiple returns could conceivably be measured by a particular beam.
On this page:
Introduction
The following documentation will introduce users to additional tips, tricks, and information specific to working with Additional Soundings. Additional Soundings are a relatively new capability offered by some multibeam echosounder hardware manufacturers. Traditional multibeam echosounder systems provided a single bottom return per beam. In many instances, for example over a wreck, there are scenarios where multiple returns could conceivably be measured by a particular beam. This new capability allows for this. Currently, Qimera supports this functionality for Kongsberg and Teledyne-Reson. Kongsberg manuals and marketing material refers to these types of soundings as "Extra Detections" whereas Teledyne-Reson uses the term "Multi-Detect". We use the general term Additional Sounding in Qimera.
How to work with Additional Soundings
Step 1
Load raw sonar files into your project and create a grid. See Getting Started for more information on how to do this.
Step 2
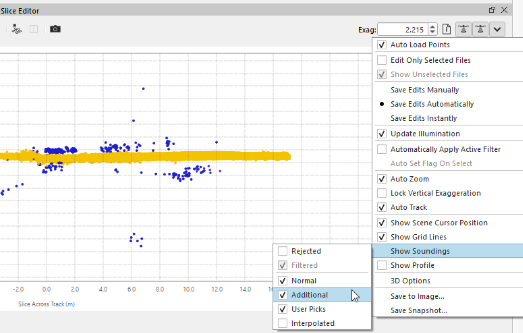
Additional soundings are included automatically. This would mean that when importing the DB file it would automatically be shown. However it could be that sometimes you need to trigger the software to show them by using a specific filter that will accept all the additional sounding. Resulting in the soundings being showed in your slice editor. Also you should then check if the soundings are actually included in the slice editor by going over the shown soundings.


There are differences on how data is flagged during processing. Teledyne-Reson multi-detect data are all flagged as accepted during processing, regardless of the priority. Kongsberg documents specifically indicate that Extra Soundings of Class 8 should only to be used for engineering and troubleshooting as they contain very noisy detections. Qimera flags these particular soundings as rejected during processing. The remaining sounding Classes are flagged as rejected if their visibility status was disabled in Kongsberg SIS during acquisition.
Step 3
Now that all of the Additional Soundings have been enabled, you may wish to globally reject some of the Additional Soundings in particular files that do not provide any benefit. For example, if surveying in the vicinity of a wreck, you may only wish to use the additional soundings for those lines that pass over the wreck. With Additional Soundings, comes additional potentially noisy data that must be cleaned. Rejecting the Additional Soundings for survey lines that do not pass over the target of interest may be desirable. This is quickly done by selecting the files for which you wish to disable the Additional Soundings and then accessing the Disable Additional Soundings under the Simple Filters section of the Tools Menu. Once you trigger this action, the Dynamic Surface will update at the end of the line processing.
The same sub-menu offers the capability to re-enable Additional Soundings. Note that neither of these actions triggers intensive re-processing; the procedure that is triggered simply sets the sounding flags in the line selection to accept or reject in a light-weight and quick pass over the QPD files.
Step 4
You can now focus on the job of verifying that the Additional Soundings gave you the additional mapping detail that you desire. You can also reject any noisy Additional Soundings that are creating artifacts in the Dynamic Surface. There are two workflows supported for this: Swath Editing and 3D Editing. Both are explored below.
Swath Editor, Water column Viewer and 4D Scene
The Swath Editor, water column view and the 4D Scene provide a powerful and intuitive working environment to assess which of the Additional Soundings are necessary to best capture the size and shape of the mapping target of interest. The image below gives an example of the suggested layout and visualization. When examining a particular file using the Swath Editor, you can enable a number of visualization options to help you understand which of your soundings are additional detections and which have been rejected and/or accepted by default. Refer to the Swath Editor documentation for more information on how to control the visibility in the Swath Editor and the 4D Scene. The Water Column documentation also provides information how to control visibility in this particular display. It is recommended that you review both of the reference materials for both of these tools to best decide what visibility options suit your workflow and the task at hand.
The image below shows the Additional Soundings drawn in blue, it is clear from these images that the Additional Soundings are providing extra resolving capability of the deck structure. Note that soundings can only be edited (marked as accepted or rejected) in the Swath Editor window.
3D Editor
Additional Soundings can be viewed in the 3D Editor as well, as shown in the image below where the Additional Soundings are displayed as teal spheres. The area based editing approach has the benefit of being able to visualize soundings from multiple survey line passes at the same time. The documentation for the 3D Editor describes how to adjust the visibility and display options for Additional Soundings. Examples of typical display and selection options that you can use are:
You can change how Additional Soundings are displayed under the Soundings Group at the bottom of the 3D Editor. The default is to display them as teal spheres. Even if the Additional Soundings are rejected, they will be displayed as a teal sphere.
If the Rejected tickbox on Control Bar on the right side of the 3D Editor is ticked, then additional the rejected Additional Soundings will be shown. Otherwise, they are not shown.
You can change your selection mode to only select Additional Soundings via the Select By dropdown menu on the Control Bar on the right side of the 3D Editor.
The Quick Start Guide describes how to use the 3D Editor in a typical area based editing exercise and it should be consulted further for information on how to visualize, select, accept and reject soundings based on a variety of selection criteria.
