The Qastor 3 pilotage software has been developed in cooperation with the Dutch and Belgian Pilot Associations. It contains proven technology from the second generation version and a completely new, touch-based, user interface that has been developed together with Studio Naam.
The software is able to run on Windows, iOS phones, and tablets. The user experience is the same for all operating systems. Simplicity and ease of use are key.
Please allow us to improve by incorporating your comments in case things are still not clear.
First Look
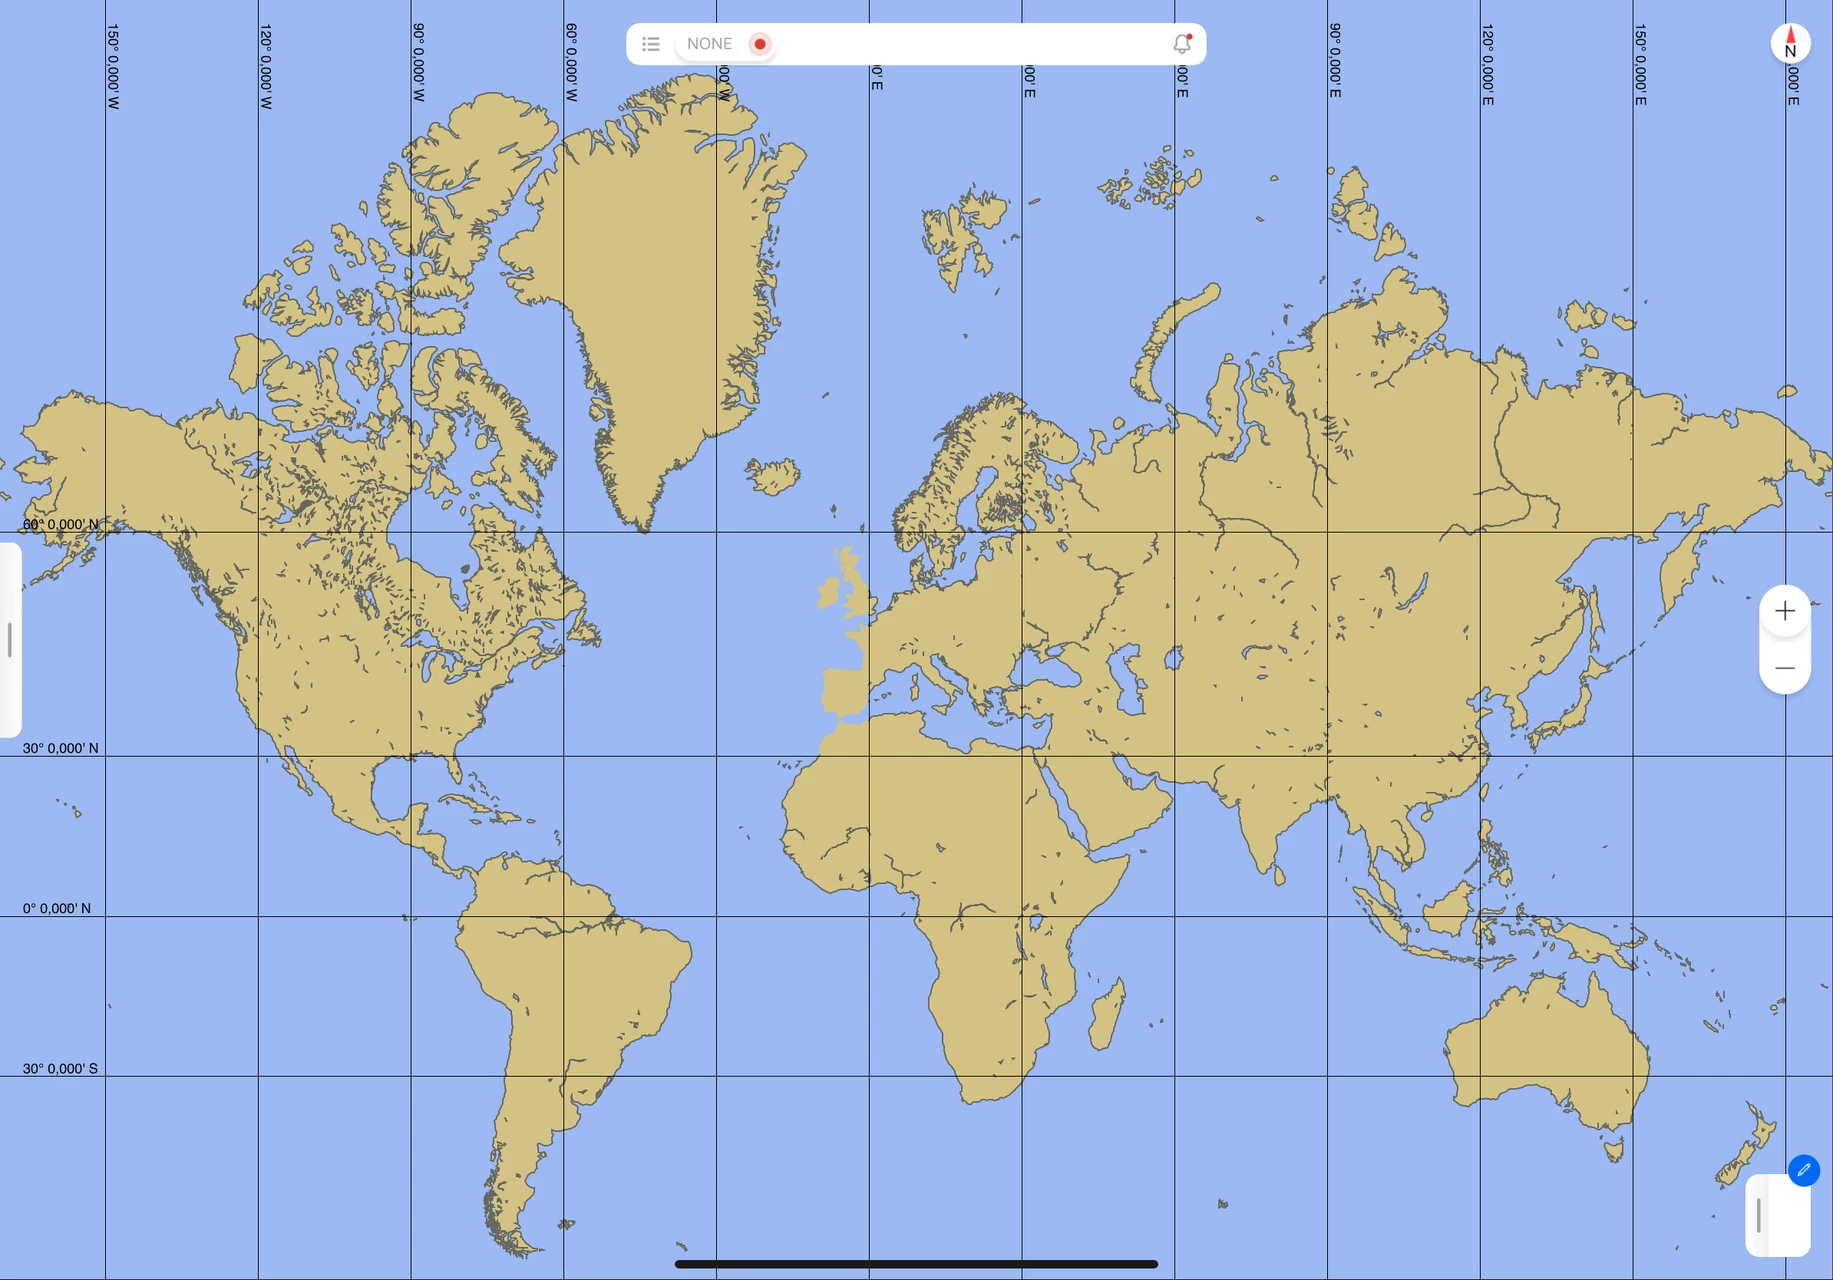
The application will show a map of the world when started for the first time. Use gestures on the touch screen, mouse wheel, and left button to zoom and pan the map.
Pressing the hamburger menu in the Top Bar or the left-hand gripper will open the side panel.
Choose either Settings or Voyage in the bottom section of the side panel, to configure the application.
Favorites can be populated in Settings or Voyage. Settings may also be accessed by means of the Radial Menu.
Context-sensitive radial menu
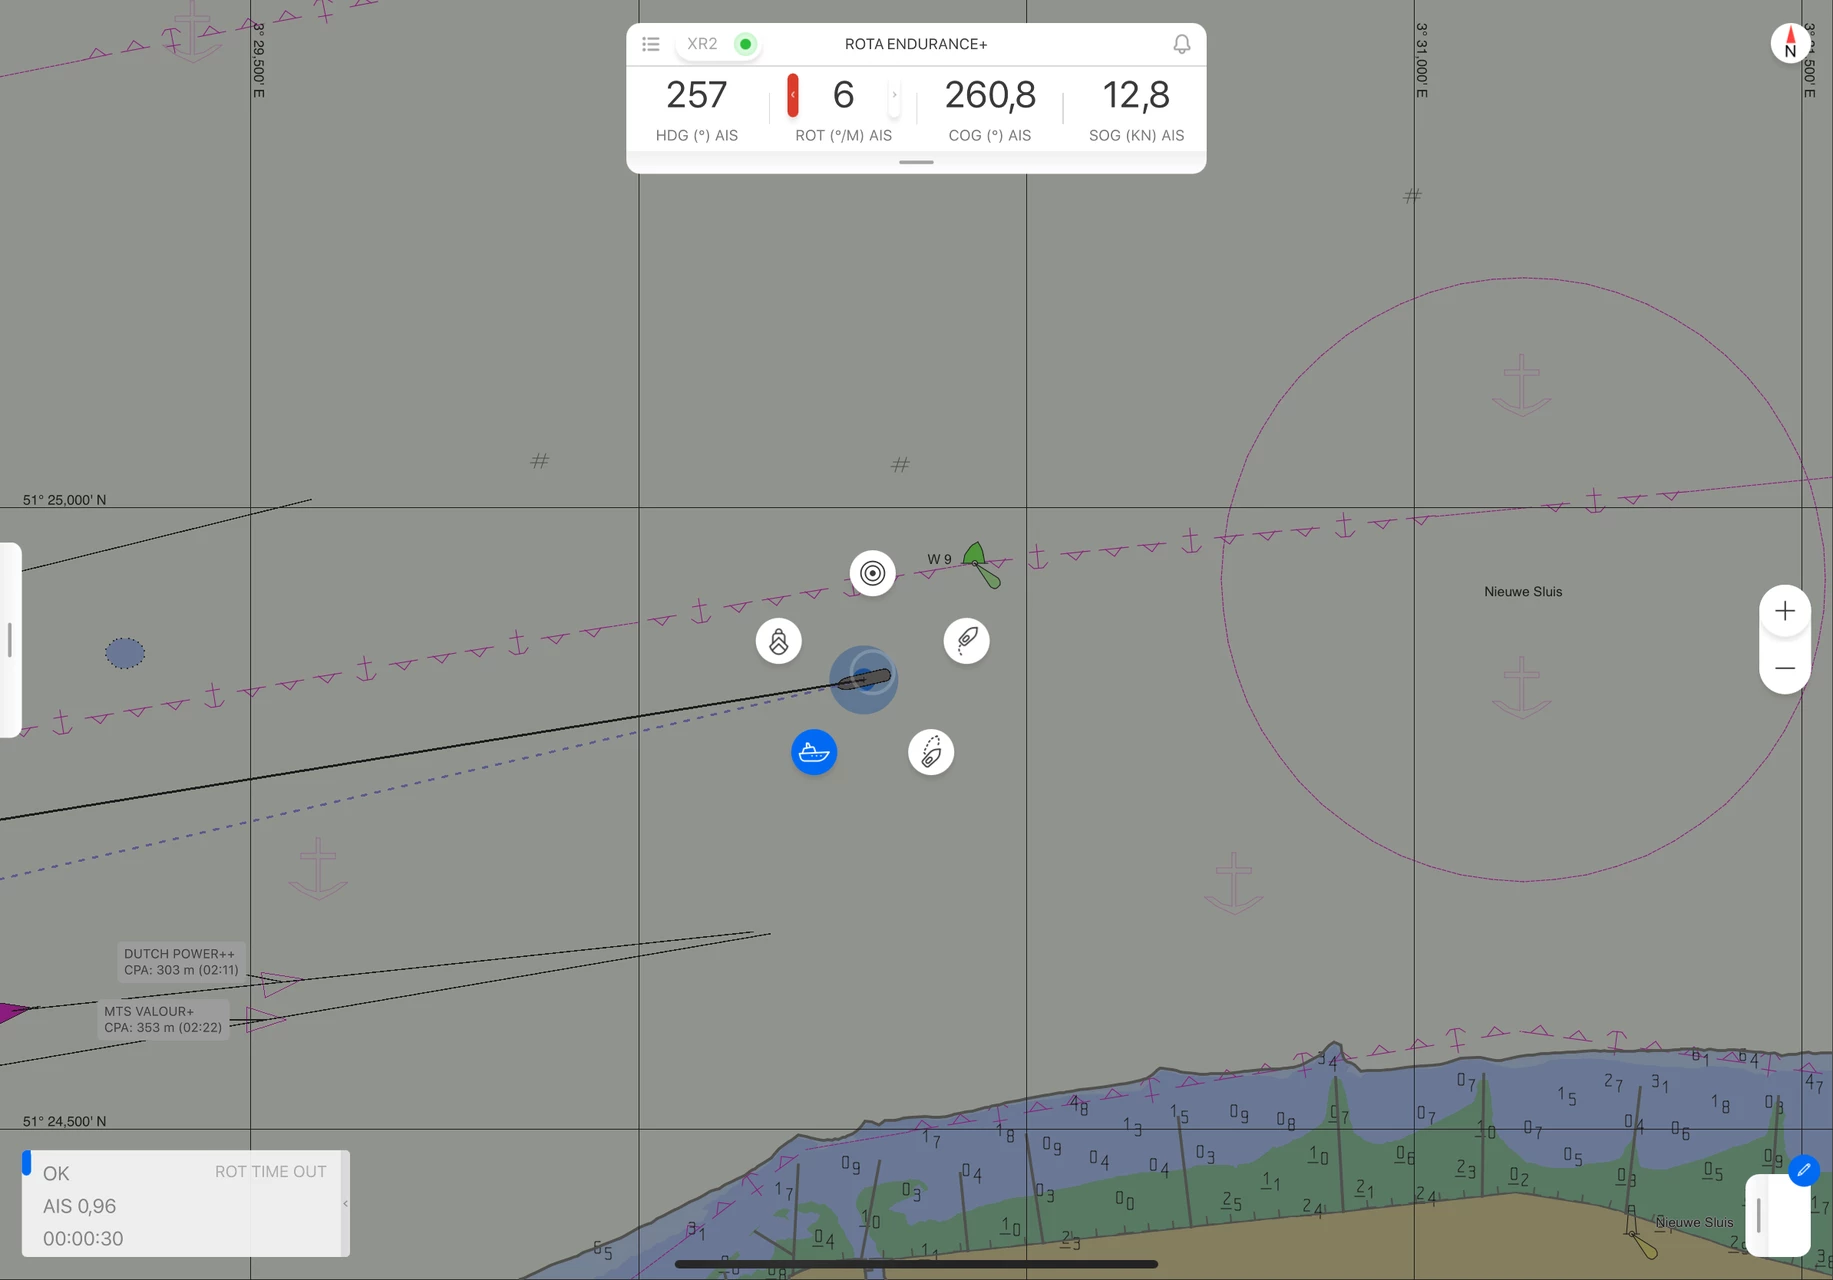
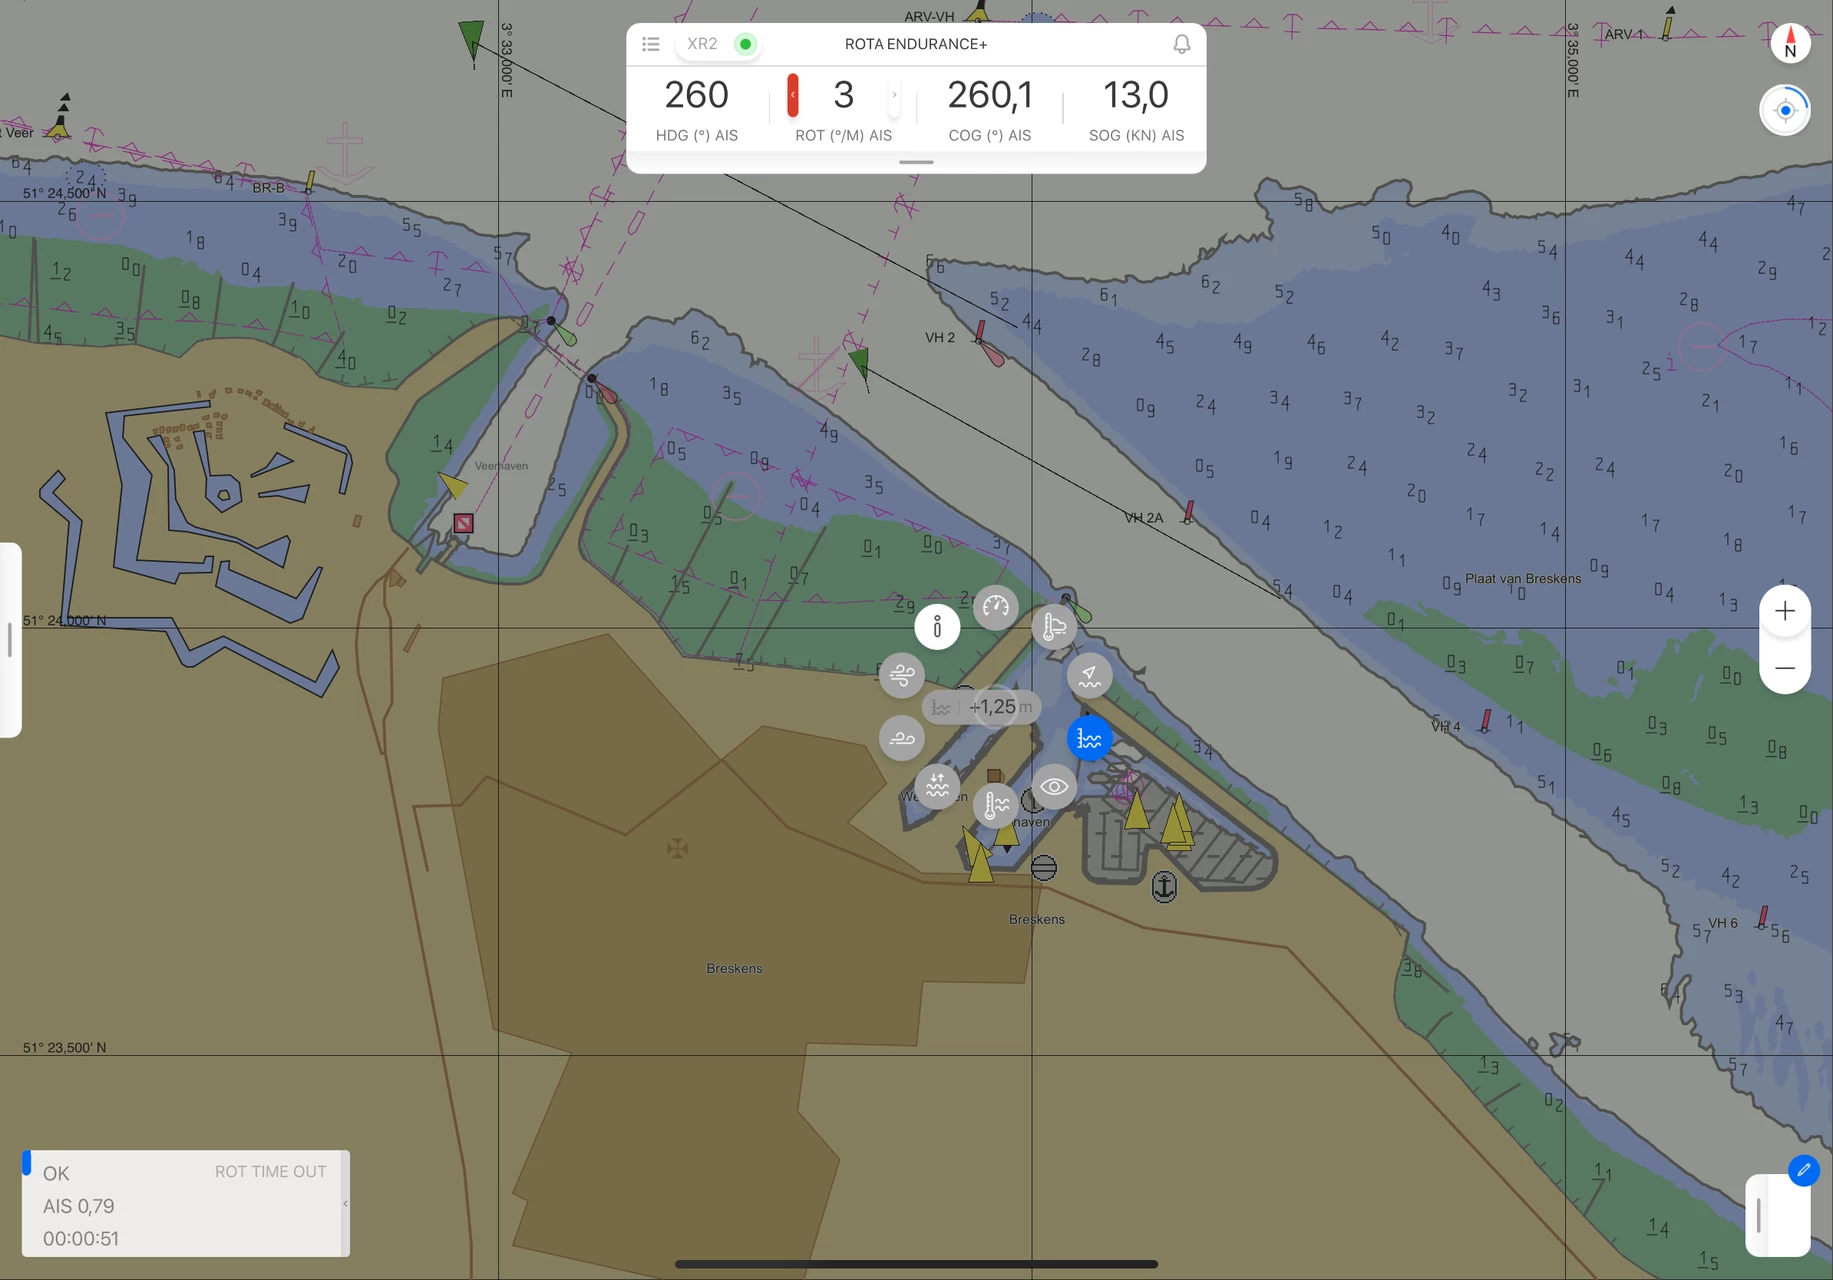
Most settings and actions may be initiated by means of the Radial Menu. The Radial Menu can be activated by a long press or right mouse click in the chart area. The content of the Radial Menu is determined by the item that was clicked.
Examples are Radial Menus related to the own ship, buoys or meteorological stations.
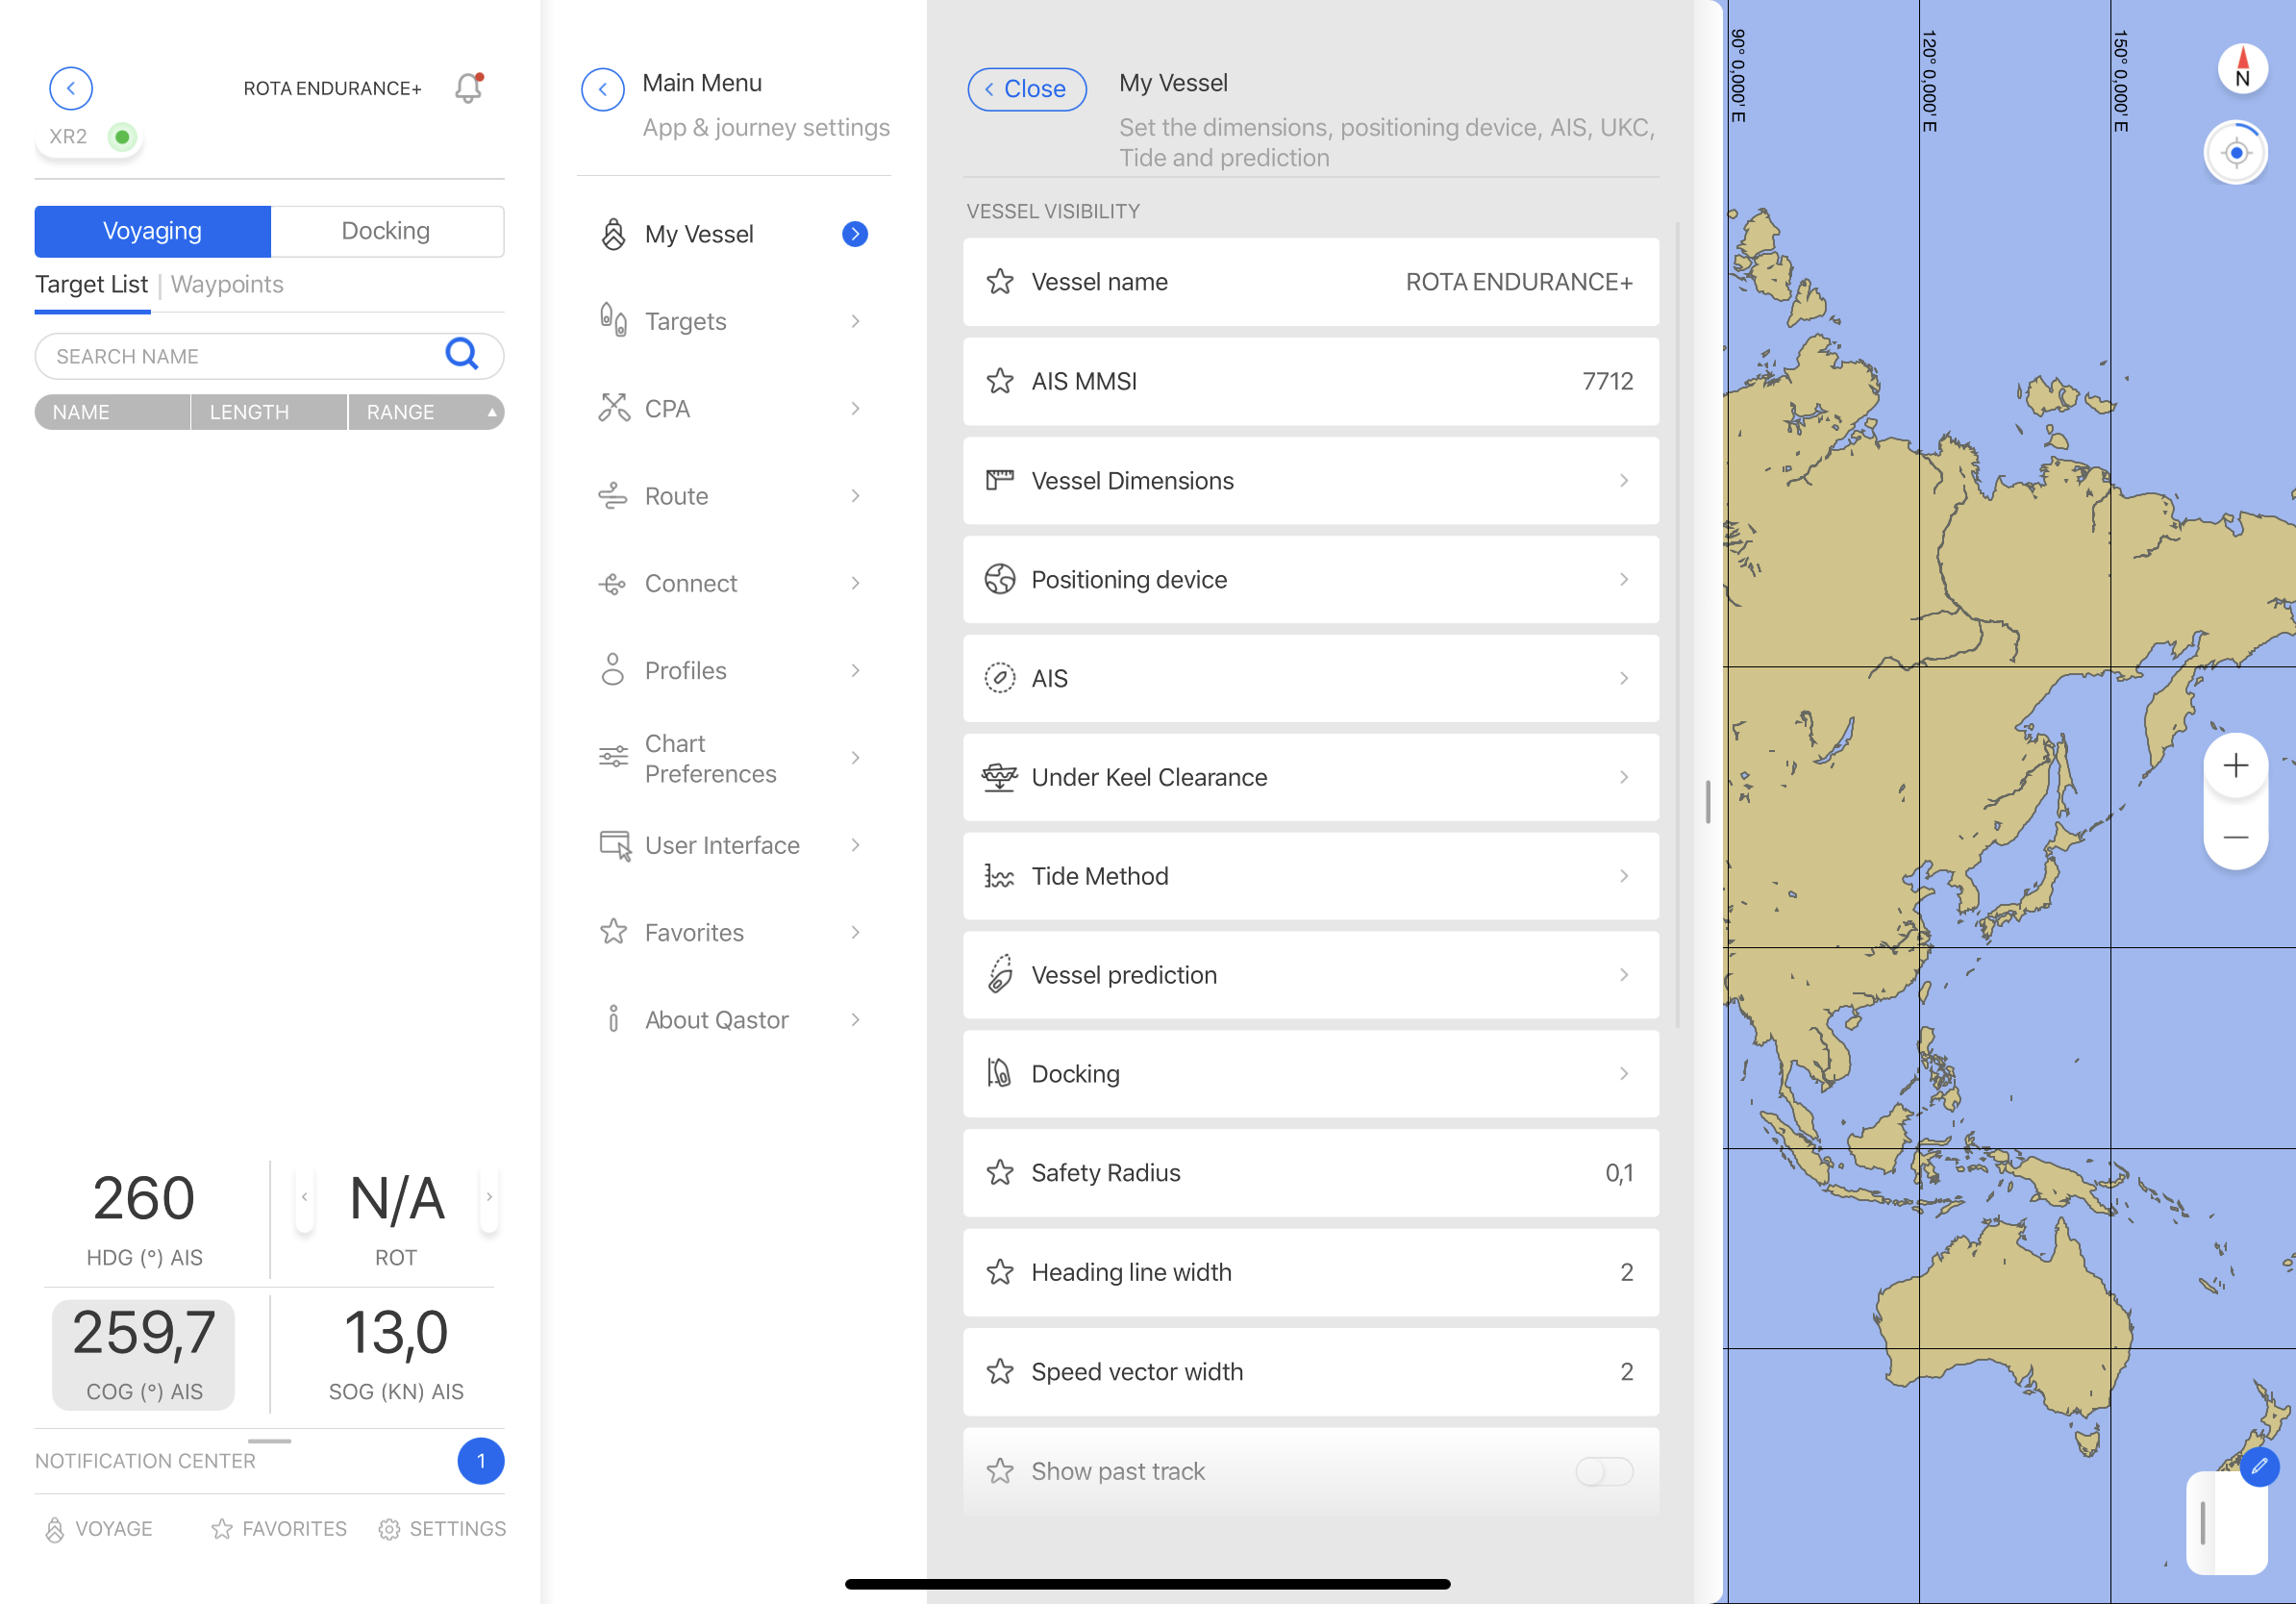
Configure Qastor
Qastor can be configured in a number of ways. The Settings section contains all configurable items. Voyage encapsulates settings that are used when starting a voyage.Frequently used settings may be flagged by the Pilot and will appear in the Favorites section.
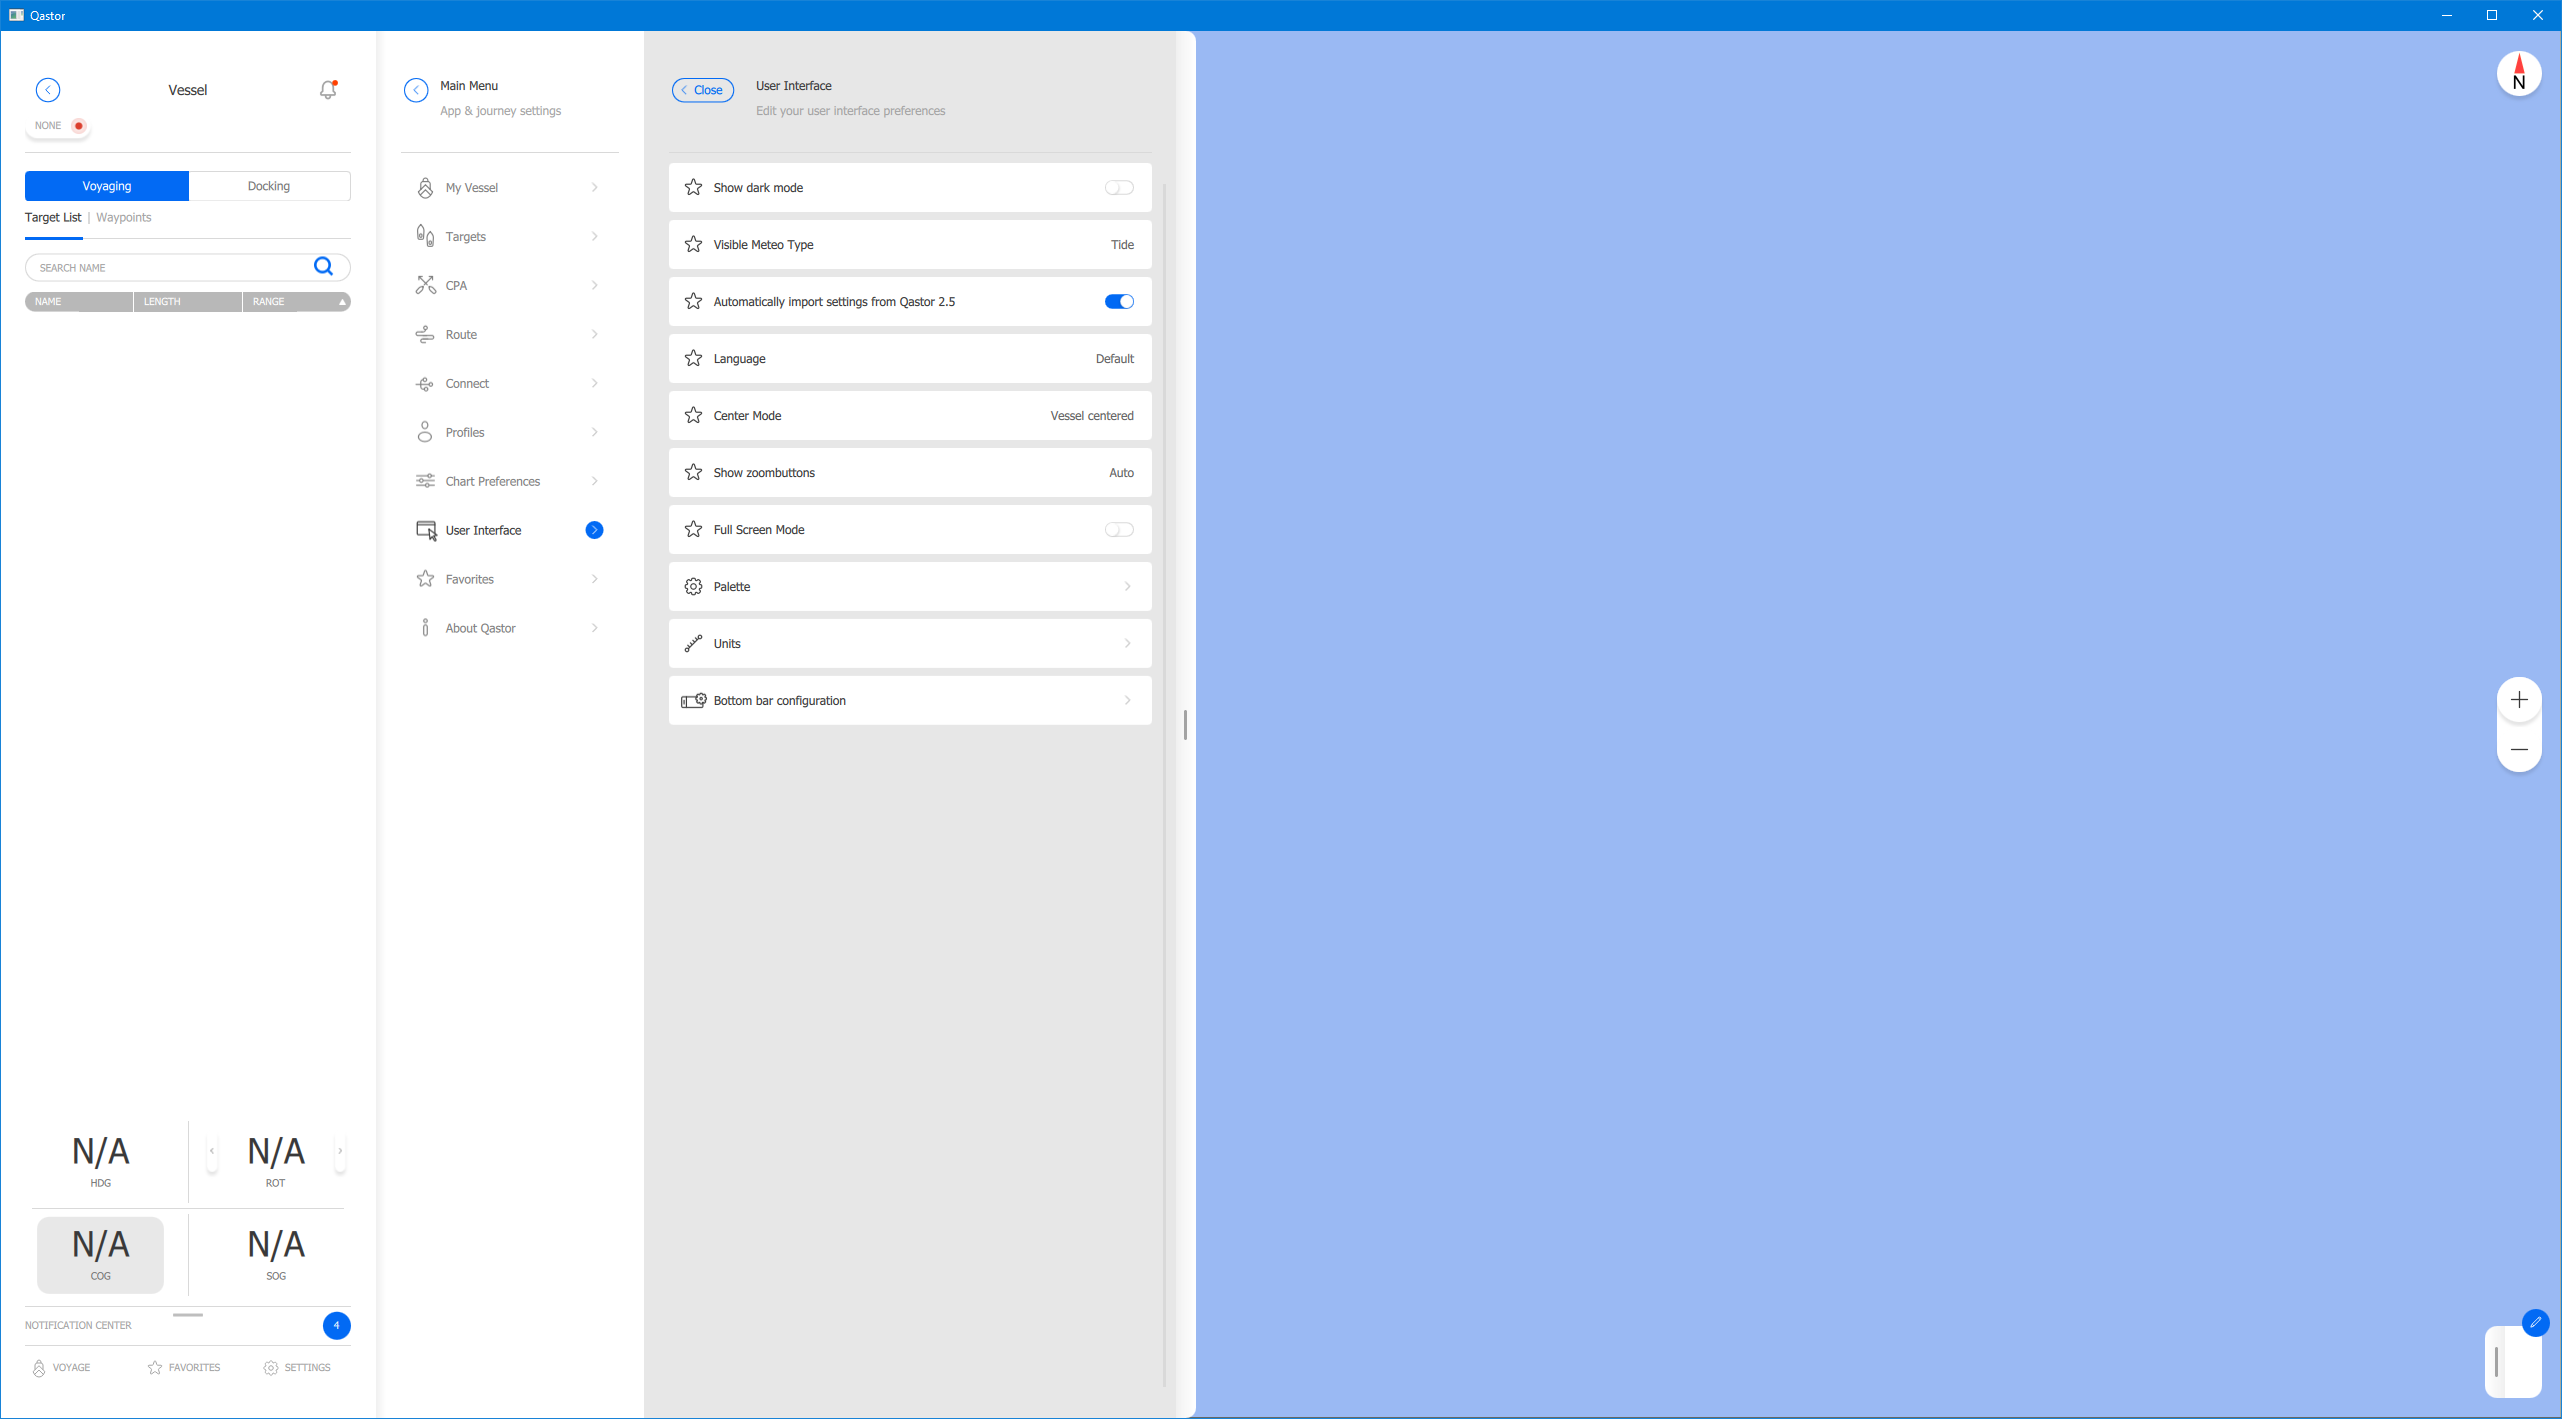
Settings
The settings are ordered by theme. The main themes can be selected in the Main Menu panel.
From a main theme a more detailed content panel will appear. Some settings may appear in multiple places depending on the theme they belong to. An example is the Under Keel Clearance (UKC) section which contains the relevant vessel parameters as well as chart settings dealing with UKC.The chart settings will also appear in the Chart Preferences section.
Setting changes are directly applied and updated in the chart view, when applicable.
Settings pages may contain theme related alarm settings. An example is the Rate Of Turn Timeout alarm, which can be set in the Positioning Device panel. Selected alarms will issue Notifications in the Notification Center.
Navigation panel shortcuts
Toggling between Settings, Favorites and Voyage can be done via the shortcuts in the bottom section of the Navigation panel. The shortcuts will also appear when the Navigation panel is minimized.
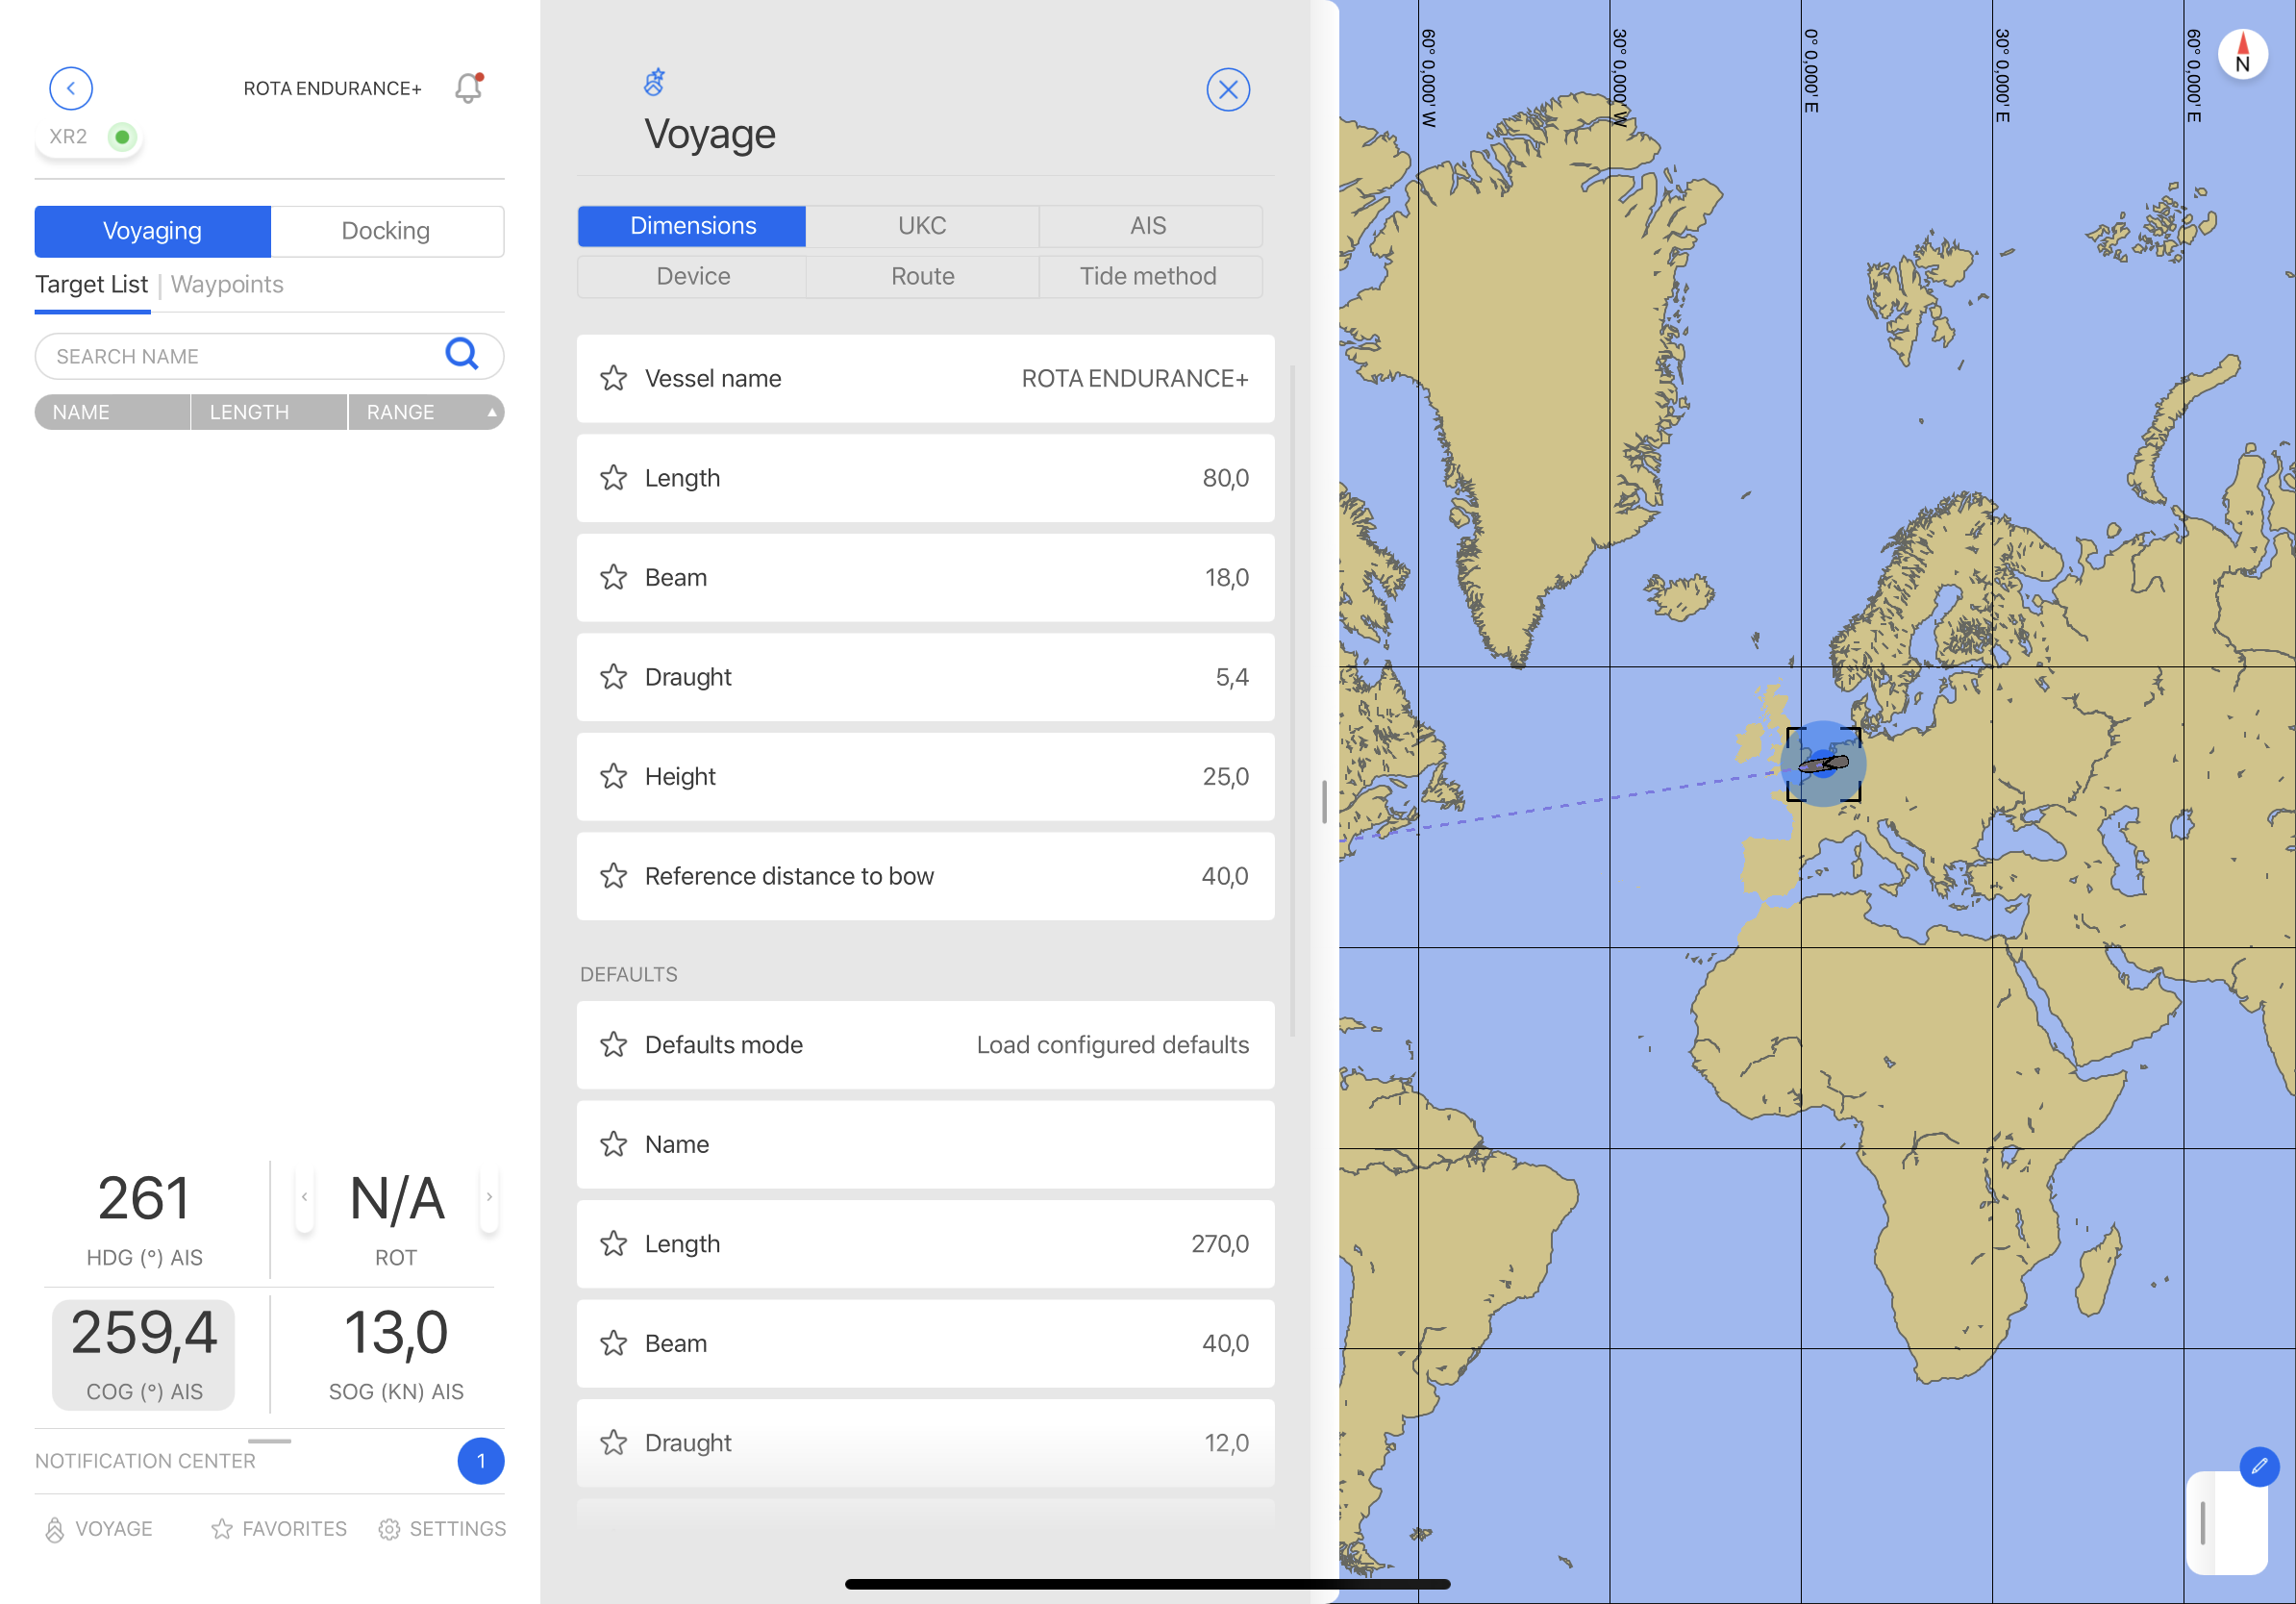
Voyage
Voyage, formerly known as Transit Setup, is used to quickly access the most important settings when starting a voyage. This reduces the need to go into the full settings menu.
Voyage can be activated at the bottom of the navigation side panel. Quick access is also available via the radial menu of the own ship.
Voyage is categorized by the following themes:
-
Dimensions
-
UKC (Under Keel Clearance)
-
AIS (Automatic Identification System)
-
Device
-
Route
-
Tide method
The Voyage themes are available in the top menu of the Voyage panel.
Radial Menu - Voyage
Voyage can be accessed by activating the Radial Menu on the own vessel.
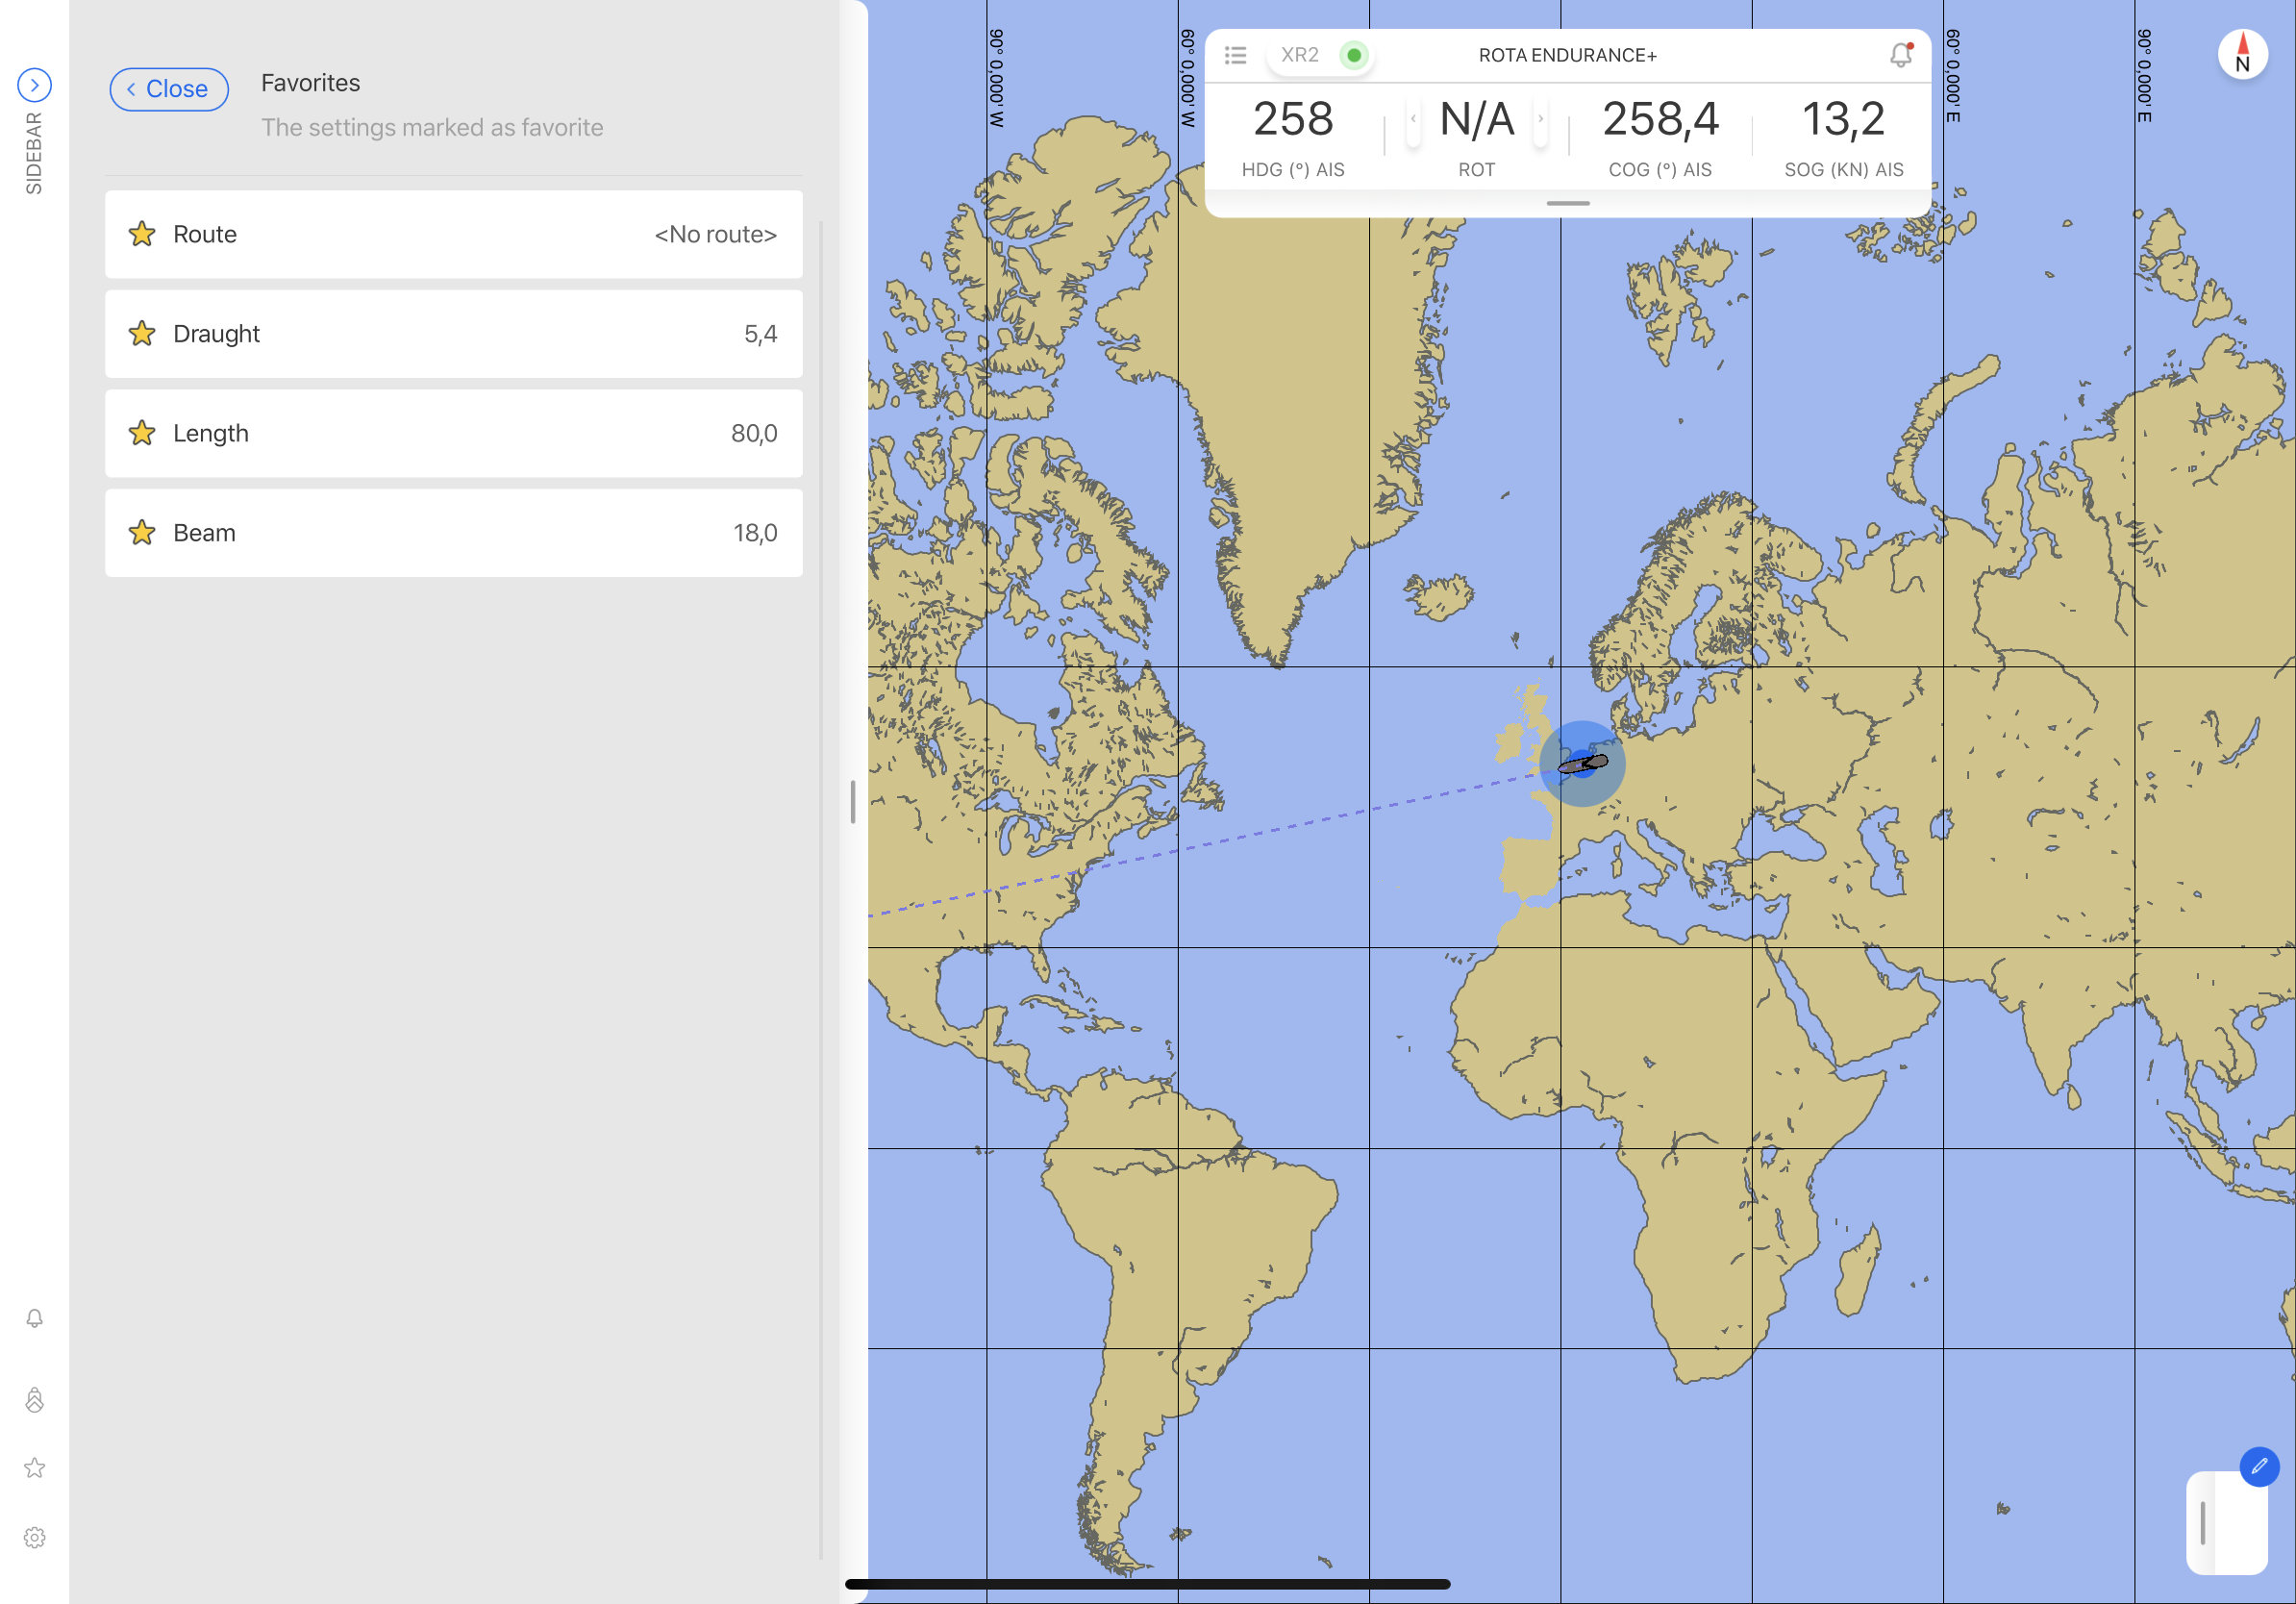
Favorites
Frequently used settings may be flagged as favorite by clicking on the star symbol. The selected setting will then also appear in the Favorites section.
Positioning Systems
To select a Positioning system, go to Settings - My Vessel - Positioning Device or Voyage - Devices.
Some systems have been predefined, to allow for a quick setup.
The software will adapt to the selected system in terms of accuracy, actions and error handling.
Less accurate systems require fewer decimal places. Functionality regarding mooring and docking is only possible with High-End devices.
The list of predefined systems will be further expanded in cooperation with the manufacturers.
Docking / Mooring functionality
Apart from having the correct license, the software will block functionality based on the system integrity.
Exchanging data with Connect Server
Exchange of static and live data can be done through Connect Server. Connect Server gathers data from many sources and provides a single point of access to that data.
Communication with Connect Server is fully integrated into the Qastor 3 application. For Qastor 2.5 a separate Connect Client tool is required. Connect Server login credentials can be entered in the Settings - Connect section.
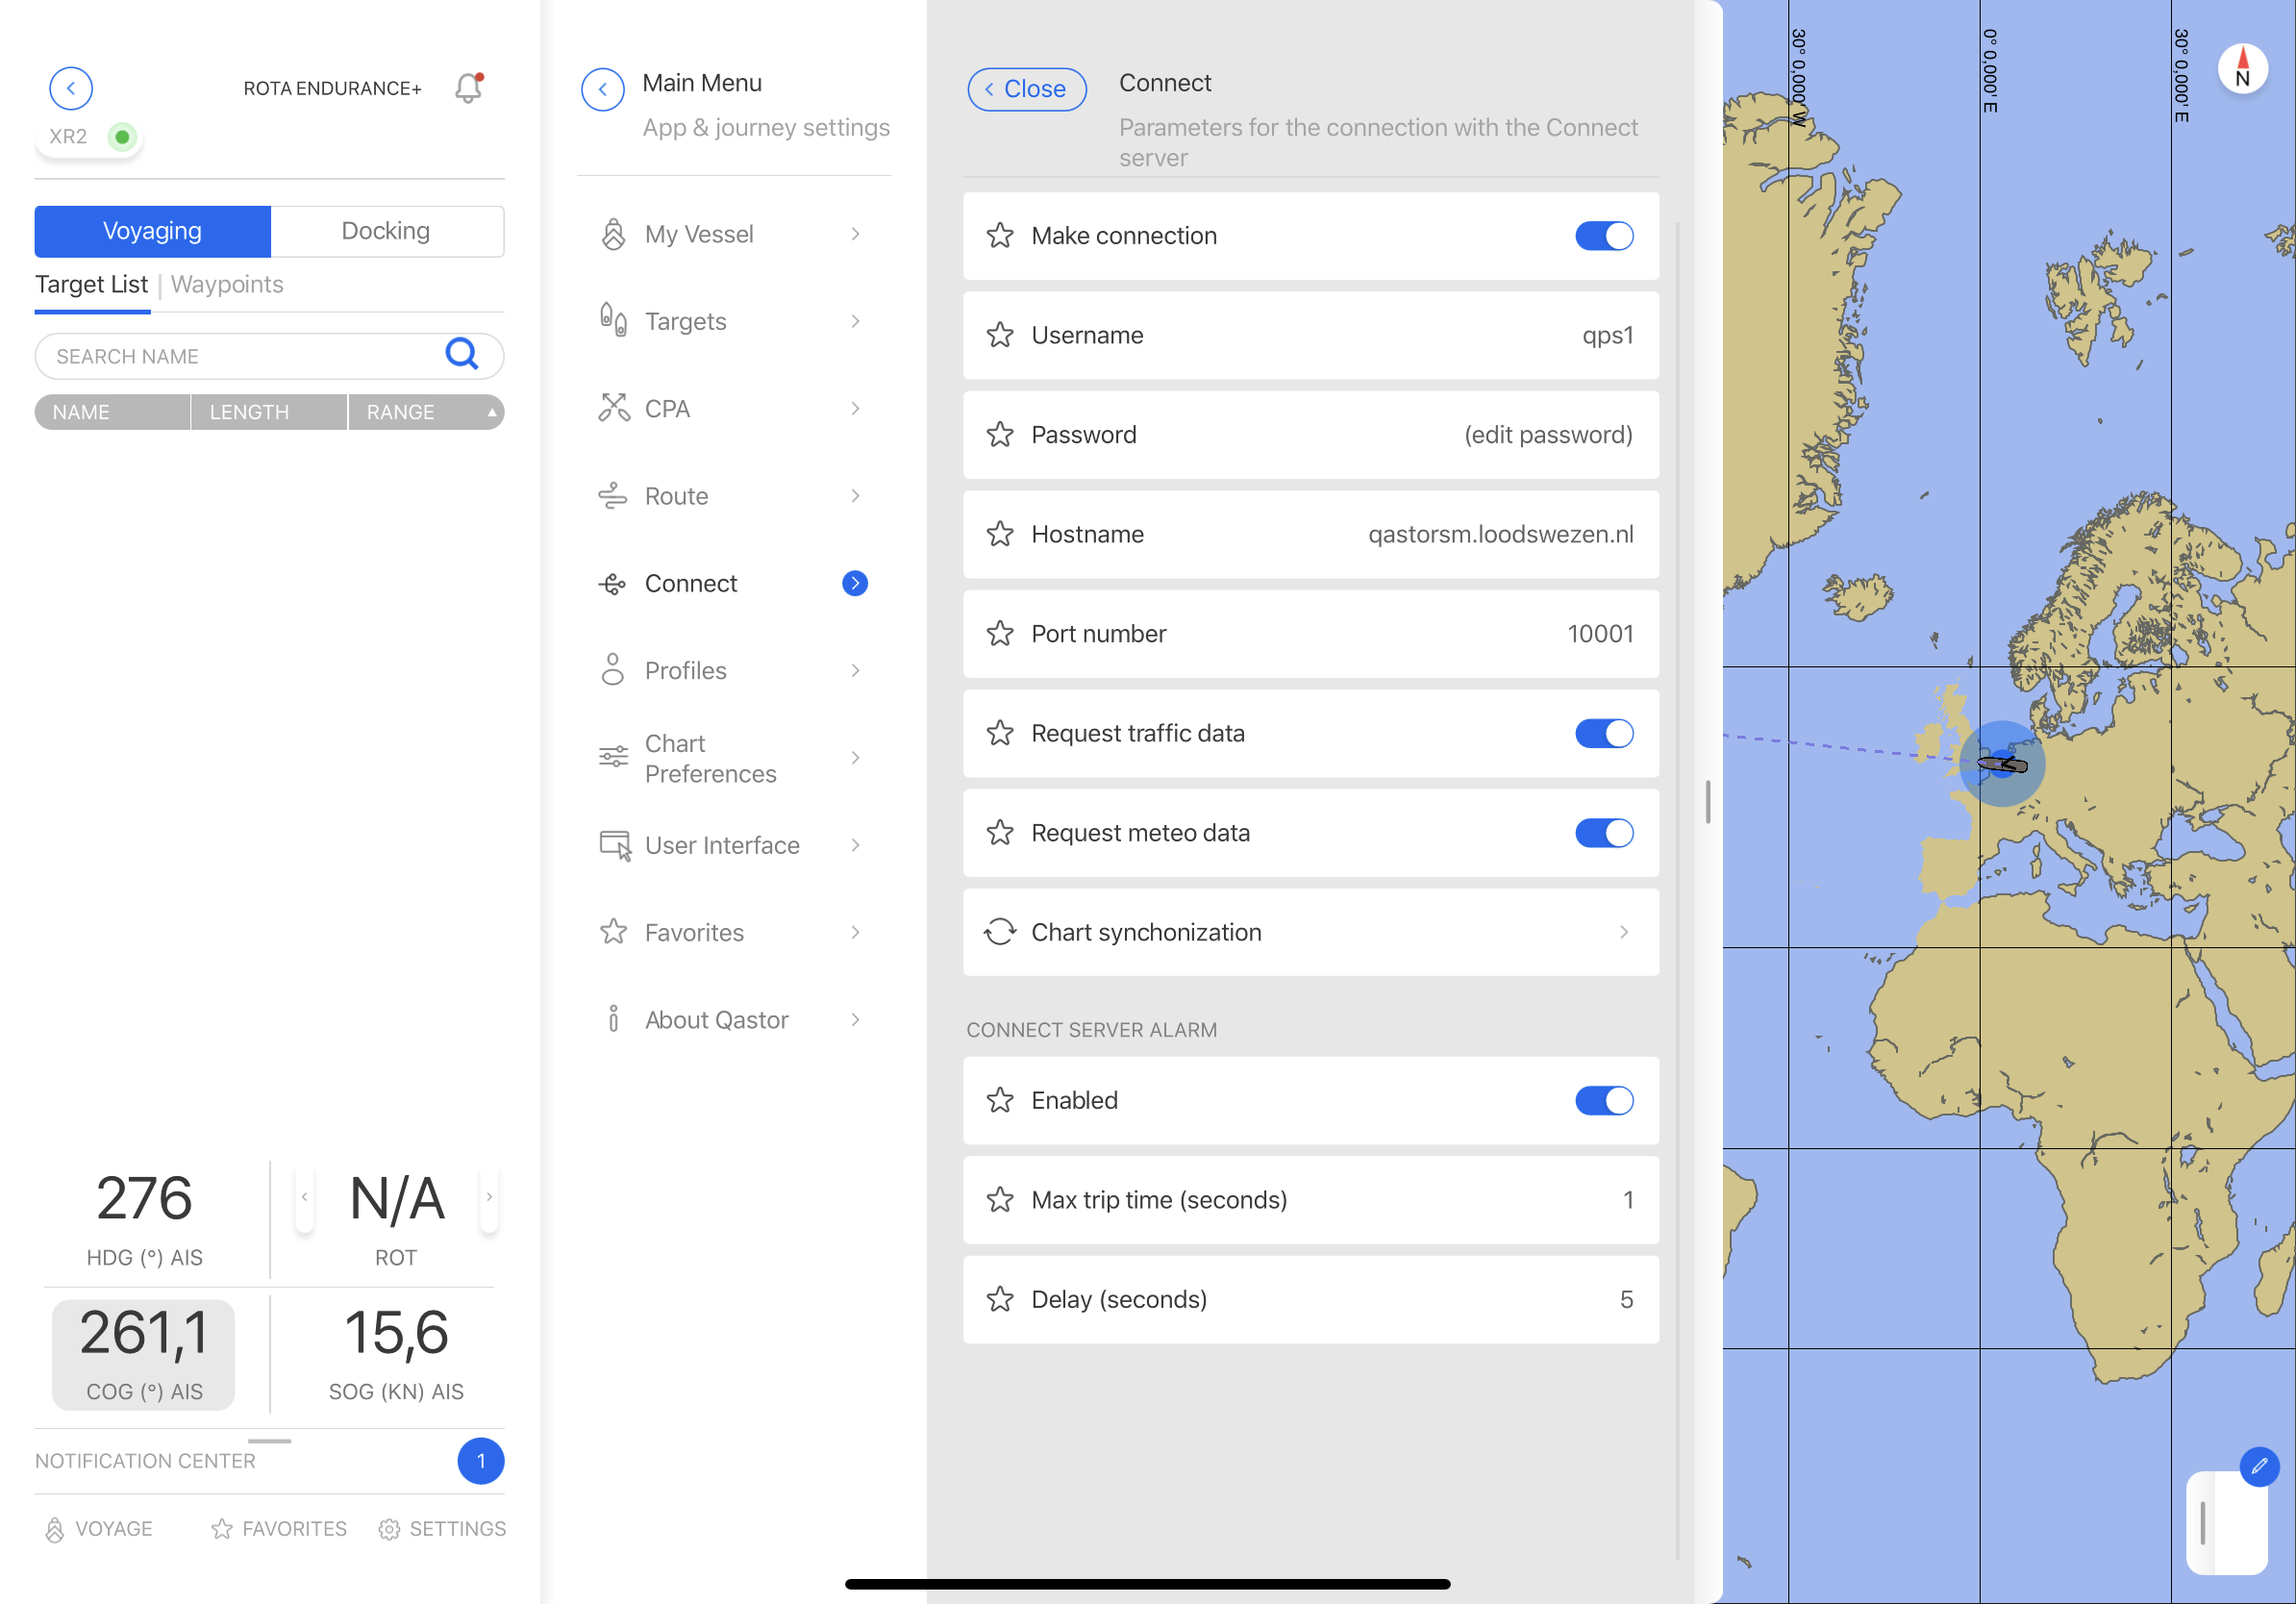
Data modalities
Connect Server can provide static- and live- data.
Examples of static data are charts, routes and mooring lines. Meteorological- and vessel traffic data are typical live data feeds.
The traffic data typically originates from Vessel Traffic Services (VTS). Meteo data can be provided by meteorological offices, wave-rider buoys, etc. Interpretation, decoding and configuration of traffic and meteo data flows is done in the Connect Server.
Qastor can request the server to provide traffic- and meteo data by enabling the request in the main Connect page.
Predefined routes, which are stored in Connect, can be downloaded from within the Route section in the main menu.
Charts may be updated in the Chart Synchronization section.
User Profiles
Connect provides a user- and shared profile facility which can be controlled from the Profiles section in the main menu.
User profiles allow storage and retrieval of user settings. User settings can also be pushed to other devices with the same user account. A use case of this is when one prepares a trip on the iPhone, goes to the vessel and retrieves the settings on the device in use during the operation.
Shared profiles can be used when settings are common for a group of users. A typical use case is to set up shared profiles per region.
Connect Server License
Functionality related to Connect Server requires a Connect Server license.
QPS also provides a hosting service for static data like charts, routes and user profiles.
Contact sales@qps.nl for details.
Navigation Side Panel
The Navigation side panel contains several elements.
Top Bar items will appear in the side panel as the Top Bar disappears when the pane opens.
The main center section can visualize Voyage and Docking related information.
Notifications and warnings are gathered in the Notification Center near the bottom of the pane.
Voyaging
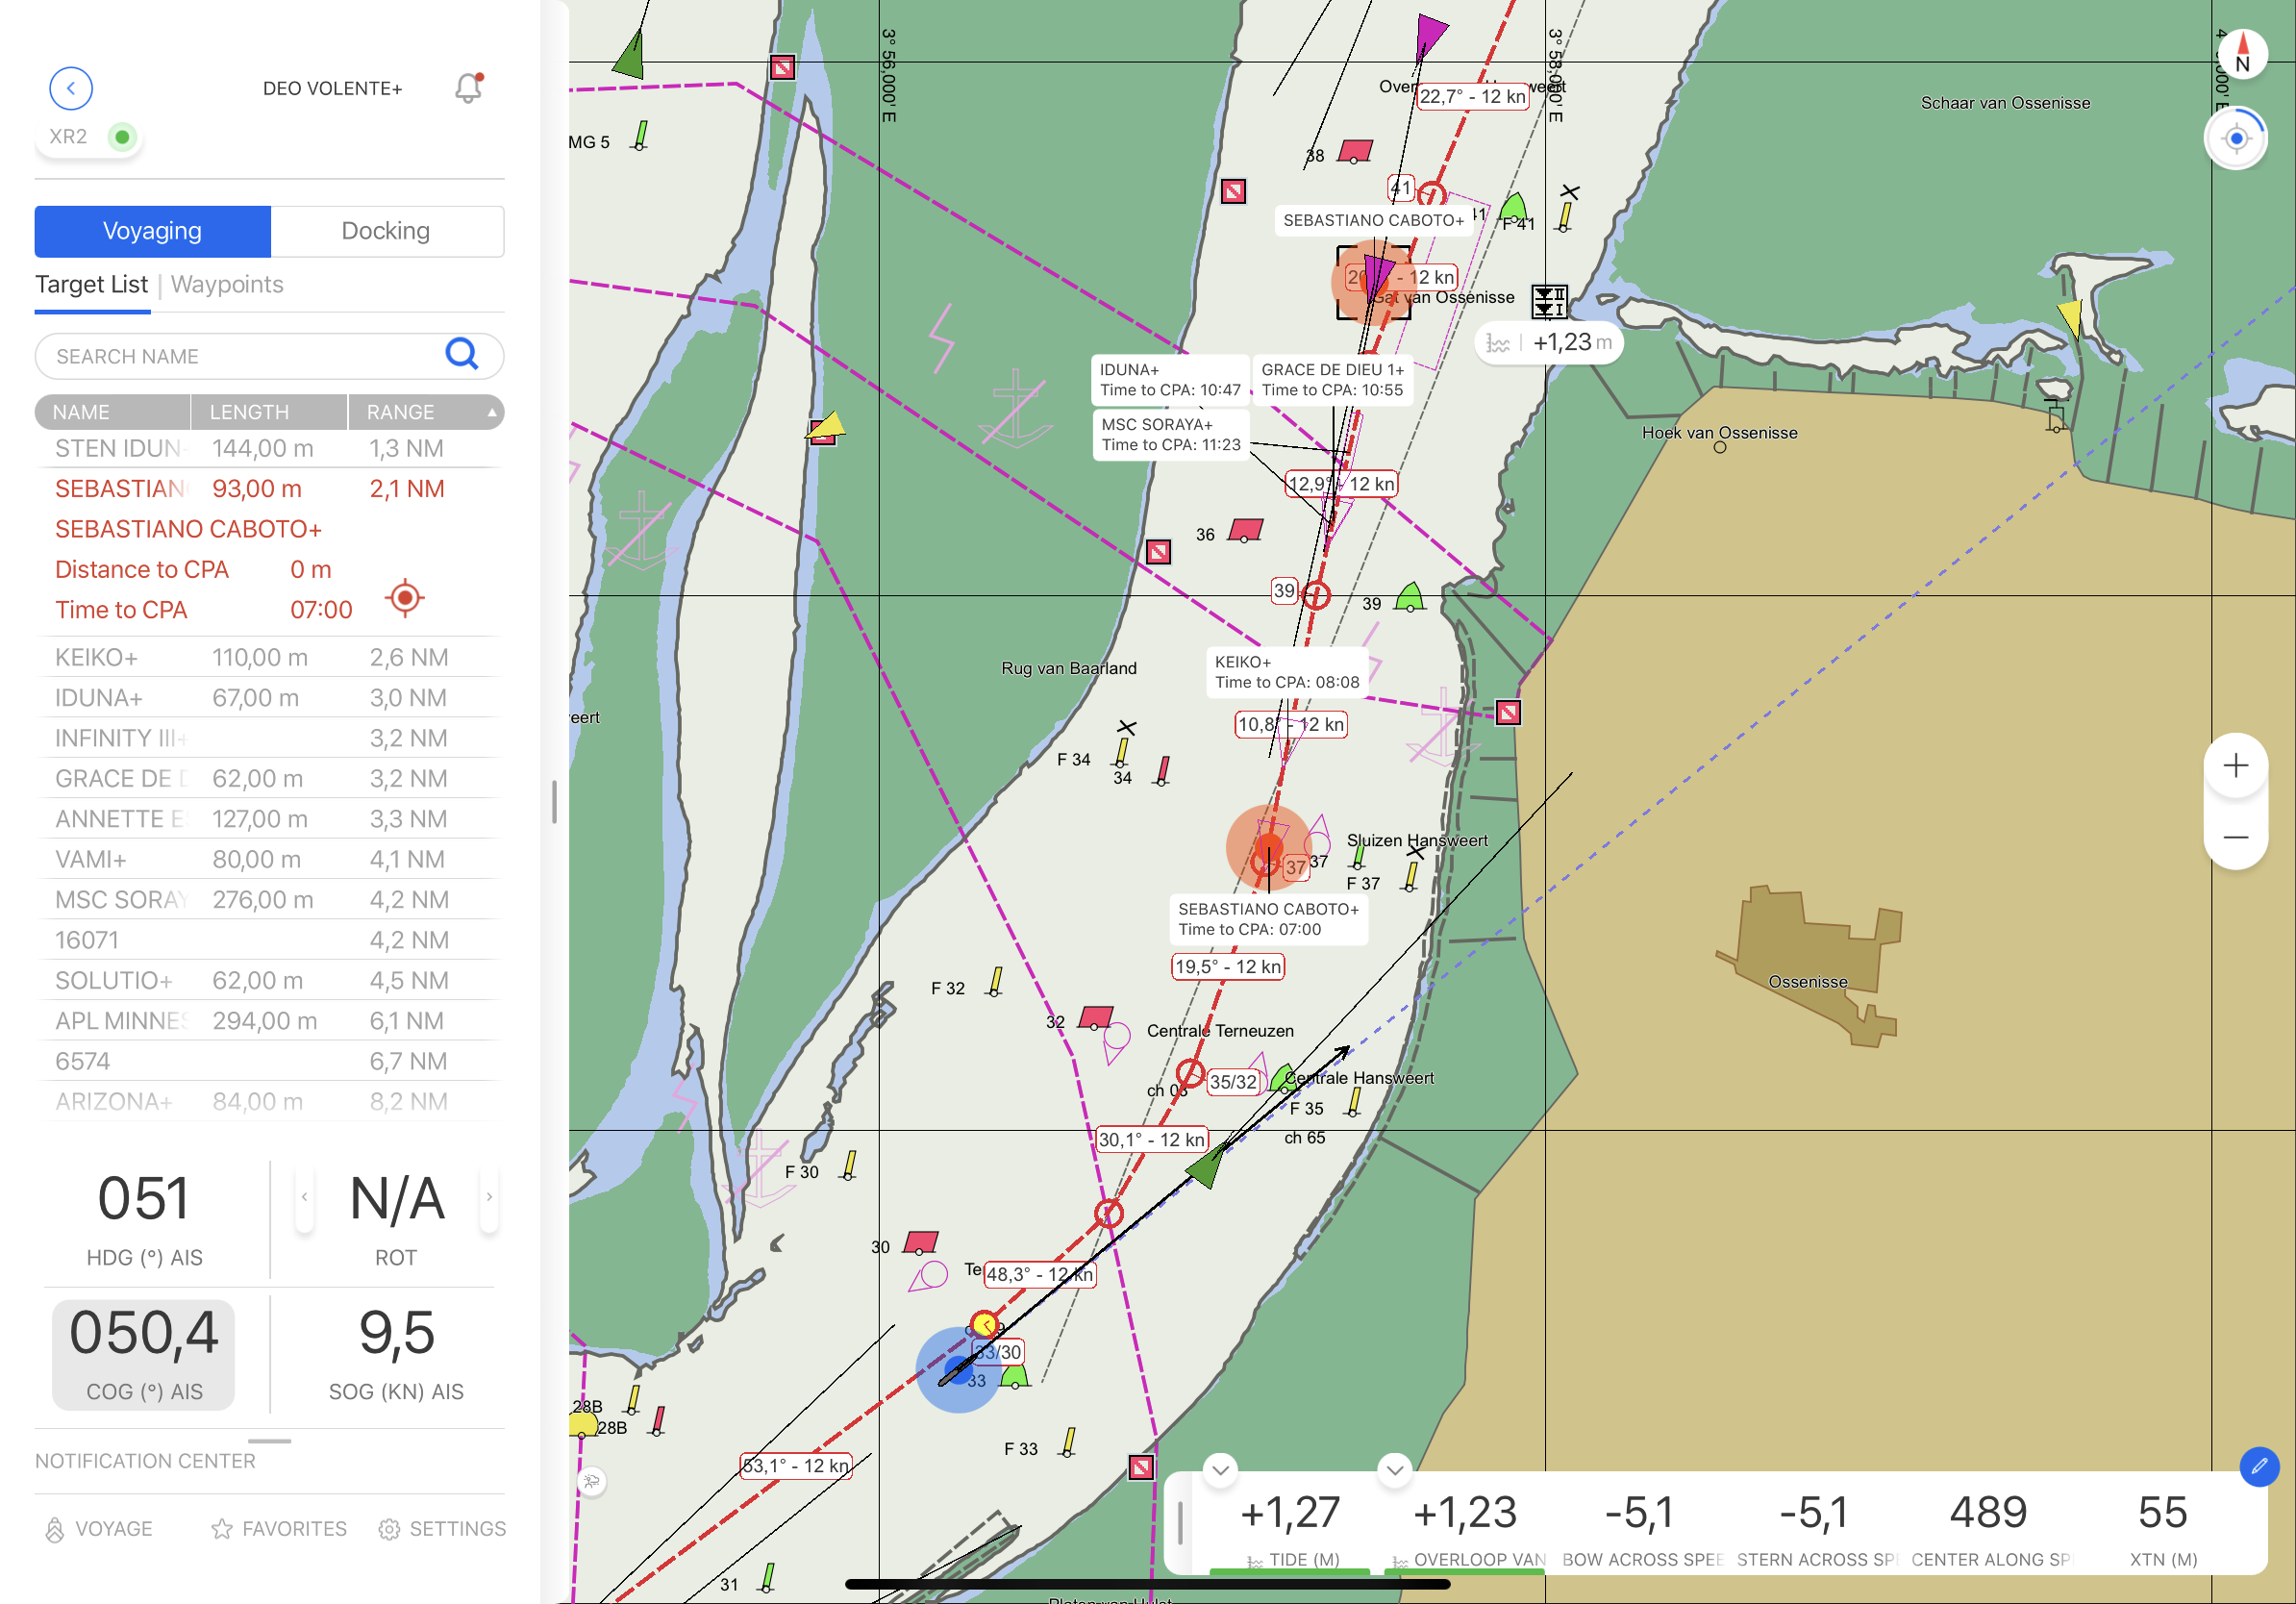
The Voyaging section of the side panel can contain a target- or waypoint- list.
Target List
Closest Point of Approach (CPA) calculations can be defined in Settings - CPA.
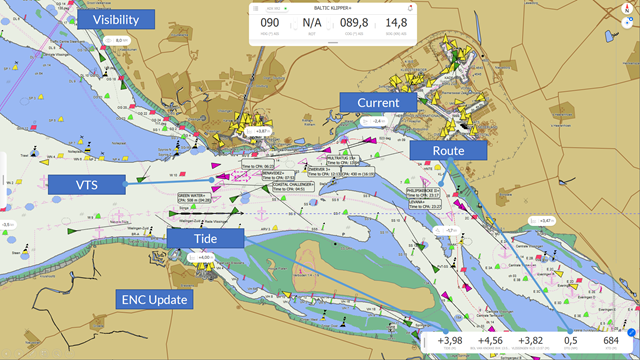
Other ships, obtained through the own AIS receiver, Pilot Plug or via the VTS - Connect feed, are made visible in the map view. The map view can also show the CPA targets.
CPA targets can also be viewed in the Side Panel - Voyaging - Target List.
The content of the columns of the Target List can be modified and sorted by clicking on the column header.
Selectable items are: name, range, bearing, time to BCR (Bow Cross Range), time to CPA, CPA distance, SOG (Speed Over Ground), length, width and draft.
Items in the list can be expanded and selected. The chart view focus will jump to the selected target, which is also highlighted.
A countdown gadget will appear just below the North arrow. After countdown the chart will refocus on the own ship.
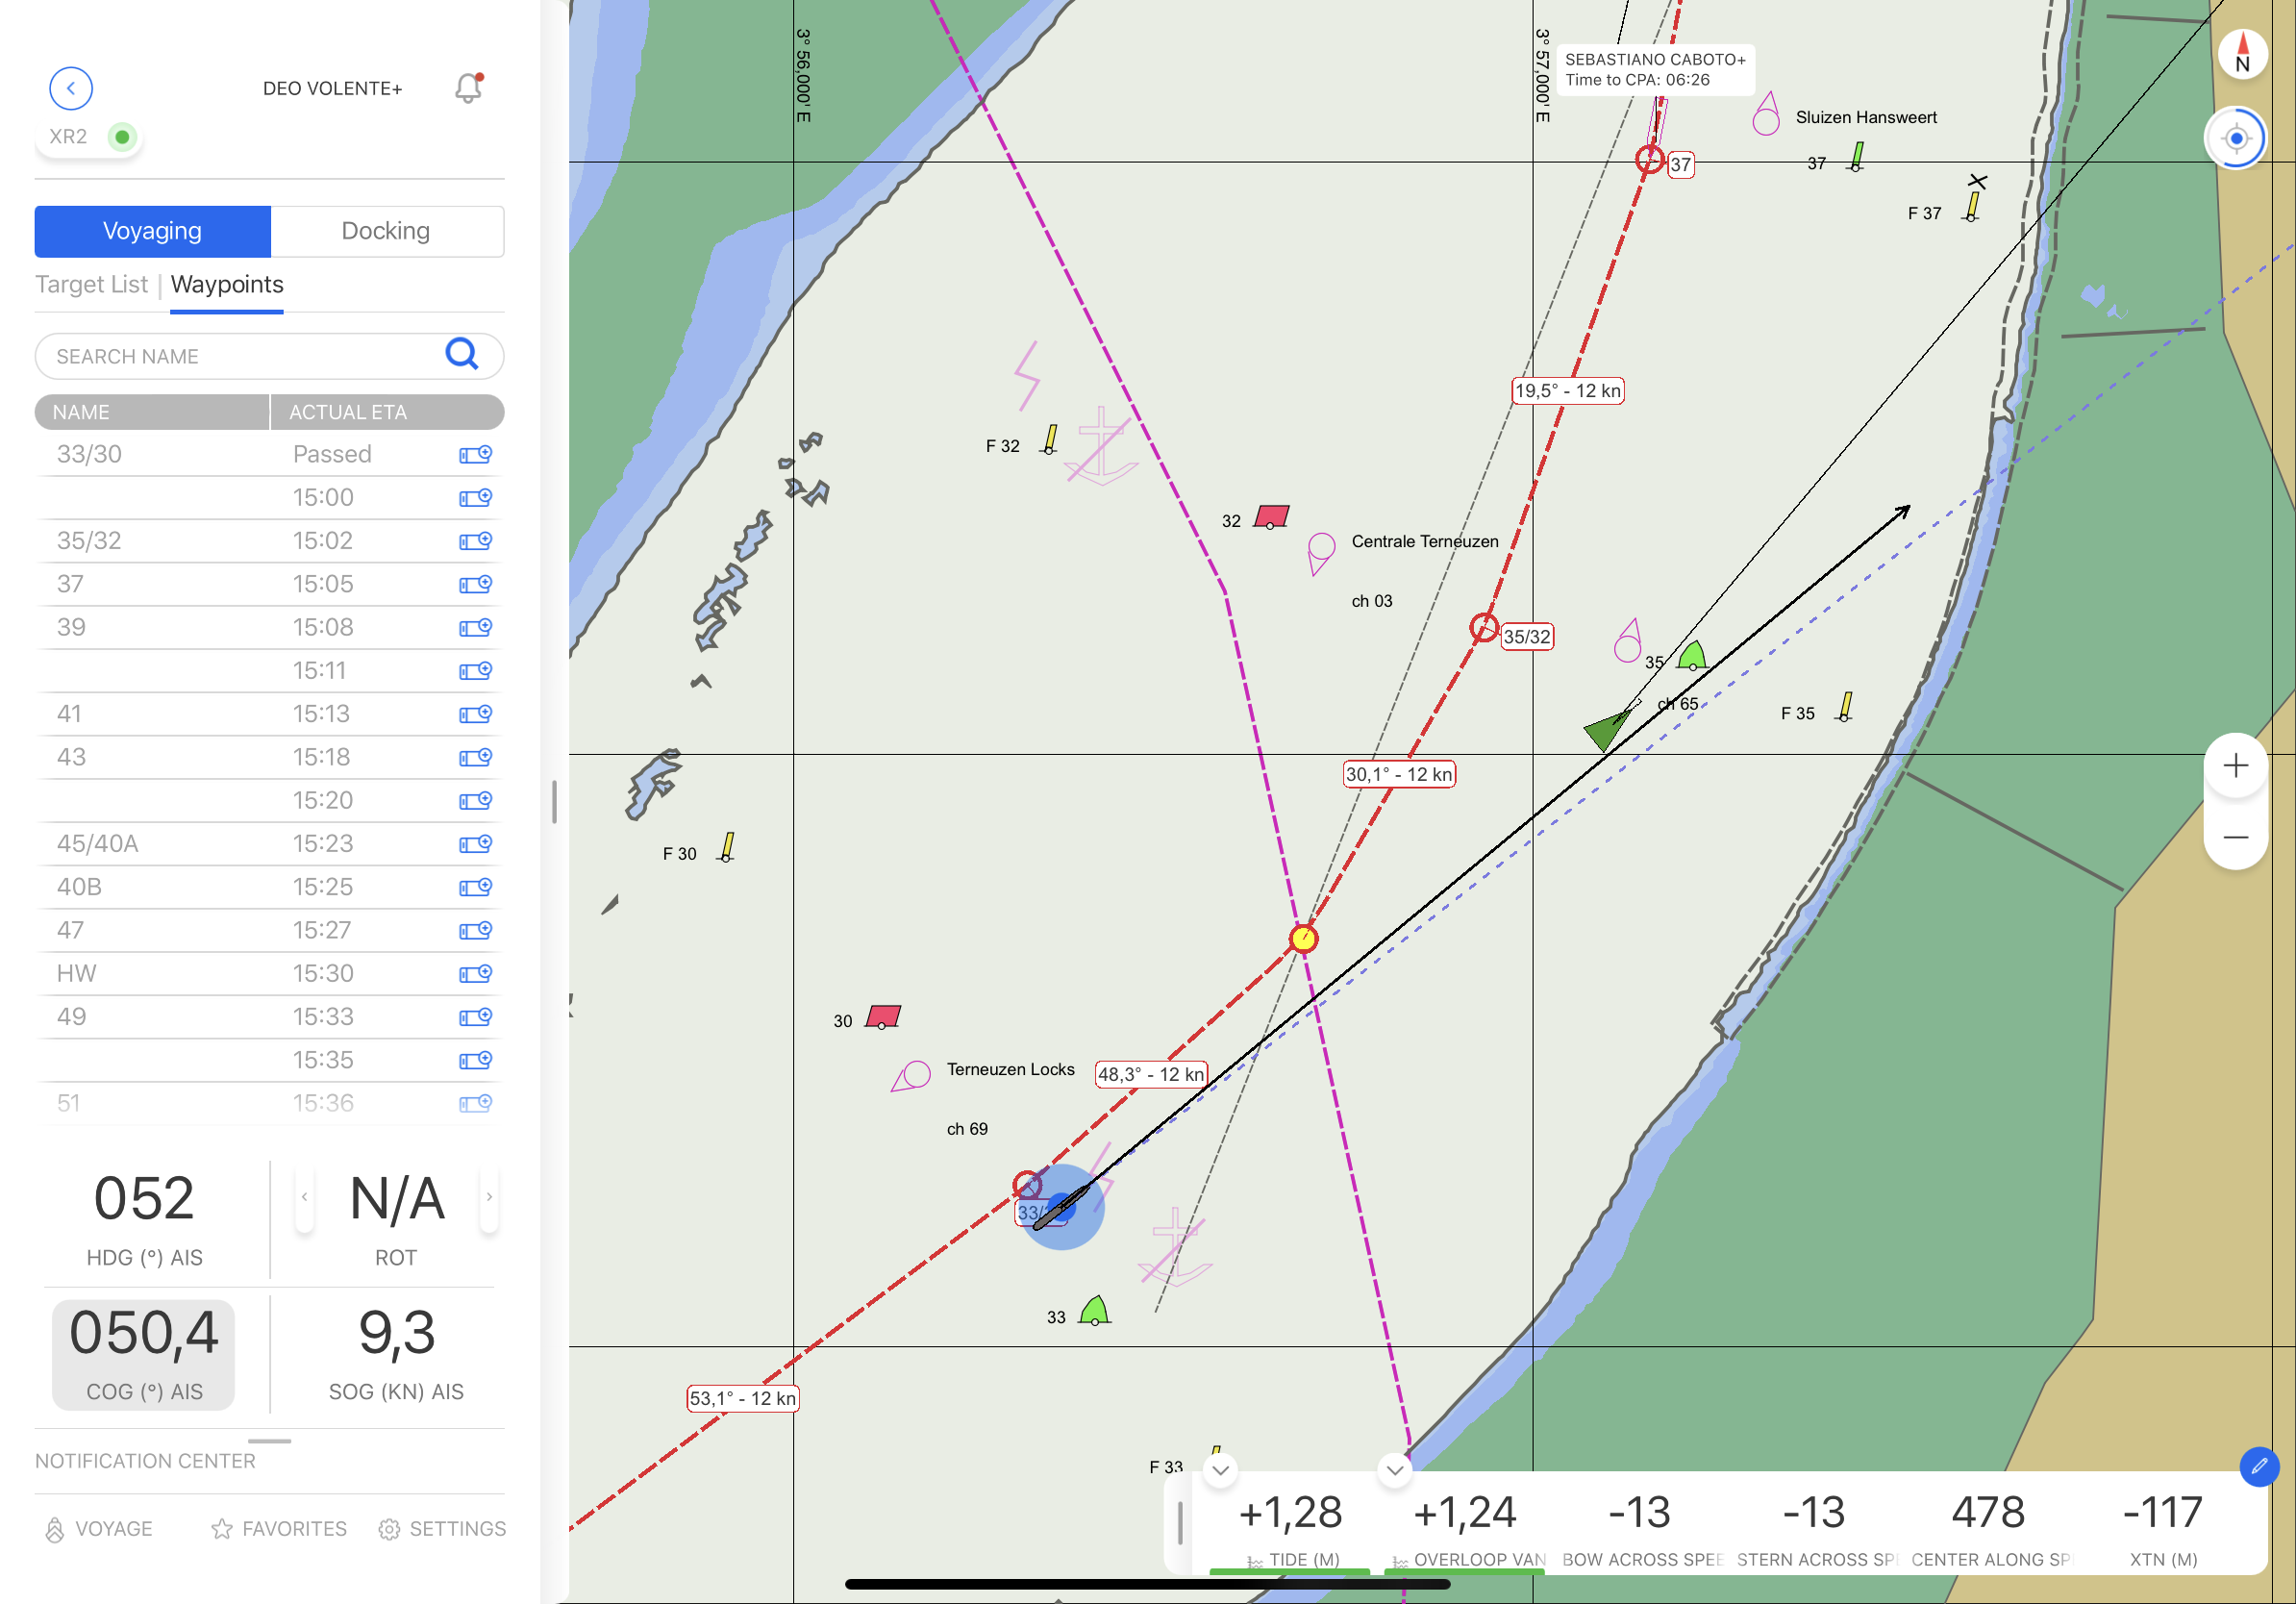
Waypoints
The waypoints of a chosen route can be viewed in the side panel.
The content of the columns of the Waypoint List can be modified by clicking on the column header.
Selectable items are: name, planned ETA (Estimated Time of Arrival), planned TTG (Time To Go), actual ETA, actual TTG and DTG (Distance To Go). The planned speed is defined per leg-line in the route file.
Waypoints can be selected by clicking on the blue indicator which will turn green when selected. The selected waypoint(s) are activated in the bottom bar on the lower right side of the map view.
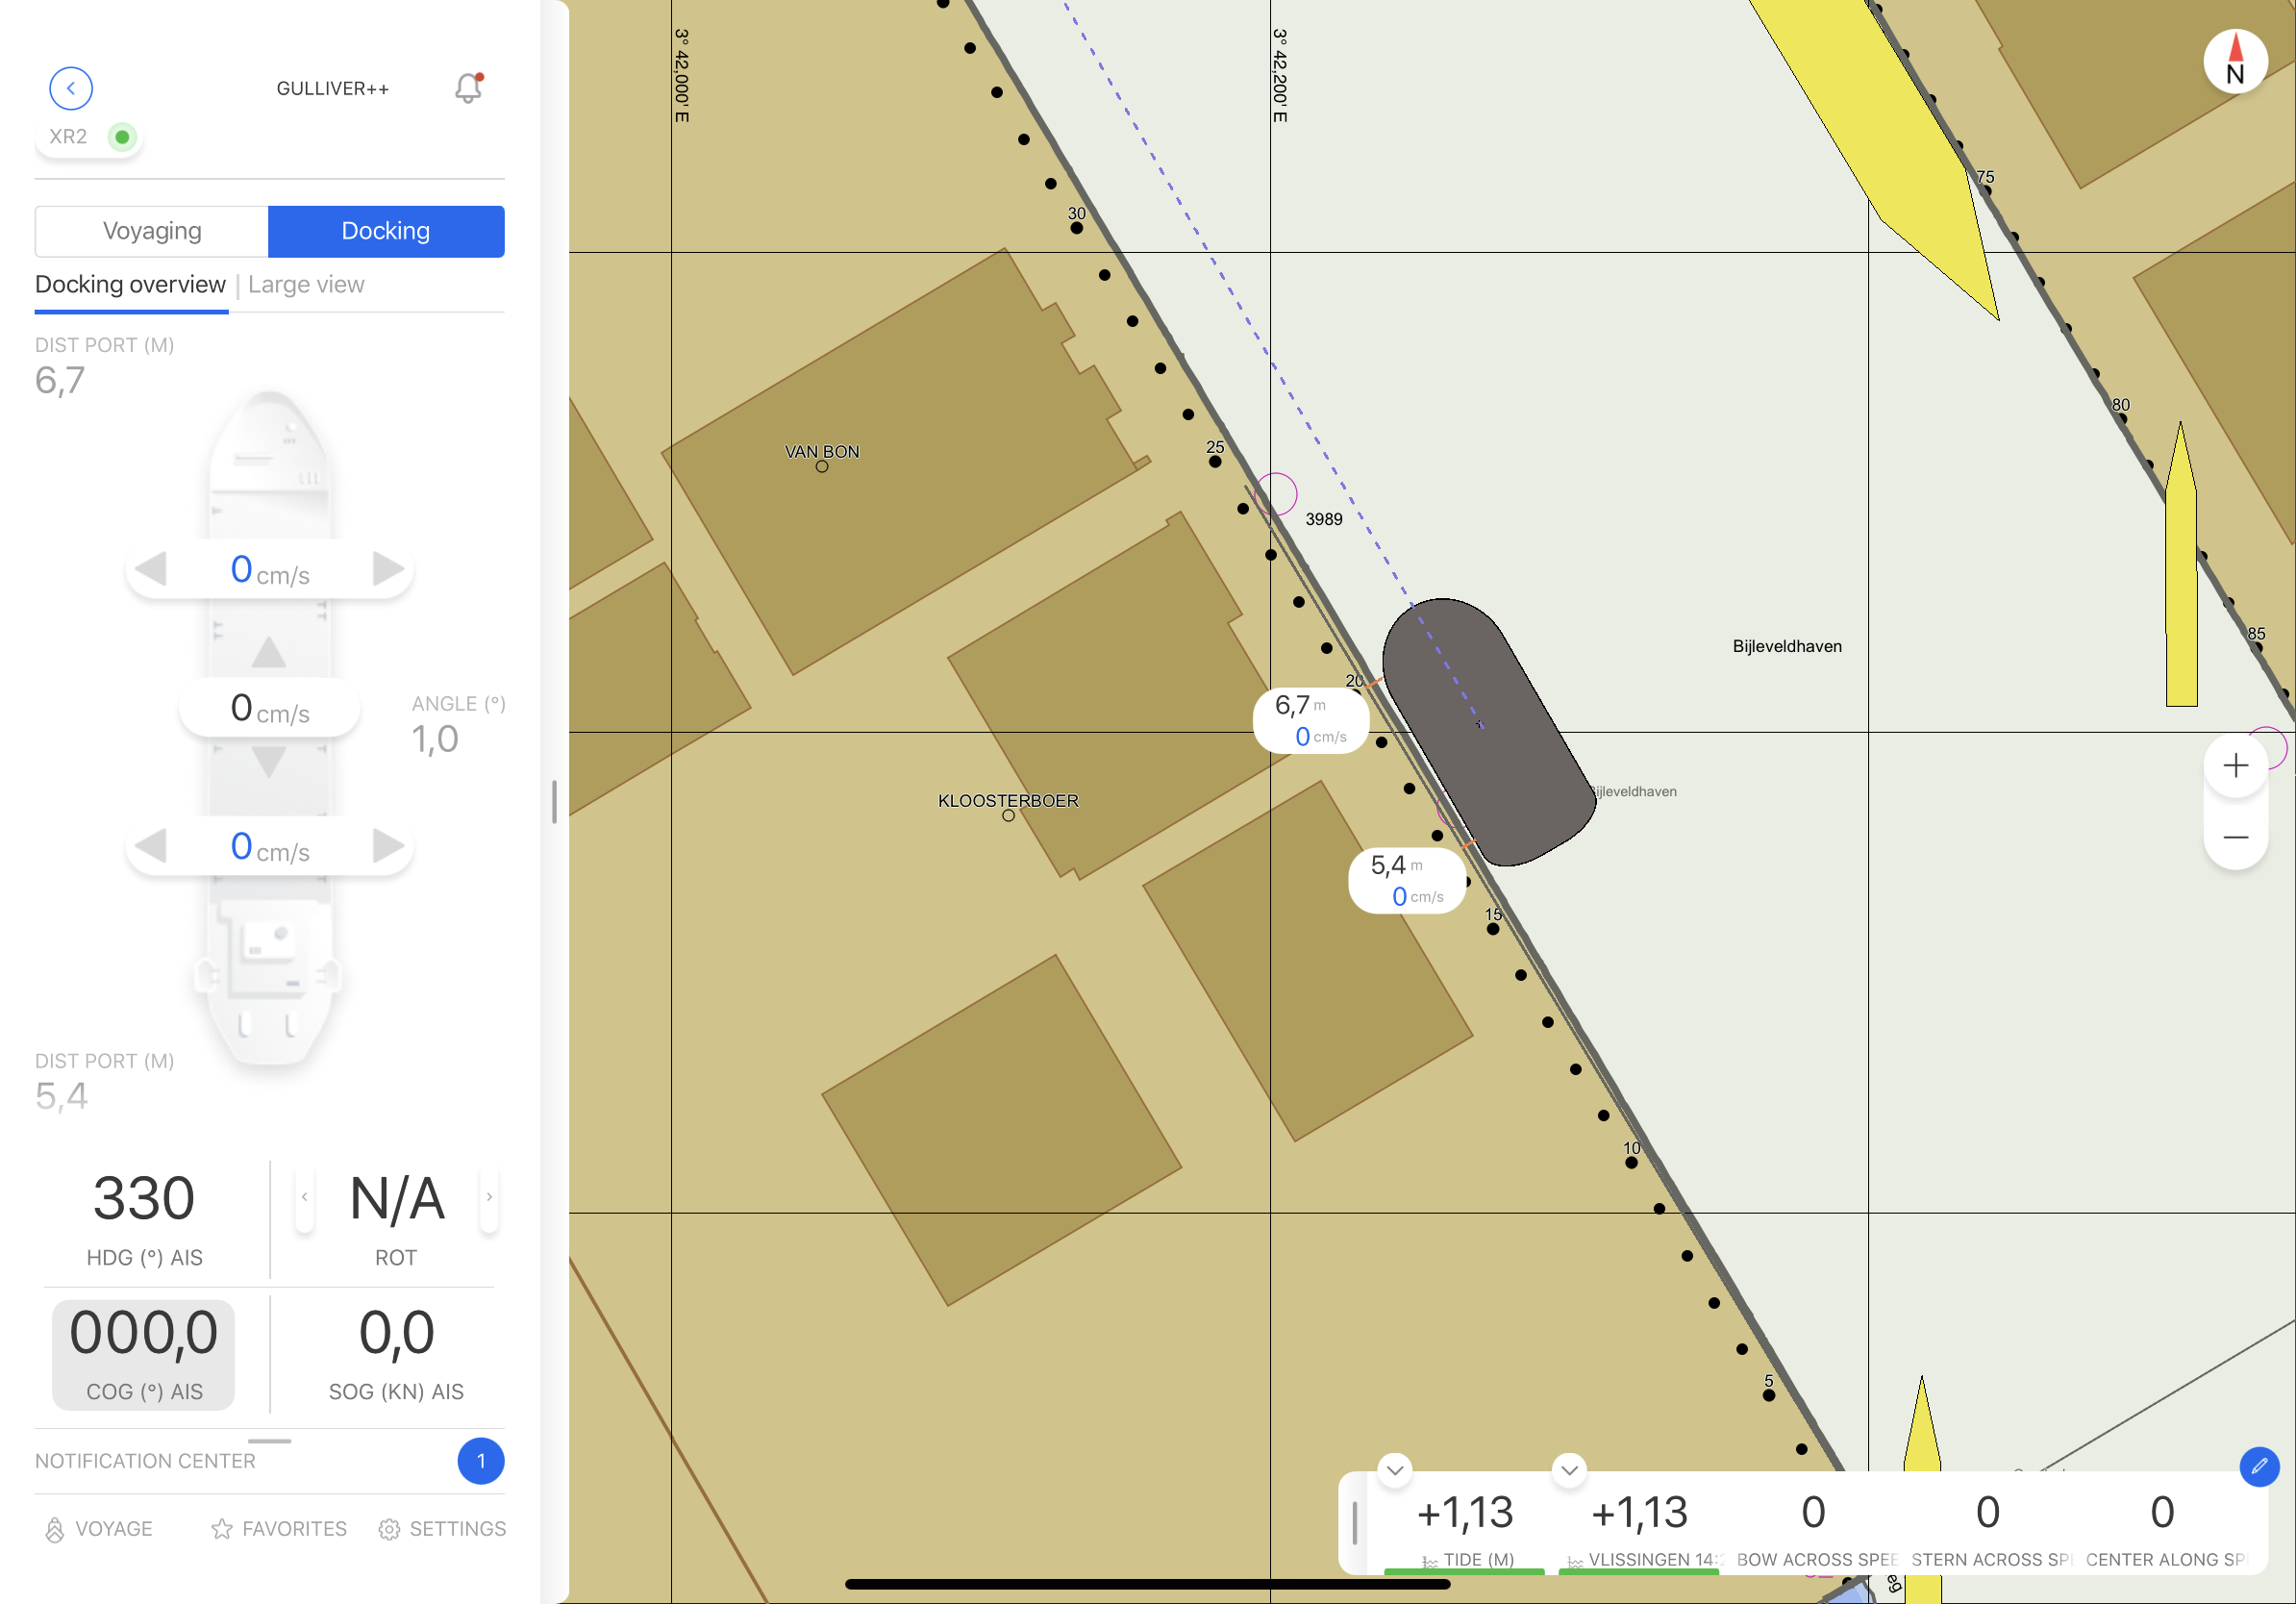
Docking
The side panel Docking view may be used during Docking, Lock Approach and other manoeuvres which require a detailed overview of speeds and distances.
Mooring and Lock lines can be synchronized with Connect Server in Settings - My Vessel - Docking. On Windows devices it is also possible to choose the NavLines.xml file using the file browser.
There is no separate Docking Mode anymore, like there used to be in Qastor 2.5. The application will render the mooring lines once distances fall below thresholds which are set in the mooring line file.
Notification Center
Notifications can be issued to provide information, to issue warnings or to report faults.
When the side panel is closed, the notifications will appear in the bottom - left corner of the map view.
A click or swipe on the notification will move it away from the map view. The notification can always be viewed in the Notification Center which is part of the side panel.
Notification Center
Click on the Alarm bell in the Top Bar to quickly access the Notification Center.
Other Elements
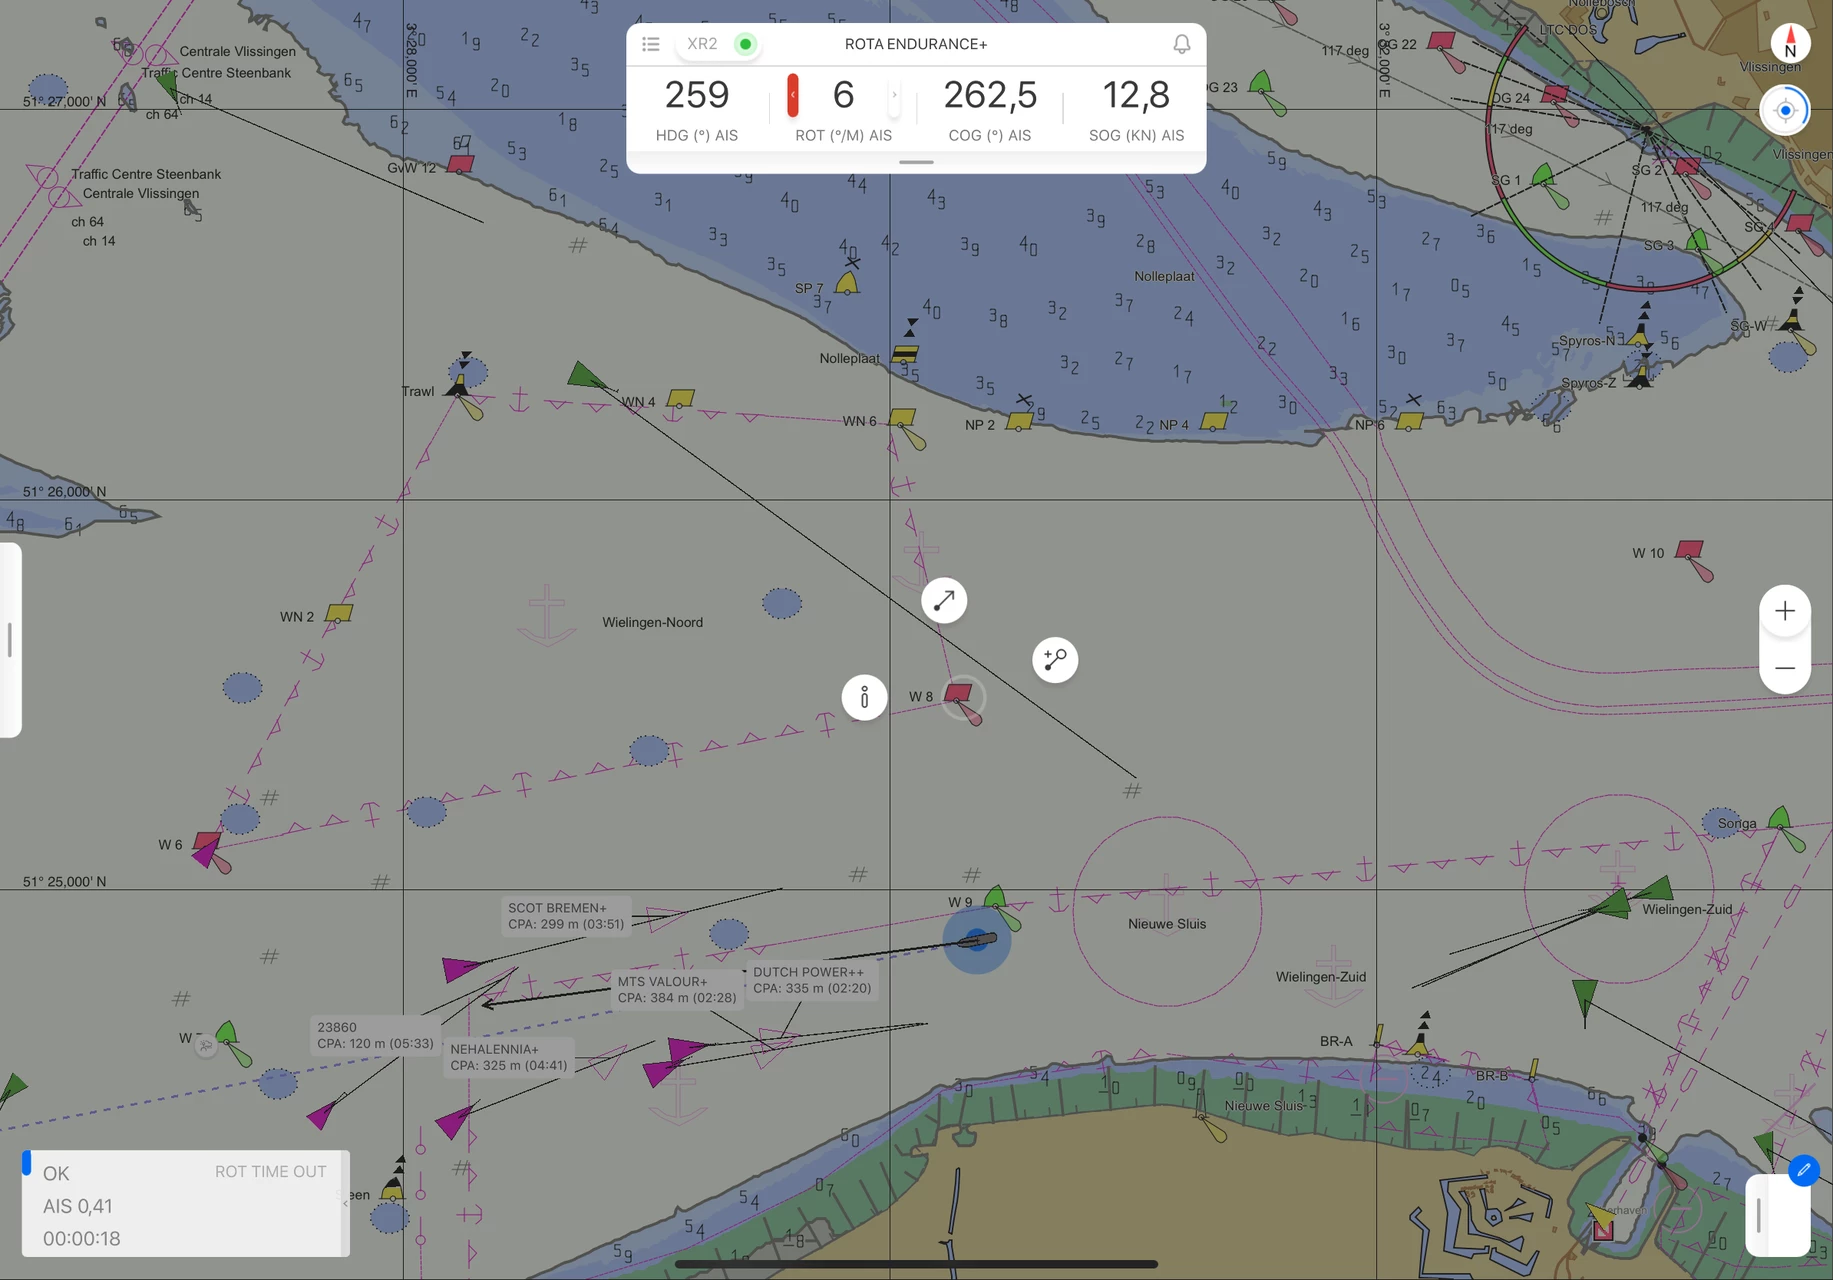
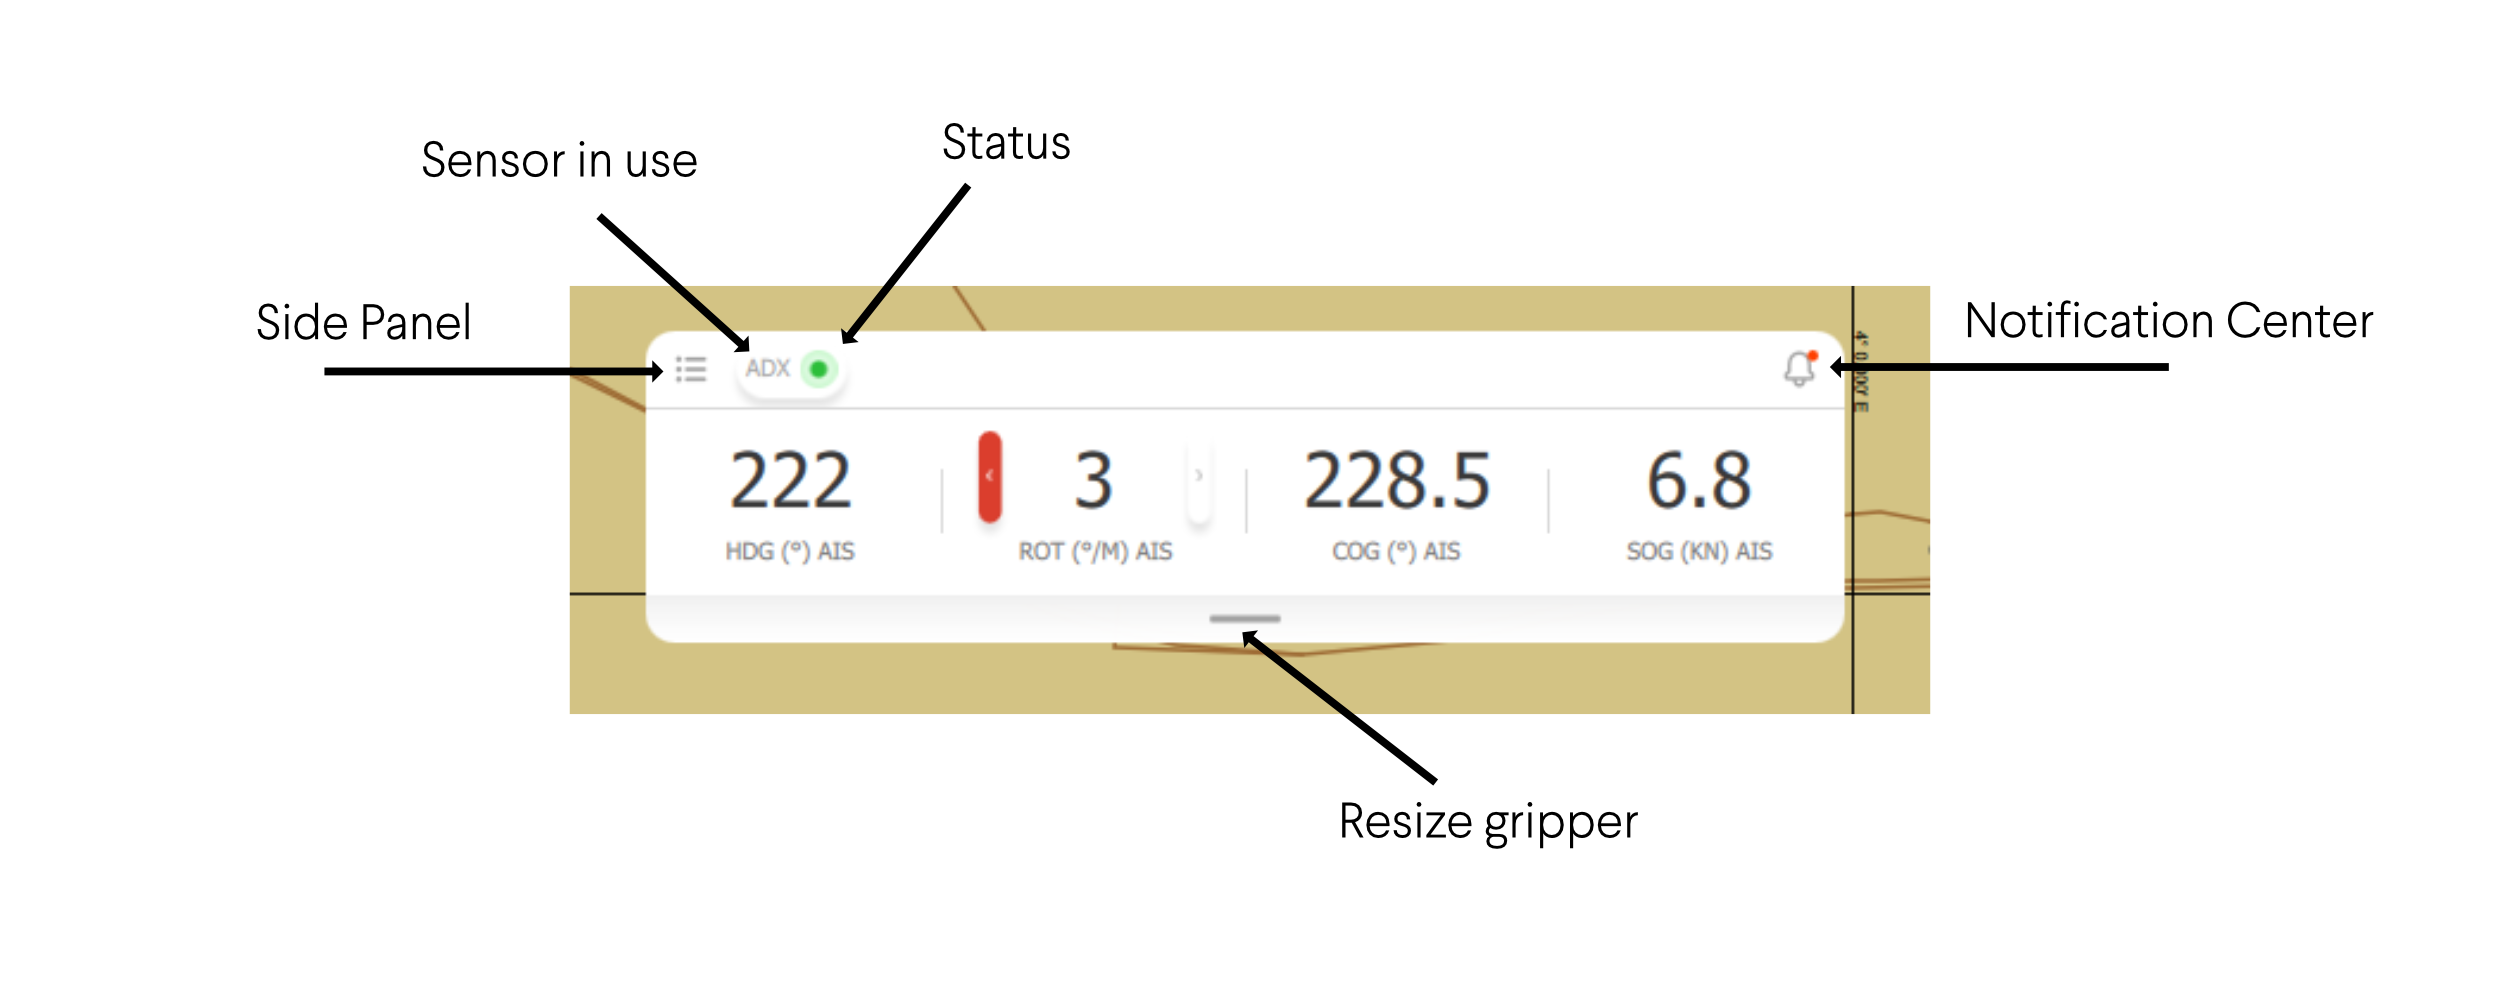
Top Bar
The Top Bar shows the key navigation values: heading (HDG), rate of turn (ROT), course over ground (COG) and speed over ground (SOG). Unit and source of origin are found underneath the values.
The ROT is accompanied by starboard and port indicators which will color green or red when the ROT exceeds one degree per minute.
The bar also shows the positioning sensor and its status. The notification bell reveals if error notifications exist and can be clicked to open the notification center. Pressing the hamburger menu will open up the side pane and will close the Top Bar. Top Bar items will then appear in the side panel.
The Top Bar may be resized using the gripper which can be moved to the left and right in the vessel name area.
Bottom Bar
The bottom bar resides in the lower right corner of the chart view.
Its content can be configured through settings - user interface - bottom bar configuration. Items can be added or removed and the sequence of appearance can be altered by dragging the items by the tree-line grippers. The bottom bar configuration may also be accessed by pressing the blue pencil on the upper right side of the bottom bar itself.
Some of the individual items can be configured by pressing the arrows on top of the items. Waypoint presentation can be altered to show the Estimated Time of Arrival (ETA) or Time To Go (TTG) using the actual or planned speed. See also the side panel waypoints section in this document.
Items related to tide contain a color bar to indicate the age of the measurement and status of the interpolation in case multiple tide stations are available. The age threshold can be set by clicking on the arrow just above the tide element.
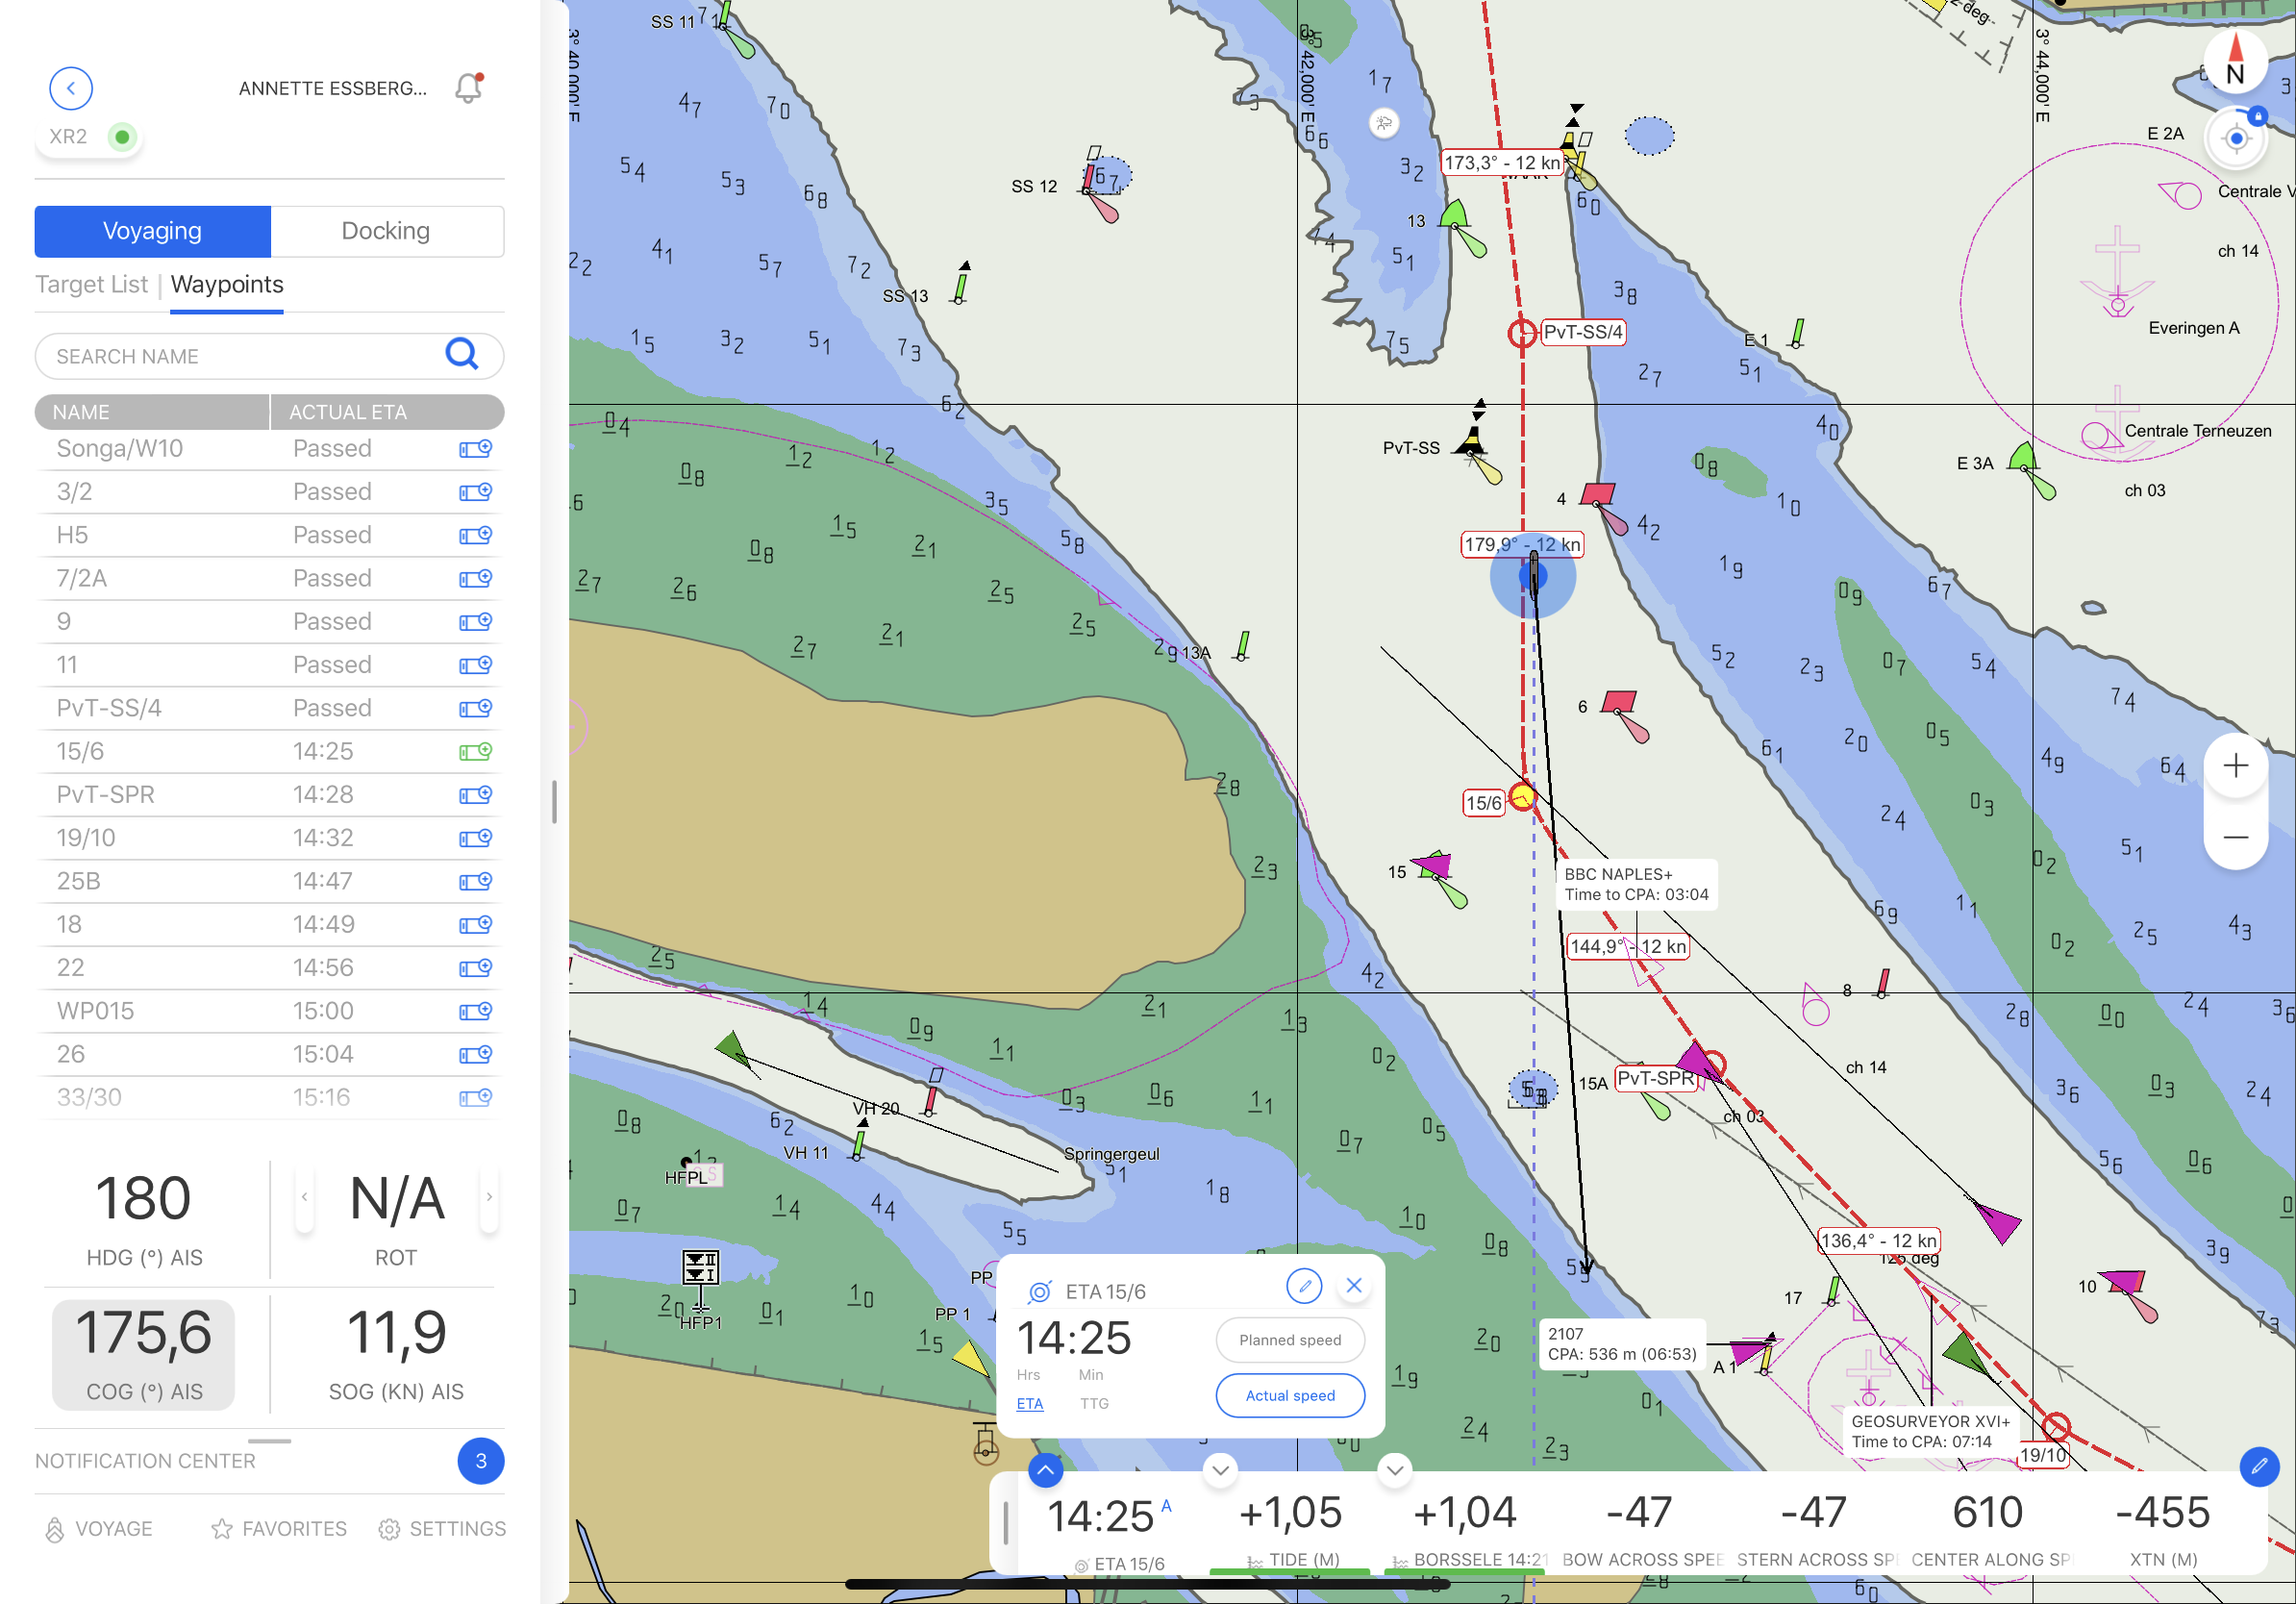
Chart orientation
The chart orientation can be toggled from North- to Heading- to Route-Up by clicking on the top right (North) indicator.
It is also possible to freely rotate the chart with a two finger touch gesture.
Orientation Lock
All chart orientation modes can be locked by a long-press on the indicator.
This may be handy to prevent the chart from rotating when using touch gestures to zoom.
Countdown gadget
The countdown gadget will be visible when panning the chart away from the own ship. Click on the gadget, or let it complete the countdown cycle, to jump back to the own vessel .
Countdown Gadget
Do a long press on the countdown gadget to lock it. Do this if you do not want the application to jump back to the own vessel after countdown.
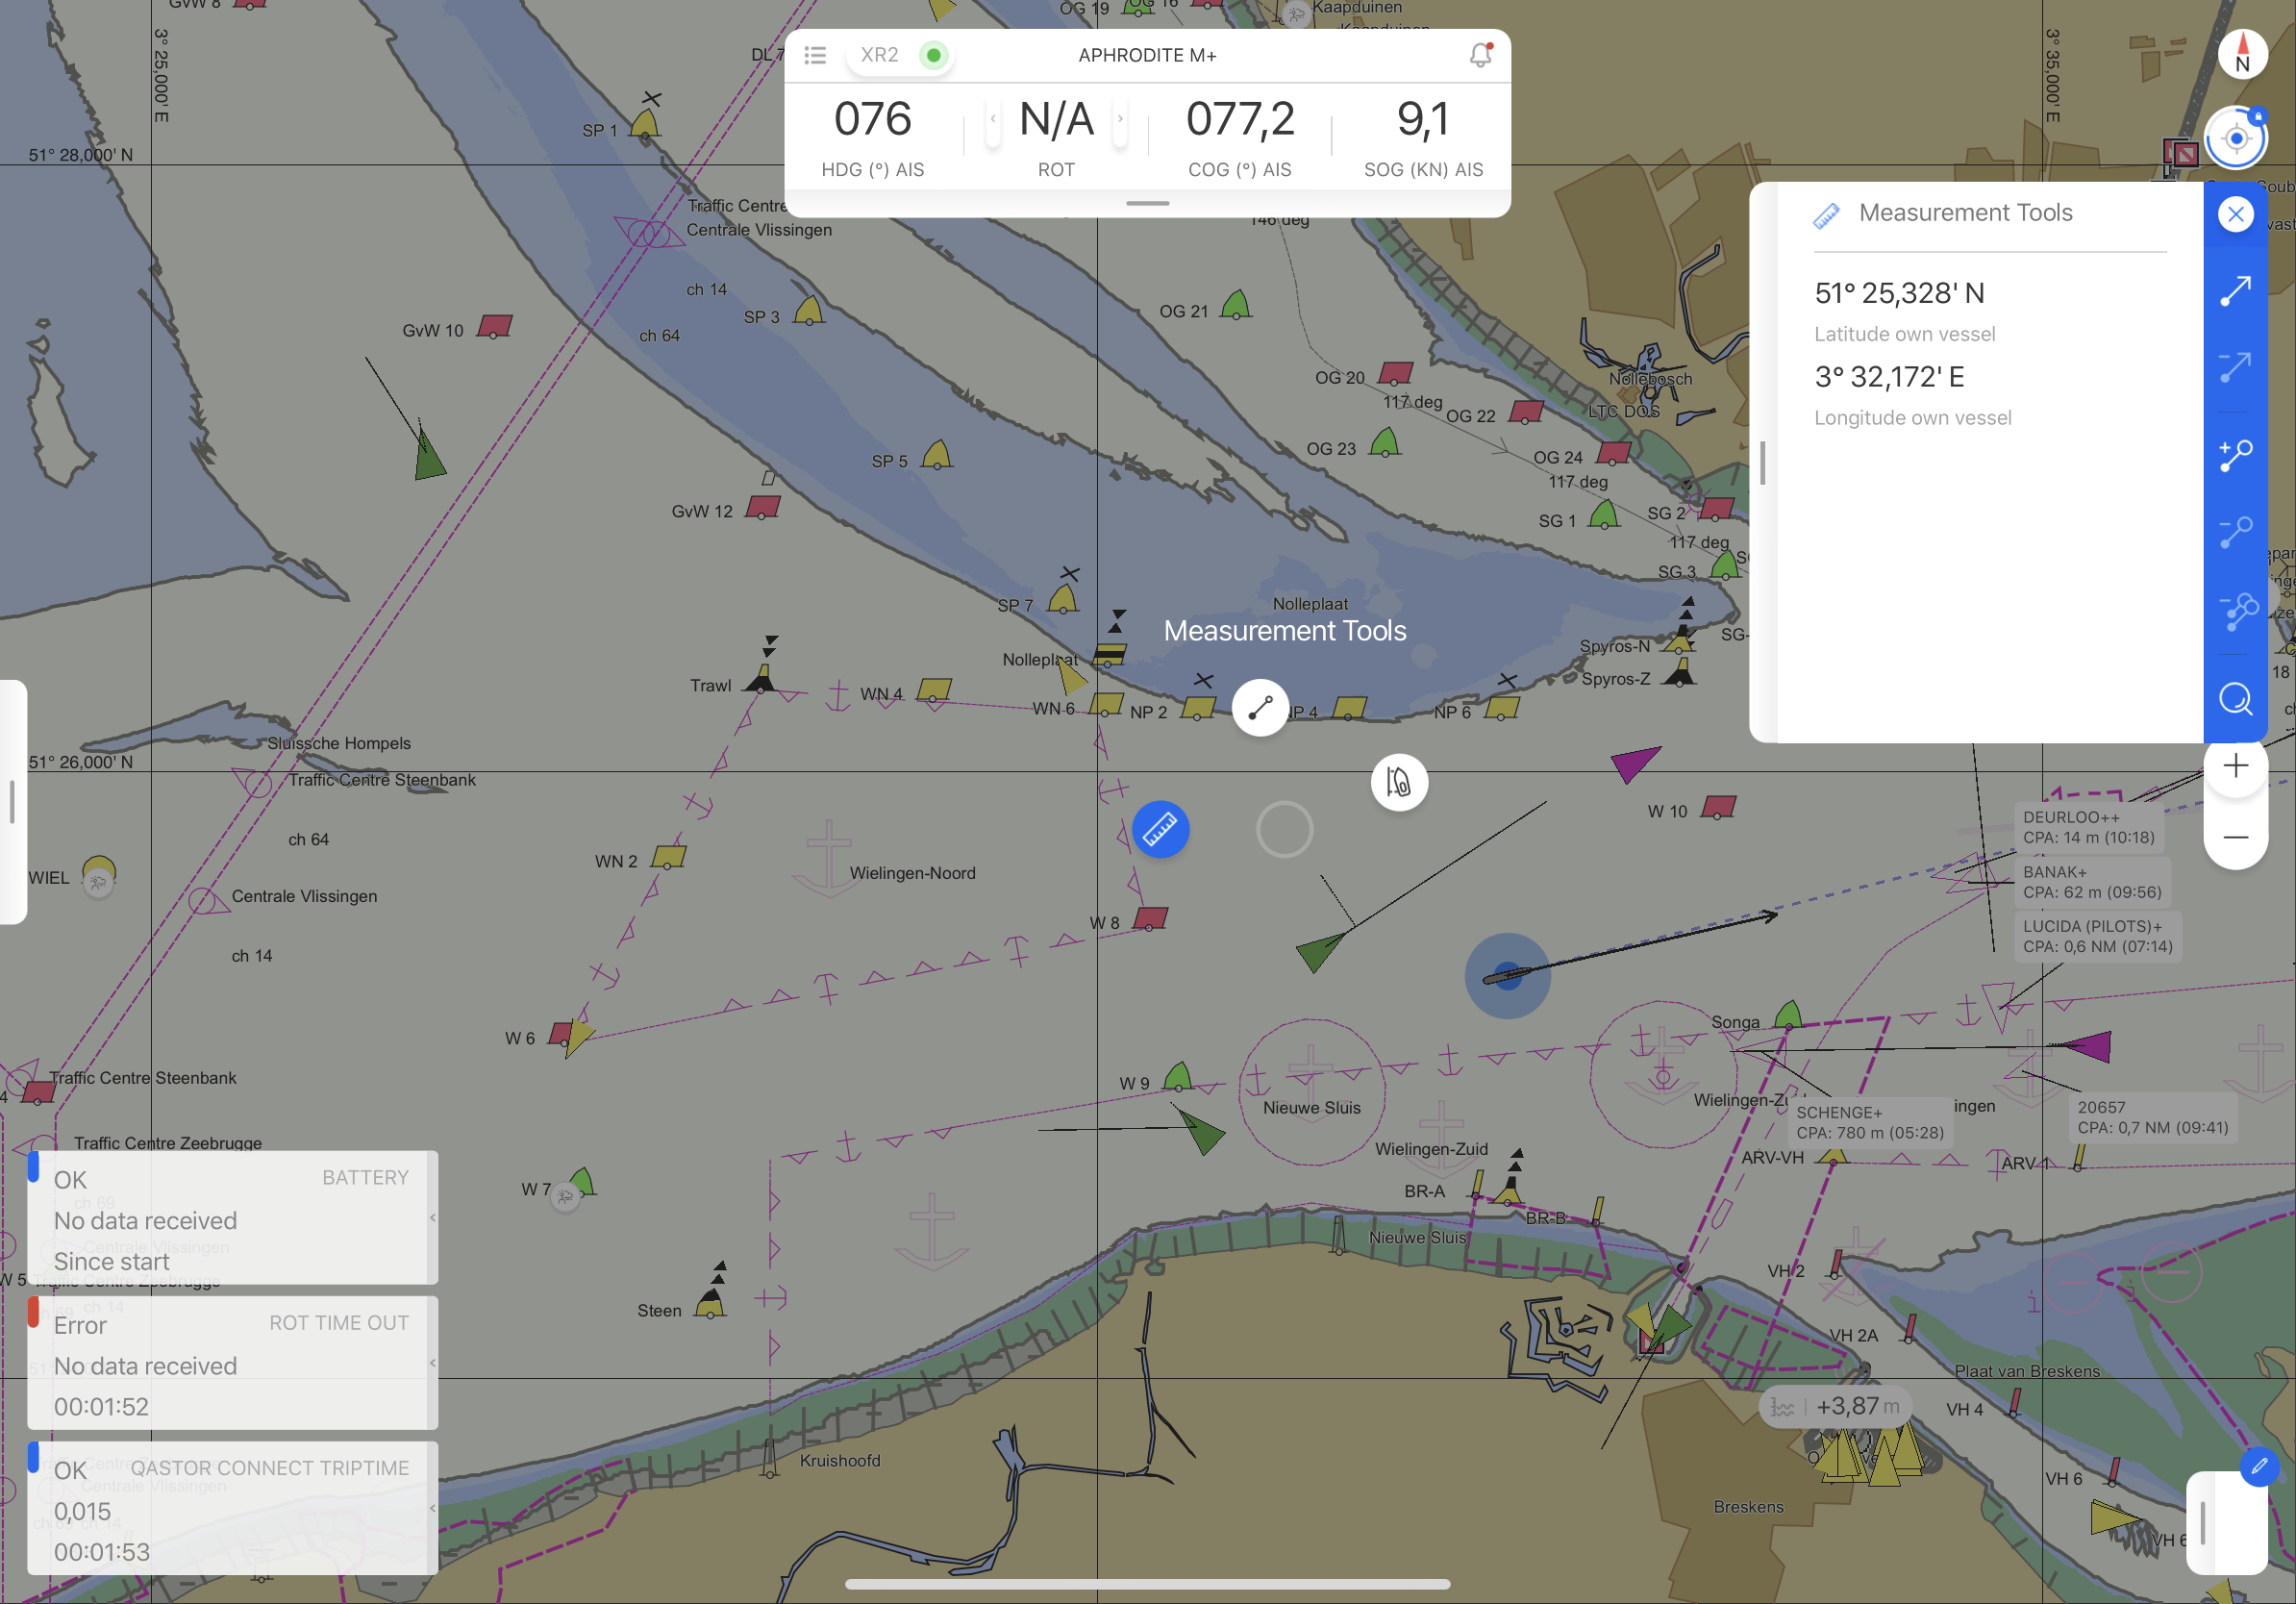
Measurement tool
Measurement tools can be initiated via the main radial menu. It is possible to add range markers and to create multiple distance markers from the own ship.
Transition from Qastor 2.5 to Qastor 3
Qastor 3 can be installed next to Qastor 2.5. Both versions can run parallel to each other allowing direct comparison between the two versions. This only applies to the Windows operating system as that is the only platform on which Qastor 2.5 can operate.
Qastor 2.5 settings can directly be used in version 3 by enabling the Automatically import settings from Qastor 2.5 in the User Interface section of Qastor 3. Qastor 3 will adapt each time the settings are saved in Qastor 2.5 (by pressing CTRL + S).
Note that settings done in Qastor 3 will not be picked up by Qastor 2.5. Also note that Qastor 3 settings will be overwritten by Qastor 2.5 settings each time Qastor 3 restarts. Switch off the automatic settings synchronization to prevent this.