FMGT - Visual Objects
The Visual Objects tab of the Source Files Panel as shown in the Visual Objects Tab figure allows the user to interact with the visual layers of the Map View.
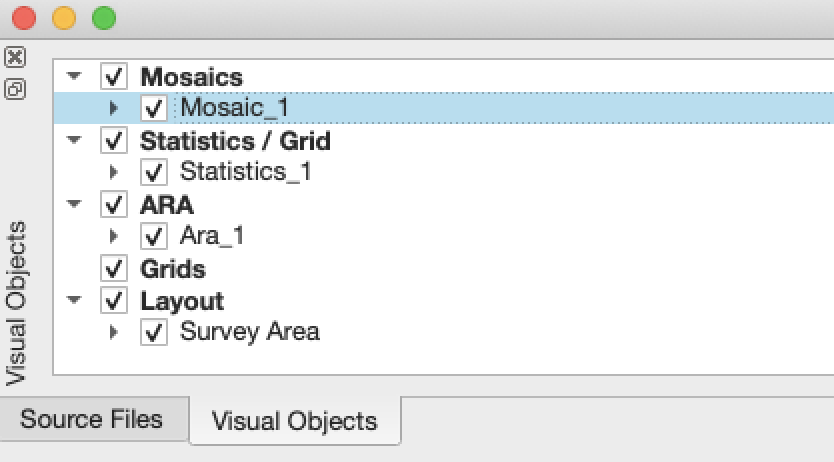
Visual Objects Tab
When nodes are unchecked, they will not be rendered in the Map View. If the root node of a specific type such as Mosaics is unchecked, all mosaics in the Map View will be hidden. Right clicking on specific nodes will bring up the context menu that is associated with that node type.
Under each mosaic node are the tiles that have been created for that mosaic. If tiling was not specified, there will be only one tile.
Under each Statistics / Grid node will appear all of the associated statistical layers as show in the Statistics / Grid Layers figure.
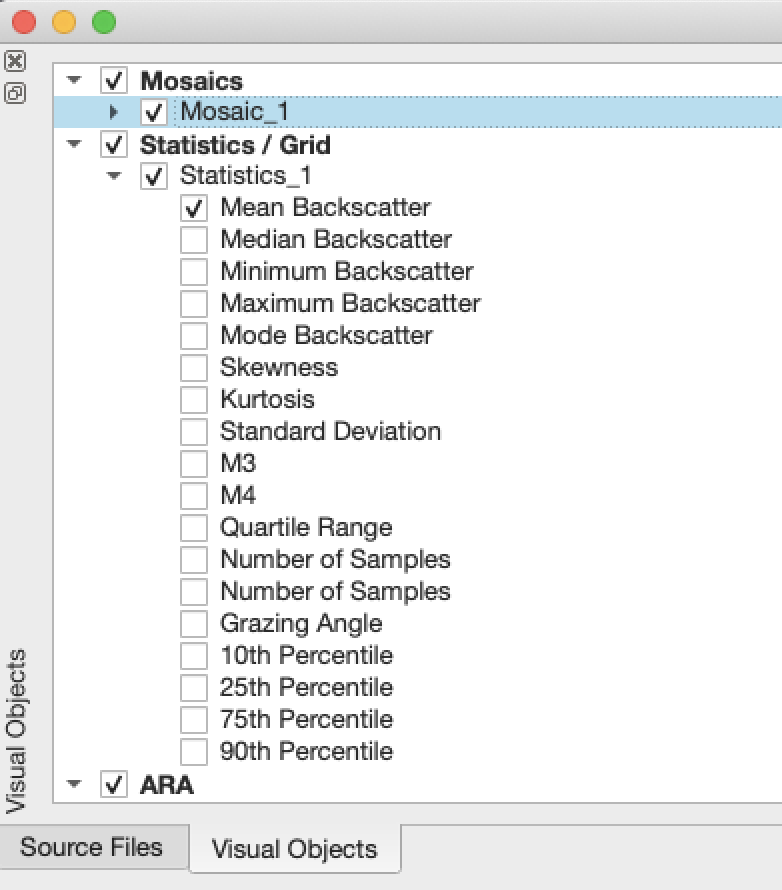
Statistics / Grid Layers
As you show one layer in the statistics / grid tree, FMGT will automatically hide the previous layer by unchecking it. FMGT will also display the histogram associated with the selected layer in the Histogram tab of the Processing Panel.
Under each ARA node are all of the ARA layers associated with that ARA object as shown in the ARA Layers figure.
As you show one layer in the ARA tree, FMGT will automatically hide the previous layer by unchecking it. FMGT will also display the histogram associated with the selected layer in the Histogram tab of the Processing Panel.
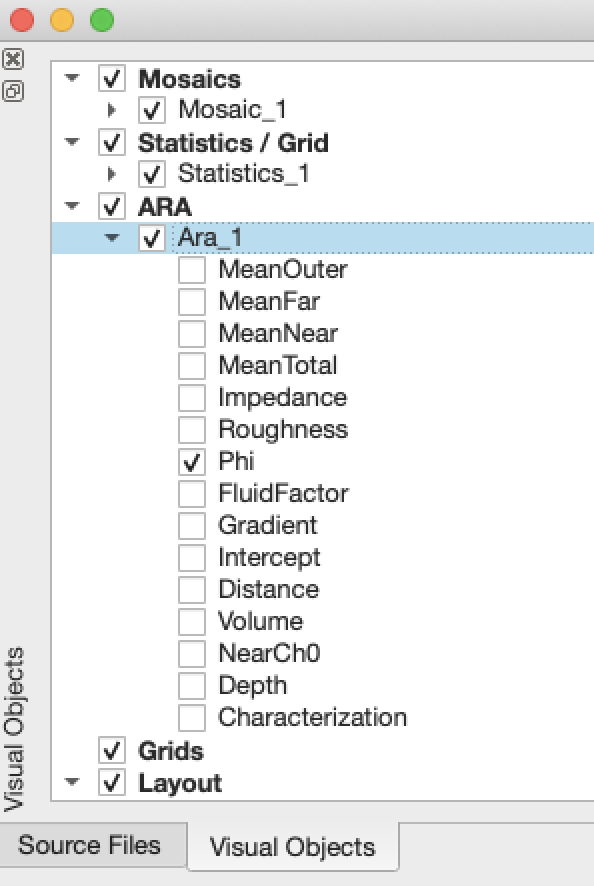
ARA Layers
Under the Grid node are all of the loaded reference grids. Each visible grid will be used during processing of sidescan data to help correct the processed backscatter. If you do not wish to use a reference grid during processing, simply uncheck it.
Reference grids are only used for visual reference when processing standard time series data using processed bathymetry.
The Layout node contains the extents of the currently defined survey area. This is typically the extents of the loaded files but can be overridden using the Settings->Survey Area menu option.
Mosaic Context Menu
Right-click on a mosaic root node, mosaic node or mosaic tile node to activate the context menu shown in the Mosaic Context Menu figure. Different components of this menu will be active based on the node level you select. During export, if the layer node is selected, all tiles will be exported with the selected filename as a prefix and "TileN" as the suffix. When selecting an individual tile, only the single tile will be exported.
The Remove option is used to remove a single mosaic from the project. The user will be prompted to confirm this action.
The Remove All option is available if you click on the root node and will remove all mosaic layers from the project. The user will be prompted to confirm this action.
The Check All option is available if you click on the root node and will check all mosaic layers in the project.
Mosaic Context Menu
The Uncheck All option is available if you click on the root node and will uncheck all mosaic layers in the project.
The Rename option is used to rename the mosaic layer.
The Load option is available if you click on a specific mosaic tile. If the tile is currently unloaded, FMGT will attempt to load the tile. If you are running a 32-bit install of FMGT, memory availability may prevent loading of a specific tile into the Map View.
The Unload option is available if you click on a specific mosaic tile. If the tile is currently loaded, it will unload the tile from the scene.
The Load Tile Layout option is available if you click on a specific mosaic layer and allows you to load the layout of that mosaic. This is an easy way to get back the tiling layout if you want to produce more mosaics using the same tiled structure.
The Mosaic Information will provide details about the mosaic layer, such as: Resolution, Width and Height (in distance units), number of Columns and Rows (in pixels), and 3-Sigma dB range (low and high).
The Refresh option is available to add or remove source files from the selected mosaic based on if they are checked or unchecked in the source files panel. The newly created mosaic will have the same processing parameters used in the creation of that specific mosaic. This provides an easy way to add or remove lines from a mosaic layer.
The Export sub-menu provides a way to export your mosaic tiles to another format.
The Grayscale Geo TIFF option exports the mosaic as a single plane GeoTIFF file. If multiple tiles have been used in the mosaic creation multiple GeoTiffs will be created representing each tile.
The Color Geo TIFF option exports a color version of the mosaic. If multiple tiles have been used in the mosaic creation multiple GeoTiffs will be created representing each tile.
The One Merged Grayscale Geo Tiff option exports a multi tiled mosaic as a single plane GeoTIFF.
The One Merged Color Geo TIFF option exports a multi tiled mosaic as a single coloured GeoTIFF.
The One Merged Floating Point Geo TIFF option exports a multi tiled as a single 32bit floating point GeoTIFF.
The Surface option launches the surface exporter dialog shown in the Surface Export Dialog figure. The mosaic surface can be exported in several formats. These include:
ASCII Z
ASCII XYZ
ArcView ASCII Grid, or
Raw binary grid
NetCDF/GMT Grid
Floating Point TIFF
QPS GRD3
When saving the data, areas of the surface containing no data may be included with the output file if the Include Missing Data option is on. If missing data is included, a special value is written for these data points, indicated by the No Data Value text field.
The precision for the Z value can also be set here.
When writing a binary file, you may specify either writing an 8-bit or 16-bit number, or a 32-bit greyscale value containing red, green, blue, and alpha components.
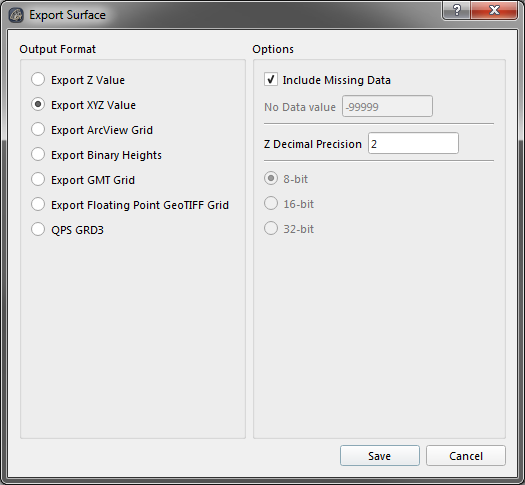
Surface Export Dialog
The Export to ArcGIS option on the sub-menu allows the user to export all tiles of a mosaic directly to an ArcGIS database. When selected, the user will be presented with the ArcGIS export dialog shown in the ArcGIS Export Dialog figure. This option is only available with the proper licensing configuration.
The Name field should contain the intended "prefix" name of the transferred raster. Since a mosaic can contain multiple tiles, it will be named as Name_Tile1, Name_Tile2, etc. If you are exporting to a folder workspace, be sure to keep the total name length under 13 characters.
If you select the 1-band option, you will export a single plane raster containing the backscatter values of the mosaic. If you select the 3-band option, you will export an RGB image of the mosaic.
The Workspace type field is used to define what workspace types are browsed by the dialog. Once a workspace is selected, the top level feature classes and datasets can be viewed in the tree view. Click OK to proceed with the export to ArcGIS.
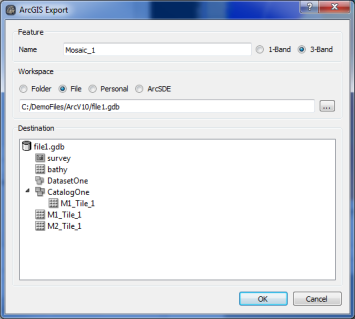
ArcGIS Export Dialog
The SD option on the sub-menu allows the user to export the mosaic to a SD layer, which can be displayed in other Fledermaus products. See Scientific Data (SD) Types.
Statistics Context Menu
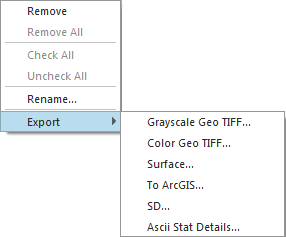
Right-click on a statistics layer or specific statistics attribute layer to activate the context menu shown in the Statistics Context Menu figure.
Statistics Context Menu
Different components of this menu will be active based on the node level you select. During export, if the layer node is selected, all specific statistic layers will be exported to the selected filename as a prefix and "layername" as the suffix. When selecting a specific layer, such as Mean, only the single layer will be exported.
The Remove option is used to remove a statistics layer from the project. The user will be prompted to confirm this action.
The Remove All option is available if you click on the root node and will remove all statistics layers from the project. The user will be prompted to confirm this action.
The Check All option is available if you click on the root node and will check all statistics layers in the project.
The Uncheck All option is available if you click on the root node and will uncheck all statistics layers in the project.
The Rename option is used to rename the statistics layer.
The Export sub-menu works just like the mosaic context menu and is described in the Mosaic Context Menu section.
The ASCII Stat Details exports the statistics as a .csv file.
ARA Context Menu
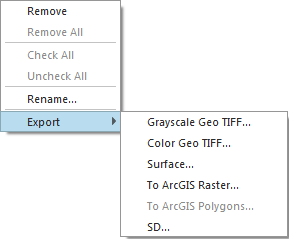
Right-click on an ARA layer or specific ARA attribute layer to activate the context menu shown in the ARA Context Menu figure.
ARA Context Menu
Different components of this menu will be active based on the node level you select. During export, if the layer node is selected, all specific ARA layers will be exported to the selected filename as a prefix and "layername" as the suffix. When selecting a specific layer, such as Classification, only the single layer will be exported.
The Remove option is used to remove an ARA layer from the project. The user will be prompted to confirm this action.
The Remove All option is available if you click on the root node and will remove all ARA layers from the project. The user will be prompted to confirm this action.
The Check All option is available if you click on the root node and will check all ARA layers in the project.
The Uncheck All option is available if you click on the root node and will uncheck all ARA layers in the project.
The Rename option is used to rename the ARA layer.
The Export sub-menu works just like the mosaic context menu and is described in the Mosaic Context Menu section.
Reference Grid Context Menu
Right-click on a reference grid layer to activate the context menu shown in the Reference Grid Context Menu figure below.

Reference Grid Context Menu
The Remove option is used to remove a reference grid from the project. The user will be prompted to confirm this action.
The Remove All option is available if you click on the root node and will remove all reference grids from the project. The user will be prompted to confirm this action.
The Check All option is available if you click on the root node and will check all reference grids in the project.
The Uncheck All option is available if you click on the root node and will uncheck all reference grids in the project.
