
Editing CUBE Hypotheses
Viewing the CUBE Hypotheses
After a CUBE PFM has been created with DMagic, the PFM file can be opened in Fledermaus using the regular method. In the PFM Attribute Panel, the CUBE surface in the PFM can be displayed by selecting Cube Flt. Surface from the Surface drop-down menu.
Select an area on the PFM surface and load 3D Editor.
Using the 3D Editor to edit Cube Hypotheses
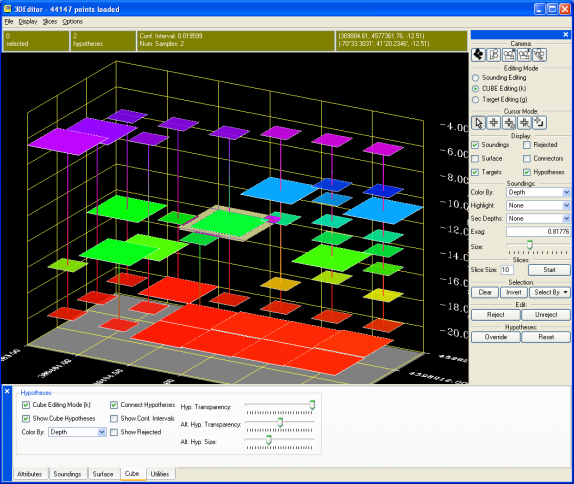
To view the Cube hypotheses in the 3D Editor, click the Cube Editing toggle, located on the upper right of the Control Bar (see figure Example of Audit File from Editing). When the Cube Editing toggle is activated, the interface of the 3D Editor will change. To indicate the editor is in a different mode, the color of the grid and the color of the status panels will change to yellow. To show the Cube hypotheses without entering Cube editing mode, click the Hypotheses toggle in the Display group.
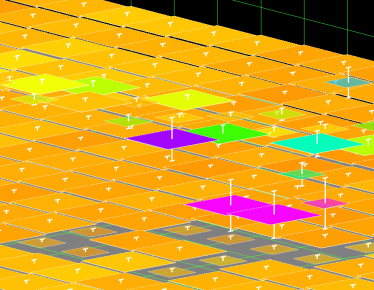
Each Cube hypothesis is represented as a flat plate, indicating the height of the hypotheses. The currently selected hypothesis is displayed as a large plate, and the alternate hypotheses are displayed as smaller plates. All of the plates in a single bin are joined by a line through their centers. To hide the soundings in the editor, disable the Soundings toggle. Clicking the Surface toggle will show the interpolated surface formed from the Cube hypotheses.
When the Cube Editing toggle is enabled, the interface changes to work on hypotheses instead of soundings (note that the 'k' key can be used to turn on or off Cube editing mode). When moving the mouse over the screen, the closest hypothesis will be highlighted and information about that hypothesis will be displaying in the status bar.
Selecting hypotheses works similar to selecting soundings. Enter any of the selection modes and single click to select a hypothesis, or click and drag to select multiple hypotheses. A hypothesis that is selected will be drawn with a solid white outline. Note that in each bin, at most one hypothesis can be selected at a time.
Editing Hypotheses with the Control Bar
The Control Bar on the right hand side changes slightly when the Cube toggle is enabled. Click the Clear or Invert buttons to modify the selected hypotheses. Clicking the Reject button will delete the hypotheses in the currently selected bins. The Unreject button will undelete hypotheses that have been deleted (click the Show Rejected toggle in the Cube Panel to view deleted hypotheses).

Control Bar in the 3D Editor when editing hypotheses
The process of marking an alternate hypothesis as the selected hypothesis is called overriding and can be accomplished by selecting alternate hypotheses and clicking the Override button. The selected hypotheses can be reset to the original hypothesis chosen by the Cube algorithm by clicking the Reset button. Overriding is usually the main editing operation when working with Cube surfaces.
Right-click Menu for CUBE Editing
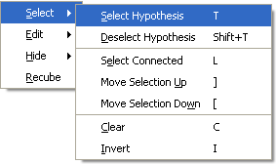
Select Menu when editing hypotheses
The right-click menu also changes when the Cube toggle is enabled. The Select menu (shown in the Select Menu when editing hypotheses figure above ) allows hypotheses to be selected, deselected, cleared, and inverted, similar to the Control Bar. The Select Connected menu option starts at the currently highlighted hypotheses and spreads out, selecting any neighboring hypotheses that are close enough in depth to their neighbors. Use the Select Connect option to select hypotheses that lie along a flat surface.
When the Move Selection Up menu option is clicked, any bins that have a hypothesis selected will have the next highest hypothesis in the bin selected. Similarly, the Move Selection Down menu option causes the next lowest hypothesis in the bin to be selected. These commands allow all of the shoal or deep hypotheses to be selected easily. For example, press 'C' then 'I' to select all hypotheses, press ']' repeatedly until the topmost hypotheses are all selected, and then press 'O' to override all the hypotheses.
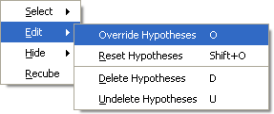
Edit Menu when editing hypotheses
The Edit menu on the right-click menu contains options similar to the Control Bar. Use the Override Hypotheses and Reset Hypotheses to select other hypotheses from a bin. The Delete Hypotheses and Undelete Hypotheses commands reject or unreject hypotheses. Note that if a selection is made, these commands apply to all of the selected hypotheses, otherwise the command is applied to the currently highlighted hypotheses.
The Hide menu is similar to the menu for editing soundings. This menu allows hiding of the selected hypotheses with Hide Selected, or hiding of the unselected hypotheses with Hide Unselected. To unhide soundings, use the Unhide All menu option.
The Recube menu option re-runs the Cube algorithm on the current area being edited. Instead of editing hypotheses, an operator may delete a set of soundings (for example, from a burst failure), and re-run the Cube algorithm to generate better quality hypotheses. The Recube algorithm can also be run from the Tools menu in the Fledermaus PFM Panel.
Cube Panel in the 3D Editor
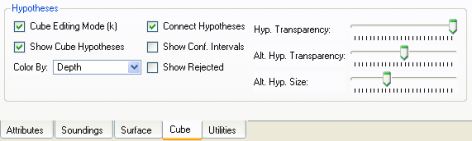
Cube Panel in the 3D Editor
A number of additional options for editing hypotheses are included on the Cube panel at the bottom of the screen. If the Cube panel is not visible, click the Options > Editor Panels menu option. The first toggle, Cube Editing Mode, is identical to the Cube Editing toggle on the upper-right area of the Control Bar. Enabling this toggle switches the interface into hypothesis-editing mode. When the Cube Editing Mode toggle is enable, the Show Cube Hypotheses is automatically enabled as well. However, the Show Cube Hypotheses toggle may be turned on by itself to just view Cube hypotheses without entering hypothesis-editing mode. This option is useful to view Cube hypotheses, but edit the soundings.
The Cube hypotheses can be colored by a number of different methods using the Color By drop-down menu. The Confidence, Num. Soundings, and Hyp. Strength options are read from the extra attributes of the bin). The Overridden option marks all bins as yellow that are set to one of the alternate hypotheses. The Color option allows coloring of the hypotheses by a solid color and the Custom option colors any bins yellow that contain a Custom CUBE Hypotheses.
By default, a line is drawn connecting all hypotheses in a bin. To hide this line, deselect the Connect Hypotheses toggle. If the Show Conf. Intervals toggle is enabled, a line representing the 95% confidence interval is displayed about each hypothesis (see the Confidence Intervals in the 3D Editor figure below). Enabling the Show Rejected toggle will display all hypotheses that have been rejected. This toggle is necessary to unreject hypotheses.
Confidence Intervals in the 3D Editor
The last three sliders in the Cube panel control how the selected and alternate hypotheses are displayed on the screen. The Hyp. Transparency slider controls the transparency of the selected hypotheses and the Alt. Hyp. Transparency slider controls the transparency of the alternate hypotheses. The sliders range from fully transparent on the far left to fully opaque on the far right. The Alt. Hyp. Size slider controls how large the alternate hypotheses are drawn. The slider value ranges from full size on the far right to hidden on the far left.
Creating a Custom Hypothesis
Sometimes an operator may wish to identify a sounding as the chosen height of the surface (this sounding is sometimes called a feature sounding or golden sounding). To accomplish this task, turn off the Cube toggle and turn on the Soundings toggle in the Control Bar. To view the Cube hypotheses at the same time as editing soundings, click the Show Cube Hypotheses toggle in the Cube Panel. While editing soundings, right-click on a sounding and select the Set Custom Hypothesis option from the menu. This action will generate a new hypothesis and place it at the same height as the sounding. The confidence interval for the created hypotheses will be the same as the confidence interval for the sounding. A custom flag called Custom Hypo. Flag will be set for the sounding. To remove the custom hypothesis, override one of the other hypotheses in the bin. Note that only one sounding in a bin can be marked as a custom hypothesis at a time.