Vertical Curtain

Introduction
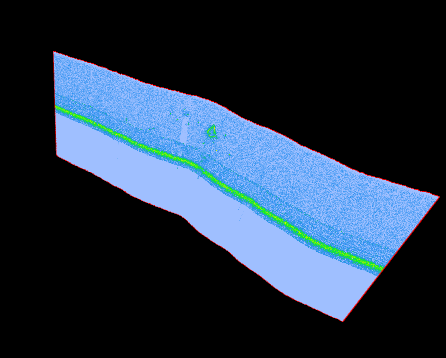
Vertical curtains are images with a fixed vertical Z range for the data. Each column of pixels is rendered at a given geospatial position. Thus the vertical imagery will follow the path given allowing the imagery to weave in and out according to the locations specified. A good example where this object type is useful is in the visualization of processed seismic or midwater imagery where the image follows the track of the ship that collected it.
Storage Format
Vertical Curtains are stored in Fledermaus in files with the .vcurtain extension.
Properties
Name | Description |
|---|---|
Column Count | The horizontal pixel count in the image. |
Row Count | The vertical pixel count in the image. |
Importing a Vertical Curtain
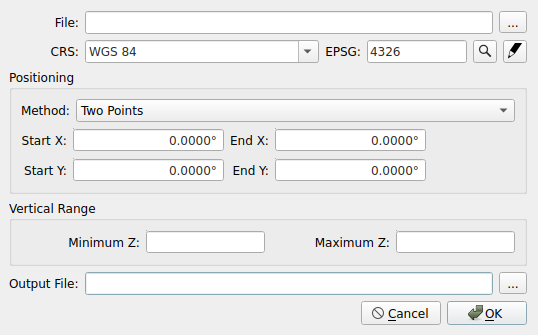
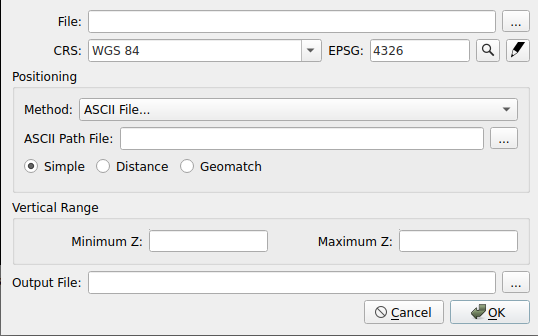
A vertical curtain or vertical image requires specific inputs on importing the image. There are two options, specified by the method option in the dialog, under Positioning. The first method is the Two Points method, whereby two coordinates in the XY plane are specified. The image is then evenly distributed in the vertical orientation between the coordinates along the image. The second method is the ASCII File method, where a file is read and applied according one of the three methods listed: Simple, Distance or Geomatch. See below for a discussion of the ASCII File method.

For the ASCII File method, there are three options as mentioned. They are:
The Simple method which evenly distributes the coordinates along the image.
The Distance method which properly distributes the points based on the relative distances between XY points listed in the file.
The Geomatch method which is similar to the Distance method, except the ASCII file of XY points must have a third parameter which forces the coordinates to be fixed to the particular pixel column specified with the remaining points evenly distributed.
To help explain how the ASCII file option works, assume we have an image to be visualized as a vertical curtain and that image has a width of 1000 pixels. To geo position the vertical curtain we need to provide a file of x and y coordinates along with a z-range. The most basic way to position your vertical curtain is to supply a file of 1000 XY coordinates, one position for each column of pixels in the input image. However, to simplify things you can provide less points and still properly geo-reference the image.
For example, if the vertical image path is a straight line you need only two XY coordinates. There are provides three modes as mentioned. The Simple mode just takes however many input (x, y) points you provide sets the first column of pixels to be at the first position given and the last coordinate to the last column of pixels and evenly distributes the other positions along the image. The Distance mode examines the distance between each point and distributes the positions to pixel columns accordingly. So for example if you gave the XY file three points and the distance between the first and second point was 50% of the distance between the 2nd and 3rd point. Then the in resulting curtain the two points would be positioned at column 333 of the 1000 column wide image and the remaining points computed accordingly. When the Geomatch option is specified and you include a third value in the input XY file matching can be more precisely controlled. For example, if an XY file like the following is provided:
400000.0 500000.0 0400050.0 500000.0 500400200.0 500000.0 1000
In this case, the third parameter specifies the column of pixels the given position should be mapped to. The second point will be the position of the 500th pixel column with the remaining points distributed accordingly even through the distance between the second two points is much greater. Given this same file with the Distance option used the second coordinate would be given to 250th pixel position instead. Note you can specify -1 as the position of the last point and the system will automatically substitute the position of the final column of pixels.
So, the stretching you see is the assignation of the pixels to the XYZ values for it, for the scene as mentioned.

Attributes

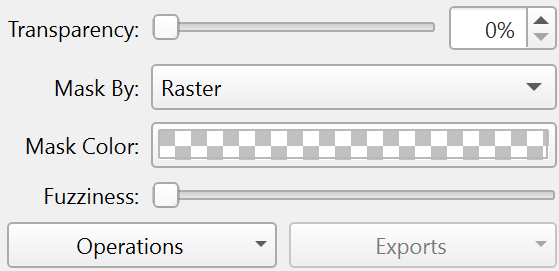
The Transparency slider allows one to have the curtain rendered with some blending of object behind the curtain based on the amount of object transparency set.
The Mask By option includes None, Color, and Raster options. When None is selected all the image's pixels are displayed. When Raster is selected any pixels in the image whose alpha value is zero will not be rendered allowing one to mask out portions of the image. An alpha value of zero means to mask (hide) the pixel, whereas the default 255 value means show the pixel. The final Color option allows for some simple dynamic masking where you can select a color and have any part of the image with the same color have its pixel hidden. This is done dynamically and does not actually modify the imagery data. For example you may have a chart which normally has a white background. The mask by Color makes it trivial to select the white background and remove it from the image displayed. To set the mask color click on the Mask Color option below the Mask By control. This will bring up a dialog to select the color and a control to pick the color from the scene if desired.
The Fuzziness slider works with the mask by color option to make it so it selects similar colors to the set mask color widening the mask selection based on the slider bars value.
Operations
Change Object Coordinate System...
While this should be very rarely needed it can be used if necessary to change the coordinate system currently applied to the object. No projection is done here you are just telling it that this new coordinate system is what the object should have been in in the first place.
Reproject Object...
Generally there are better ways to handle (re)projection work but if you really just want to convert this image into a new projection this will work. The Reproject Object option will produce a new surface by transforming the existing one into the new projection you have chosen then adds the result to the current scene.
Reproject Object To Scene...
If an object is current marked as Undisplayable in the Scene control dock this is normally because it is in a different projection than the scene is. As images don't dynamically auto-project if you want to see this object in the current scene's CRS than one can use this option. It will result in a new surface being produced that can be displayed in the current Scene.
Invert Z Imagery
This option simply inverts the imagery in the vertical plane so the bottom of the image becomes the top and vice-versa. Some packages write out the imagery reversed so this option can be used to fix it up.
Compute Mask
To mask out the black areas of the curtain, click the Compute Mask button and select the Mask Out Areas check box. Note that some VCurtains are generated with a mask so it will not have to be calculated.
Exports
The are not additional exports for the vertical curtain object.
Return to Fledermaus Visual Objects
Return to Fledermaus Reference Manual
