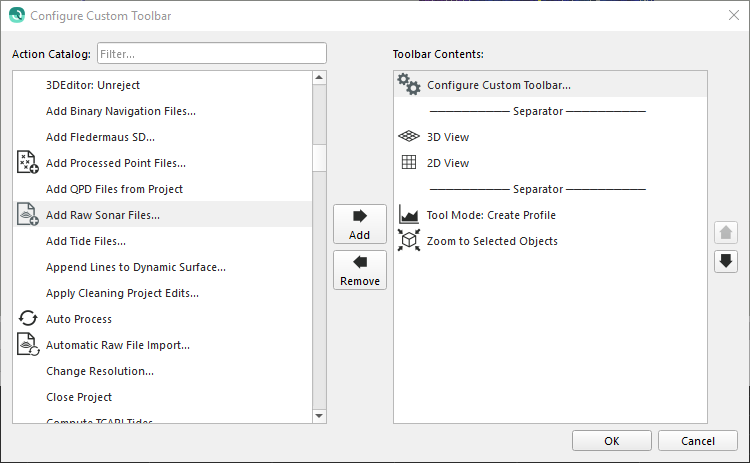
Qimera Configure Custom Toolbar Dialog
How to Start
- Configure Custom Toolbar... option of the Project menu in the Main Menu bar.
- If the Custom Toolbar is visible and the Configure Custom Tool Bar... action is added to the toolbar it can be launched by clicking the action icon.

What it Does
This dialog is used to configure items in the Custom Toolbar.
General Description
This dialog enables the customization of the Custom Toolbar by providing access to pre-determined actions. Actions can be filtered, added and removed, sorted and separated to facilitate the customization needs. All changes will be reflected in the Custom Toolbar upon completion.
Filter
The Action Catalog Filter can be used to search and narrow the list of actions.
Action Catalog
The Action Catalog list contains all available actions that can be added to the Custom Toolbar. Included as the first element in the list is a line separator that can be used for visual separation between actions.
Tool Bar Contents
The Tool Bar Contents list contains all the actions, separators and ordering that are currently applied to the Custom Toolbar.
Add
The Add button will add the selected Action in the Action Catalog list to the Tool Bar Contents list.
Remove
The Remove button will remove the selected Action from the Tool Bar Contents list.
Up/Down
The Up or Down button will move the currently selected Action in the Tool Bar Contents list in the appropriate direction. An order change in the Tool Bar Contents list will be reflected in the Custom Toolbar from Left to Right or Top to Bottom depending on the layout orientation of the Custom Toolbar.
Ok
Clicking Ok will apply the new layout as defined in the Tool Bar Contents list to the Custom Toolbar and close the dialog.
Cancel
Clicking Cancel will revert all changes.
Return to: Qimera Interface
Return to: Wizards and Dialogs

