
Qimera Export Soundings to ASCII Dialog
How to Start
- to ASCII... option of the Export→Raw Sonar File sub-menu of the Main Menu toolbar.
- to ASCII... option of the Export→Processed Point File sub-menu of the Main Menu toolbar.
- to ASCII... option of the Source→Export sub-menu when selecting a file in the Project Sources window.
What it Does
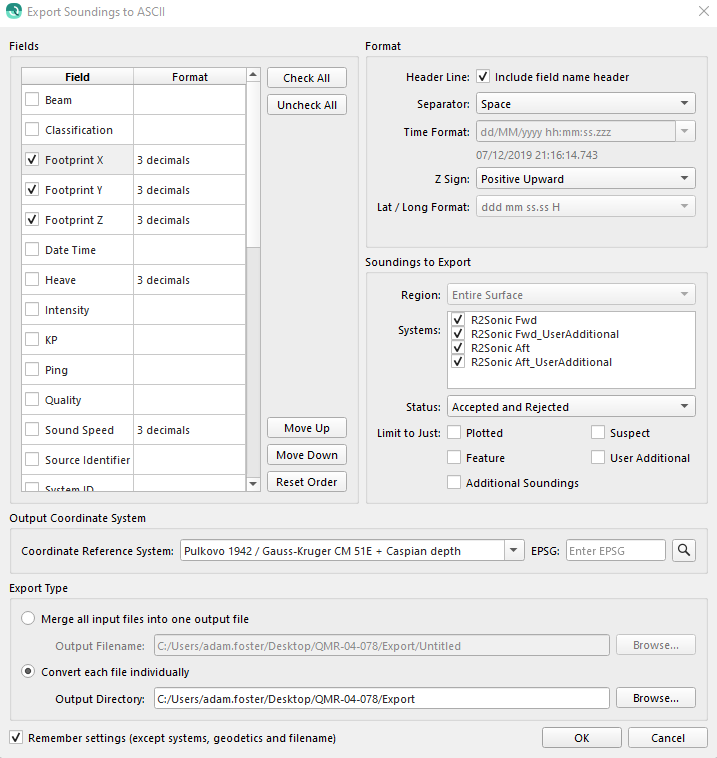
This dialog is used to Export Soundings to ASCII format with user configurable fields.
General Description
This dialog can be used to export user configurable ASCII files on a per file basis or merged into a single dataset. If you have created a dynamic or static surface and selected an area in the main work area you can limit the export to that region.
Fields
Each field can be enabled or disabled by clicking the checkbox for the corresponding item. The fields can be moved by selecting the desired field and using the Move Up and Move Down buttons. Global checking and unchecking can be performed using the corresponding buttons Check All and Uncheck All. The initial ordering of the Fields List is alphabetical and can be re-applied using Reset Order button. The format column allows for selection of how many decimal places of precision will be displayed in the export file. To edit this, double click on the cell and use the spinbox to set the value. If the output coordinate system is geographic then X and Y fields will have their format column disabled. They will instead be formatted according to the latitude / longitude combobox. X fields will map to longitude and Y fields will map to latitude. Once selection and ordering are completed the configuration can be saved by checking the Remember Settings checkbox and clicking Ok. This configuration will automatically be loaded when the dialog is launched.
Format
Selecting the Header Line checkbox will result in the final output file containing a header reflecting the selection in the Fields Group. The header text will be preceded by '#' and include the selected Separator between the fields.
The Separator combobox allows the user to choose from a pre-set list or enter a custom, single character, separator. When selecting the Custom option a Textfield is displayed allowing the user to enter their desired separator.
The Time Format can be modified when the Date Time field is selected in the Fields list. There are several predefined formats that can be selected or the user can enter their own format in the combobox. An ASCII example of the selected format output is displayed below the Time Format combobox. The Time Format expression can be separated by any ASCII character the user chooses. The last used Time Format will be saved and loaded by default when the user selects 'OK' to start the export.
The following formatting options can be used when manually creating a Time Format;
| Expression | Output |
|---|---|
| h | the hour without a leading zero (0 to 23 or 1 to 12 if AM/PM display) |
| hh | the hour with a leading zero (00 to 23 or 01 to 12 if AM/PM display) |
| m | the minute without a leading zero (0 to 59) |
| mm | the minute with a leading zero (00 to 59) |
| s | the second without a leading zero (0 to 59) |
| ss | the second with a leading zero (00 to 59) |
| z | the milliseconds without a leading zero (0 to 999) |
| zzz | the milliseconds with leading zeros (000 to 999) |
| AP or A | AM/PM display (upper-case) |
| ap or a | am/pm display (lower-case) |
| Expression | Output |
|---|---|
| d | the day as number without a leading zero (1 to 31) |
| dd | the day as number with a leading zero (01 to 31) |
| ddd | the abbreviated day name (Mon to Sun) |
| dddd | the full day name (Monday to Sunday) |
| M | the month as a number without a leading zero (1-12) |
| MM | the month as a number with a leading zero (01-12) |
| MMM | the abbreviated month name (Jan to Dec) |
| MMMM | the full month name (January to December) |
| yy | the year as two digit number (00 - 99) |
| yyyy | the year as a four digit number (2018) |
The Z Sign combo box allows you to choose the positive direction of z-axis values.
Soundings to Export
The Region combo box can be used to select either the full area or a selected area to export. This combo box will be disabled if no selection is made prior to launching the dialog and will default to the full area of the selected source item(s).
The Systems list can be used to refine your export selection in cases where source files have multiple data collection systems. Systems can be enabled for export by checking the system in the list.
The Status combo box can be used to refine your selection based on only Accepted, Rejected or both Accepted and Rejected soundings.
The Limit to Just checkboxes can be used to refine the selection to only the selected flags. Multiple flags can be selected for export.
Output Coordinate System
The output coordinate system allows the user to change the coordinate system that the resulting output will be referenced to. By default the project system will be set on launch. If a geographic coordinate system is selected, X and Y fields will have their format column disabled in the table. The latitude / longitude combo box and example label will then be enabled.
Export Type
If multiple files are selected for export these can be merged into one single export file using the Merge radio button or written to individual files using the Convert each file individually radio button. Folders and files can be created using the corresponding browse buttons or entering text into the fields following your operating system convention.
Remember Settings
The Remember Settings checkbox can be used if you want the dialog to continue to launch with your current settings. It should be noted that Systems, Output Coordinate System and filenames will not be remembered.
Return to: (2.6) Qimera Interface#qimerainterface
Return to: Wizards and Dialogs