QPA Developer Guide
QPS Plugin Architecture
(QPA)
Developer Guide
Extending the capabilities of the Fledermaus Suite of Tools
Version 1.0 (Qt 4.7.X)
Introduction
Readers of this document are expected to be familiar with software development on Windows, Mac and Linux platforms and to understand the fundamentals of C++ as well as the development tools used on each platform (i.e. Visual Studio, XCode, etc.). This document will cover the general interface specification as well as some examples on how to write a plugin. Samples will be done on the Windows platform with platform specific examples done in following appendices.
Requirements to build plugins
You need C++ compiler (Visual Studio 2008, gcc (Mac), gcc (Linux), the public install of Qt v4.7.X and the QPS Plugin SDK. Please see Chapter 10 for installation guidelines on setting up your development environment. Webinars are also available for environment configuration as well as plugin creation.
What is a plugin?
In computing, a plugin (or plug-in) is a set of software components that adds specific abilities to a larger software application. If supported, plugins enable customizing the functionality of an application. Well known examples of plugins are the Adobe Flash Player, the Adobe Photoshop SDK, QuickTime and Microsoft Silverlight. (wiki).
Plugins allow individual organizations to add their own set of proprietary capabilities to an existing application. These capabilities can then be used internally, sold publicly, freely distributed or provided to QPS for replication across all platforms and delivery as a standard component of the Fledermaus install. Any scenario is possible and the client has complete control on what they wish to do with their capabilities.
What makes plugins powerful?
Plugins are powerful in that they can instantly add capability to an installed application. Simply shutdown the application, install the plugin into the applications "plugins" folder (as simple as a file copy), restart the application and new the new functionality is instantly available for use.
How is it delivered?
The QPS Plugin Architecture (QPA) is delivered as a set of C++ include files that define the virtual interface. There are no additional libraries to link. The QPA is intended to be publicly distributed and at this time, no fee is charged for its use. The user is also required to install the public distribution of Qt which is required to build the plugins.
Version 1.0 of the QPA is for the development of plugins targeting FMMidwater, FMGT and the generic bathymetric file parsing capability used by Fledermaus and DMagic in the construction of PFMs and grids.
How are QPS plugins implemented?
QPS plugins are developed in a C++ environment using "thin" pure virtual interface classes. The plugins are compiled as a DLL and named according to their target environment. At runtime:
- The application enumerates a list of potential plugins from a specified directory
- The application interrogates each plugin for the expected plugin interface instance
- Validated plugins are then "connected" to the appropriate locations within the application GUI.
In a normal scenario, a plugin is loaded by a "host", typically an application that employs a communication interface to interact with the plugin as shown in Figure 1. 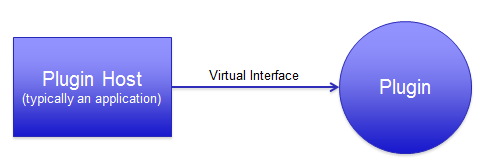
Figure 1 – Single Direction Communication
This is an example of simple single direction communication. The hosting object makes calls to the plugin (i.e. Execute()) but in this scenario, the plugin has no means to communicate or request information from the hosting application.
This type of plugin is perfectly reasonable as it may provide capabilities based on resources outside of the scope of the application. This interface will provide information about the plugin such as type, name, organization and status that can be used by the hosting application for display within the primary GUI.
The architecture that the QPA employs in Figure 2 involves bi-directional communication, where the plugin has the ability to request resources and information from the application. For example the plugin could request the currently selected line, the current ping, or do more sophisticated operations such as file decoding and coordinate transformation. 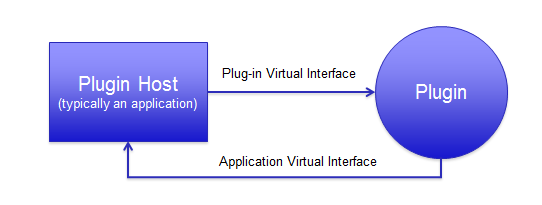
Figure 2 - Bi-Directional Communication
Interface Architecture
The plugin interface architecture shown in Figure 3 provides the mechanism of communication between the plugin and its host. This example shows the interface for the FMMidwater tool, but each application supported by QPA has its own specific application and plugin interface derived class. 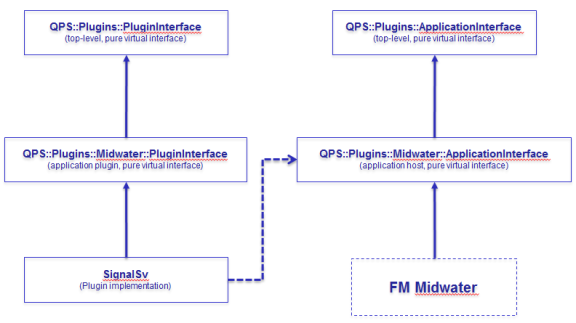
Figure 3 - Interface Architecture
If you are creating a plugin for a specific application such as FMMidwater, you must derive your plugin class from the Midwater specific PluginInterface class. All class types within the QPA use namespaces to reduce potential naming collisions. For the QPA, the primary namespace is QPS::Plugins. There are other namespaces exposed by the interface specification but these will be discussed later.
Plugin Extensions
When compiling plugins, the build environment assigns the proper 2 part extension in order for the applications of the FM Suite to know which plugins to load.
The first part of the plugin extension indicates the operating system environment. Possible choices are win32, win64, mac32, mac64, lin32, lin64. The second part of the extension indicates the plugin type. Possibilities are sh_plugin (shared tool), mw_plugin (FMMidwater), gt_plugin (FMGT) and sf_plugin (SF Parser).
Quick Start Guide
For this example, we will use the Windows environment to build a simple shared tool plugin.
Step 1 – Copy the template
Make a copy of the sh_template plugin directory located in the SDK\plugins\shared folder. Rename this folder to sh_myplugin.
Step 2 - Renaming the .pro file
Rename the sh_template.pro file to sh_myplugin.pro.
Step 3 – Change the makefile name
If you want to later build this plugin on the mac, open the Makefile and change sh_template to sh_myplugin at the top fo the file.
Step 4 – Creating the project
Open a Qt command prompt window and change directories to your sh_myplugin directory. At the command prompt type:
qmake –t vclib
This will create the .vcproj file for loading into Visual Studio 2008. Start Visual Studio and load that project now.
Step 5 - Edit the plugin.h file
There are a few simple changes you need to make to the primary header file. First, change the return value of DLLName() to be "sh_myplugin". Next change the return value for the Name() method to be "Demo Plugin". Finally, change the return value of the Organization() method to be "Acme".
Step 6 - Edit the plugin.cpp file
Go to the bottom of the file and change the sh_template parmeter in the _Q_EXPORT_PLUGIN2_ macro to be sh_myplugin. Next, go to the Execute() method and add the following line:
m_applicationInterface->InfoMsg("This is the plugin!", NULL);
Step 7 - Compile the plugin in release mode
Compile the plugin as a released DLL. FM Suite applications will not load plugins built in debug mode. You need to debug using either the TestHarness application or by running the FM application from the command line with the -debug" option and include VaDebug(…) calls in your plugin.
Step 8 - Copy the plugin
You must copy the compiled plugin to the Fledermaus installation bin\plugins folder. Another option is to edit the SDK\plugins\external_destdir.pro file such that the destination of your compiled plugins is targeted for the bin\plugins folder of your local install. Know that if your plugin has errors, it could prevent some FM Suite applications from running.
Step 9 – Run FMMidwater
When FMMidwate is run, you will see your plugin under the Tools menu as shown in Figure 4. When you activate it, you will see the Info Dialog as shown in Figure 5. 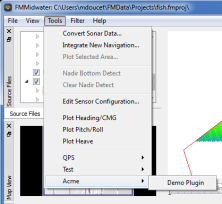
Figure 4 - Acme Shared Tool Plugin 
Figure 5 - Acme Shared Tool Dialog
FMMidwater Plugins
Plugin Types
FMMidwater allows users to build 8 different midwater specific plugin types as well as the shared tool type. The type of the plugin determines how the plugin will manifest in the FMMidwater GUI. At runtime, FMMidwater enumerates all plugins with the extension "mw_plugin" or "sh_plugin" and connects them to the appropriate location in the GUI.
Import
Import plugins are used by FMMidwater to bring data into your project for processing. The import plugin allows you to transform custom data into a format supported by FMMidwater. For example, you could create a custom navigation importer that converts your navigation data into one of the formats supported by PIO (See QPA Reference Manual). Plugins of this type are called using the standard Execute() method.
Import plugins appear under the File->Import menu of FMMidwater as shown in Figure 6. 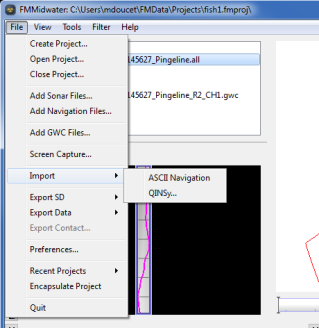
Figure 6 - Import Plugin
CustomTool
Custom tool plugins connect to the GUI in the same way as SharedTool plugins do, with the primary difference being that they have the interface capabilities of the Midwater::ApplicationInterface as opposed to the lower level QPS::ApplicationInterace. CustomTool plugins can run modal or modeless and have the capability of reacting to changes in project file focus as well as time slider udpates. A sample of a custom tool that reacts to time slider updates can be found in SDK\plugins\mw\mw_timeDisplay. This plugin display a clock that changes time when the FMMidwater slider changes. The result can be seen in Figure 7. Plugins of this type are called using the standard Execute() method. 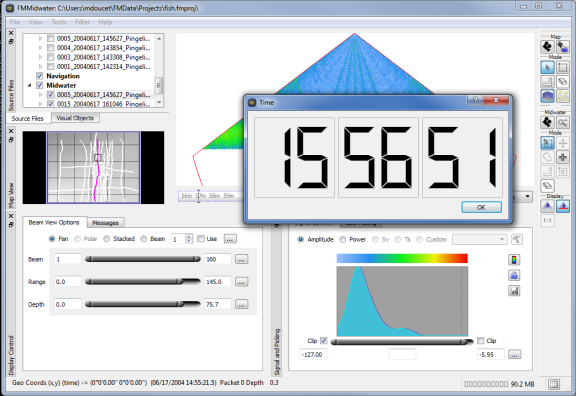
Figure 7 - Time Bar Plugin
To react to time changes, the plugin must contain the following method as defined in the Plugin.h file:
public slots:
void timeSliderChangedSL(double t);
To react to changes in file focus, the plugin must contain the following method as defined in the Plugin.h file:
public slots:
void fileFocusChangedSL(QString filename);
ExportSD
These plugin types allow the user to export SD objects from FMMidwater. This type of plugin is currently only supported by QPS. In a later release of the Plugin Specification, plugins will be able to create SD objects dynamically. Plugins of this type appear under the File->Export SD menu of FMMidwater. Plugins of this type are called using the standard Execute() method.
ExportData
These plugin types allow the user to export generic data from FMMidwater. An example would be if the user wanted to export currently selected water column targets as ASCII x, y, z, amplitude records. Plugins of this type appear under the File->Export Data menu of FMMidwater as shown in Figure 8. Plugins of this type are called using the standard Execute() method. 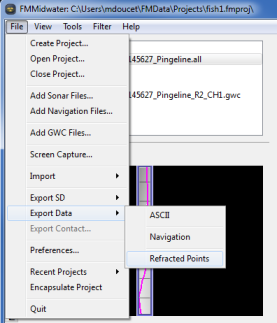
Figure 8 - Export Data Plugin
SourceContextMenu
These plugin types appear in the right-click menu of the Sensor node in the Source Files tree view. When the plugin is called, it can use the GetSelectedLineName() of the Midwater::ApplicationInterface to determine which line is active. Plugins of this type are called using the standard Execute() method.
NavContextMenu
These plugin types appear in the right-click menu of the Navigation node in the Source Files tree view. When the plugin is called, it can use the GetSelectedLineName() of the Midwater::ApplicationInterface to determine which line is active. Plugins of this type are called using the standard Execute() method.
GWCContextMenu
These plugin types appear in the right-click menu of the Midwater node in the Source Files tree view. When the plugin is called, it can use the GetSelectedLineName() of the Midwater::ApplicationInterface to determine which line is active. Plugins of this type are called using the standard Execute() method.
SignalConvert
These plugin types appear in the Custom combo box on the Signal Options tab of the Signal and Picking dockable widget as shown in Figure 9. 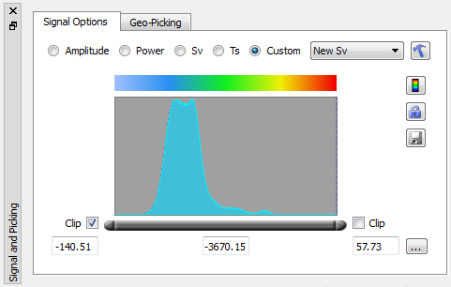
Figure 9 - SignalConvert Plugin
The hammer icon to the right of the combo box will activate the plugin's settings dialog box by calling the ShowPreferences method of the base plugin class. The plugin can use this to display a settings dialog which then persists these values to disk for later use. Plugins of this type are called using the ConvertSignal() method.
FMGT Plugins
Plugin Types
FMMidwater allows users to build 13 different GeoCoder Toobox specific plugin types as well as the shared tool type. The type of the plugin determines how the plugin will manifest in the FMGT GUI. At runtime, FMGT enumerates all plugins with the extension "gt_plugin" or "sh_plugin" and connects them to the appropriate location in the GUI. Plugins of this type are called using the standard Execute() method.
Import
Import plugins are used by FMGT to bring data into your project for processing. The import plugin allows you to transform custom data into a format supported by FMGT. For example, you could create a custom sonar format reader that would create new GSF files then add them to the project.
Import plugins appear under the File->Import menu of FMGT as shown in Figure 10. 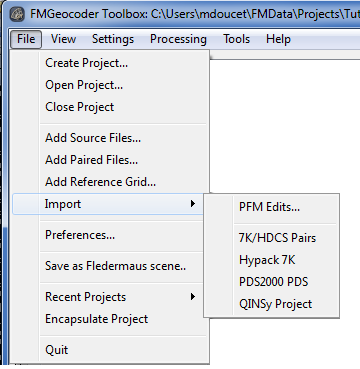
Figure 10 - Import Plugin
SourceContextMenu
These plugin types appear in the right-click menu of the Source node in the Source Files tree view. When the plugin is called, it can use the GetSelectedLineName() of the GeocoderToolbox::ApplicationInterface to determine which line is active. Plugins of this type are called using the standard Execute() method.
MosaicContextMenu
These plugin types appear in the right-click menu of the Mosaics node in the Visual Objects tree view. When the plugin is called, it can use all of the Mosaic*()_ methods defined by the GeocoderToolbox::ApplicationInterface to do mosaic specific processing. Plugins of this type are called using the standard Execute() method.
StatisticContextMenu
These plugin types appear in the right-click menu of the Statistics node in the Visual Objects tree view. When the plugin is called, it can use all of the Statistics*()_ methods defined by the GeocoderToolbox::ApplicationInterface to do statistic specific processing. Plugins of this type are called using the standard Execute() method.
ARAContextMenu
These plugin types appear in the right-click menu of the ARA node in the Visual Objects tree view. When the plugin is called, it can use all of the Statistics*()_ methods defined by the GeocoderToolbox::ApplicationInterface to do ARA specific processing. Plugins of this type are called using the standard Execute() method.
CustomTool
These plugin types appear under the Tools menu of FMGT. Custom tools can run Modal or Modelss and can react to changes in file focus. Plugins of this type are called using the standard Execute() method.
To react to changes in file focus, the plugin must contain the following method as defined in the Plugin.h file:
public slots:
void fileFocusChangedSL(QString filename);
Processing
These plugin types appear in the Process Configuration dialog of FMGT as shown in Figure 11. They become part of the standard processing pipeline. Since they are part of the primary processing pipeline, they also get the advantages of FMGT's multi-core processing architecture. These are powerful plugins are they allow the user to change specific stages of the FMGT processing pipeline. There are 7 distinct stages that can be configured by the user. This configuration is saved in the current project and will persist until the configuration is reset. 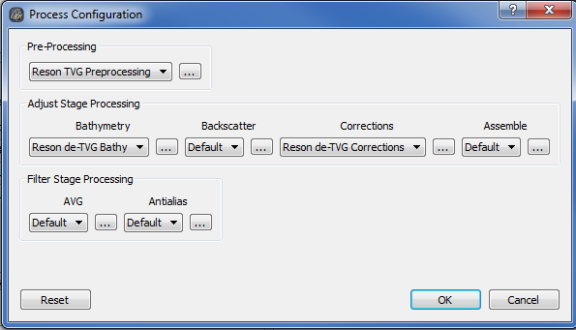
Figure 11 - Processing Configuration Dialog
Every available plugin of a particular type will appear in the specific combo-box. The plugin can also provide its own configuration dialog which is activated by the "…" tool button next to each combo-box. This will call the ShowPreferences() method of the base Plugin interface.
Each processing plugin executes on a PluginProcessingParmaters data structure that is passed in from FMGT. This structure will have the appropriate components loaded according to the type of files being processing (.ALL or .GSF). FMGT will do all the loading of the appropriate data and the plugin does all of the processing.
PreProcess
These plugin types allow for pre-processing to be done in a custom pipeline. They will appear in the Pre-Processing combo-box and are activated by the Execute_PreProcess() method of the GeocoderToolbox::PluginInterface.
ProcessBathy
These plugin types allow for the bathymetry processing stage to be performed in a custom pipeline. They will appear in the Bathymetry combo-box and are activated by the Execute_ProcessBathy() method of the GeocoderToolbox::PluginInterface.
ProcessImagery
These plugin types allow for the imagery processing stage to be performed in a custom pipeline. They will appear in the Backscatter combo-box and are activated by the Execute_ProcessImagery() method of the GeocoderToolbox::PluginInterface
ProcessCorrections
These plugin types allow for the corrections processing stage to be performed in a custom pipeline. They will appear in the Corrections combo-box and are activated by the Execute_ProcessCorrections() method of the GeocoderToolbox::PluginInterface..
ProcessAssemble
These plugin types allow for the assemble processing stage to be performed in a custom pipeline. They will appear in the Assemble combo-box and are activated by the Execute_ProcessAssemble() method of the GeocoderToolbox::PluginInterface.
ProcessAVG
These plugin types allow for the Angle Varying Gain processing stage to be performed in a custom pipeline. They will appear in the AVG combo-box and are activated by the Execute_ProcessAVG() method of the GeocoderToolbox::PluginInterface.
ProcessAntialias
These plugin types allow for the Antialias processing stage to be performed in a custom pipeline. They will appear in the Antialias combo-box and are activated by the Execute_ProcessAntialias() method of the GeocoderToolbox::PluginInterface.
SF Plugins
Plugin Types
SF plugins are used by all FM Suite gridding operations. This includes the building of PFMs as well as Sonar DTM grids. An SF plugin is built to support a particular data file extension. These plugins then stream bathymetric soundings to the FM Suite application and can Unload bathymetry edits back to the source file if desired. An example of this type of plugin is included in the SDK and can be found in the SDK\plugins\sf\sf_readerDEMO folder.
These plugins do not manifest in additional GUI elements but are instead integrated into the FM Data Gridding Wizard. If you click on the Configure button of the Wizard, you will see the Fields and Flags definitions for the plugin as shown in Figure 12. 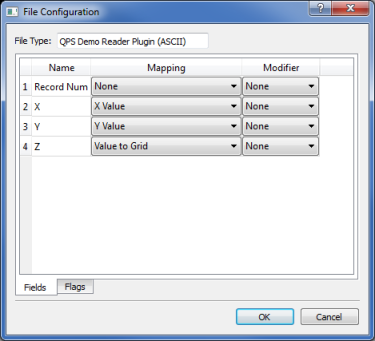
Figure 12 - SF Plugin Configuration
Shared Plugins
Plugin Types
Shared plugins consist of only the SharedTool type that is used by all FM Suite applications supporting plugins. These plugins will appear under the Tools menu of the application as shown in Figure 13 and Figure 14. If you wish to create a shared tool plugin, simply build a plugin that adheres to the base plugin interface. An example of this plugin type is provided in the SDK\plugins\sh\sh_template folder. Notice that the same plugin list appears in both menus. All of the 6 listed plugins are of type QPS::Plugins::PluginInterface::eSharedTool. 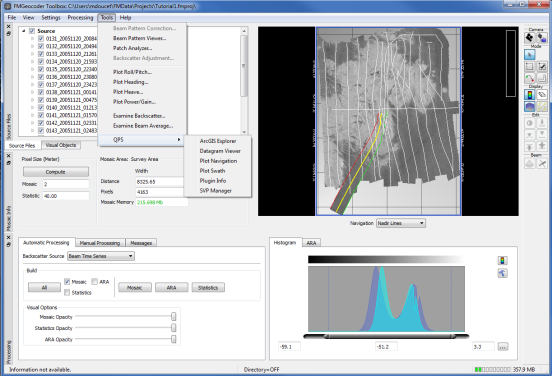
Figure 13 - Shared Tools Plugin (FMGT) 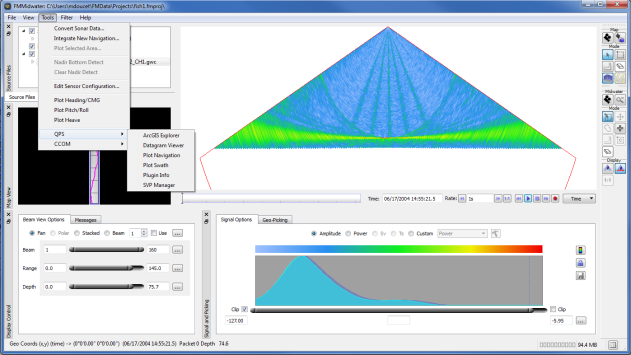
Figure 14 - Shared Tool Plugins (FMMidwater)
Building Plugins
The xx_plugin.pro file
Every plugin is configured for compilation by its .pro file. The .pro file determines what will be included in your plugin. It also determines the type of plugin you will be building (Shared, FMMidwater, FMGT, SF) based on the inclusion of one of the following plugin scripts:
plugin_mw.proFMMidwater Plugin
plugin_gt.pro FMGT Plugin
plugin_sf.pro SF Parser Plugin
plugin_sh.proShared Tool Plugin
To start building a custom plugin, first follow steps 1 and 2 of the Quick Start Guide. Then open your xx_myplugin.pro file in a text editor (Visual Studio). Listed below are the potential areas you may wish to modify for your plugin.
INCLUDEPATH
This directive allows you to add additional include directories where you may have code you want to include in your plugin. These paths will be used to modify the Additional Include Directories part of the C/C++ Configuration panel of the Visual Studio Project Property Pages dialog.
INCLUDEPATH += ../../myCode ../../myLibs/headers
DEFINES
This directive allows you to add preprocessor #defines to your project. These options will show up in the Preprocessor part of the C/C++ Configuration panel of the Visual Studio Project Property Pages dialog.
DEFINES += USE_MY_DEMO_CODE
HEADERS
This is where you list your header files for the classes you want to include in your plugin. If you wish to put one header file per line, simply add the "\" character at the end of the line. These files will appear in the Header Files sub-folder in your Solution Exporer window.
HEADERS += ../../myCode/MathWiz.h
SOURCES
This is where you list your source files for the classes you want to include in your plugin. If you wish to put one source file per line, simply add the "\" character at the end of the line. These files will appear in the Source Files sub-folder in your Solution Exporer window.
SOURCES += "../../MathWiz.cpp
QMAKE_LIBDIR
This is where you can specify additional library directories for linking your plugin. The paths will appear in the General section of the Linker panel of the Visual Studio Project Property Pages dialog.
QMAKE_LIBDIR += ../../myLibs/Release
LIBS
Define additional libraries to link with this directive. These libraries will appear in the Input section of the Linker panel of the Visual Studio Project Property Pages dialog.
LIBS += myGenericUtils.lib
Windows Compilation
Once all of your edits are complete, open a Qt command prompt window, change to your plugin directory and type:
qmake –t vclib
This will create the .vcproj file that you can open with Visual Studio and compile.
Mac/Linux Compilation
If you are on the Mac or Linux platform, open a terminal window, change to your plugin directory, and simply type:
make
Platform Configuration
Windows 32-bit Environment
Configuring the Environment
- Install Visual Studio 2008. Be sure to install the 64-bit C++ compiler on the custom options page.
- Install Visual Studio 2008 Service Pack 1.
- Download the open source Qt: (Make sure you use a 4.7.1 or 4.7.x version)
- http://get.qt.nokia.com/qt/source/qt-win-opensource-4.7.1-vs2008.exe
- Run the Qt setup.
- Go into the Qt/4.7.1/bin directory and open the qtvars.bat file.
- Right after the line echo – QMAKESPEC set to "win32-msvc2008", add the following
- set CPU=x86
- Go into the Qt/4.7.1/mkspecs/win32-msvc2008 directory and open the qmake.conf file
- For the line: QMAKE_CFLAGS = nologo -Zm200 -Zc:wchar_t
- Change it to: QMAKE_CFLAGS = -nologo -Zm200
Building Plugins
- Install the latest 32-bit Fledermaus (v7.3.2 and up)
- Create a directory to unzip the plugin SDK into (a place to build your plugins)
- Unzip the files into the target directory
- Open the "external_destdir.pro" file in the QPS_PluginSDK\plugins directory and edit the path to match where you want your built plugins to go.
- From the start menu, open the Qt Command Prompt window. *NOTE: You cannot use a standard command prompt for the next step!
- Change directories into the QPS_PluginSDK\plugins\shared\sh_datagramViewer directory.
- At the command prompt, type: qmake –t vclib
- This will build the plugin project file (*.vcproj)
- Run Visual Studio 2008 as administrator if your target path in step 4 is the Fledermaus install directory. If not, you can run normally.
- Open the project file built by step 7 (sh_datagramViewer.vcproj).
- Build the plugin in Release mode
- If needed, move the built plugin to the Fledermaus install directory /bin/plugins folder. Plugins end in extensions such as gt_plugin, mw_plugin, sw_plugin.
- Run FMGT or FMMidwater. You will see the plugin appear at the bottom of the Tools menu in a sub-menu titled "QPS".
- Congratulations, your environment is properly set up!
Debugging Plugins with Visual Studio 2008
- You need to request the "D" versions of the executables that use the debug Qt libraries along with the Debug Qt DLLs.
- Place these into your Fledermaus installation bin folder.
- Open your plugin project in Visual Studio
- Right click on you project and select Properties
- Go to the Debugging section and select the appropriate 'D' version executable as the Command using the Browse option from the dropdown.
- Run your solution. The 'D' executable will now run and load your project if it is built into the Fledermaus/bin/plugins folder.
Mac Environment
Configuring the Environment
- Insert the Mac OS X 10.6 Snow Leopard install disk in the CD/DVD drive
- Select the Optional Installs folder and run the Xcode Installer
- Select all of the default options and install
- If you installed XCode 4 from the App Store, you will not have the required 10.5 SDK installed. To accomplish this, see the instructions from: http://stackoverflow.com/questions/5378518/how-to-add-base-sdk-for-10-5-in-xcode-4
- Download the open source Qt: (Make sure you use version 4.7.1 or 4.7.x) from http://download.qt.nokia.com/qt/source/qt-everywhere-opensource-src-4.7.1.tar.gz
- Unzip the tar.
- In the Users/Username folder, create/edit the ' .profile' file and add the following lines
- Add the following lines:
export HOSTMACHINE="mac32"
export IVSOSXSDK="/Developer/SDKs/MacOSX10.5.sdk"
export MACOSX_DEPLOYMENT_TARGET="10.5"
export QMAKESPEC="macx-g++"
- Open a new terminal window
- Change directories to where you unzipped Qt (User/username/Downloads)
- Configure Qt using the following command: configure -release -fast -no-qt3support -carbon -sdk /Developer/SDKs/MacOSX10.5.sdk
- After the configure step, you will be prompted to select commercial or open source; select open soruce and agree to the license
- Now type: make
- After the make completes (hours), type: sudo make -j1 install
- Install the latest Fledermaus
- Go to the Qt install directory: cd usr/local/Trolltech/Qt-4.7.1
- You now need to copy the Fledermaus Qt frameworks over the ones installed by the Qt install step
- Make a copy of the lib directory (to tlib): sudo cp –r lib tlib
- Change to the lib director: cd lib
- Copy over the Fledermaus frameworks: sudo cp –r /Library/Application Support/IVS7/Frameworks/ .*
- Finally, add the following to your '.profile' file:
export QTHOME="/usr/local/Trolltech/Qt-4.7.1"
PATH="$QTHOME/bin:$PATH"
export PATH
- Restart a new terminal window and type: qmake -v
- You should see: Using Qt Version 4.7.1 in /Library/Frameworks
- Change directories to: cd /Developer/SDKs/MacOSX10.5.sdk/usr/include
- Create a necessary symbolic lin: sudo ln –s /Developer/SDKs/MacOSX10.5.sdk/System/Library/Frameworks/OpenGL.framework/Headers GL
NOTE*: If you need to uninstall Qt on the mac, from a terminal window use:
sudo /Developer/tools/uninstall-qt.py
Building Plugins on the Command Line
- Open a terminal window
- Change directories to where the QPA_SDK\plugins
- Edit the file 'external_destdir.pro' (open –e external_destdir.pro)
- Change the unix destir to be:
DESTDIR = "/Library/Application Support/IVS7/plugins"
- Change to the 'shared/sh_template' directory
- Type: make
- This will build a simple shared tool
- Start the FMMidwater tool
- Under the tools menu, you should see an 'Acme' sub-menu with the entry 'Demo Plugin'
- After activation, you should see a simple dialog box.
- Congratulations, your environment is properly set up!
Debugging Plugins With Xcode
- In order to build under Xcode, you need to ensure that the Qt headers files can be seen. Due to a bug in the Qt installer, you may need to create symbolic links to the header files
- Go to the Qt install directory: cd usr/local/Trolltech/Qt-4.7.1
- Change to the include directory. If you only have the QtUiTools folder, you will need to create the following symbolic links.
sudo ln –s ../tlib/QtCore.framework/Headers QtCore
sudo ln –s ../tlib/QtGui.framework/Headers QtGui
sudo ln –s ../tlib/QtSql.framework/Headers QtSql
sudo ln –s ../tlib/QtOpenGL.framework/Headers QtOpenGL
sudo ln –s ../tlib/QtXml.framework/Headers QtXml
If needed, you can create this other symbolic links:
sudo ln –s ../tlib/QtDeclarative.framework/Headers QtDeclarative
sudo ln –s ../tlib/QtDesigner.framework/Headers QtDesigner
sudo ln –s ../tlib/QtHelp.framework/Headers QtHelp
sudo ln –s ../tlib/QtMultimedia.framework/Headers QtMultimedia
sudo ln –s ../tlib/QtNetwork.framework/Headers QtNetwork
sudo ln –s ../tlib/QtScript.framework/Headers QtScript
sudo ln –s ../tlib/ QtScriptTools.framework/Headers QtScriptTools
sudo ln –s ../tlib/QtSvg.framework/Headers QtSvg
sudo ln –s ../tlib/QtTest.framework/Headers QtTest
sudo ln –s ../tlib/QtXmlPatterns.framework/Headers QtXmlPatterns
- Open a terminal window
- Change to the 'shared/sh_template' directory
- Type: qmake –spec macx-xcode sh_template.pro
- This will create an Xcode project which you can open now.
- Under the Project menu, choose New Custom Executable
- Browse to the Fledermaus installation directory (Applications/IVS Fledermaus-ver7) and select the FMMidwater application
- Click Finish and close the setting dialog.
- Go to the Project menu and select Edit Project Settings.
- On the General tab under the Place Build Options option, choose Custom Location and browse to Library/Application Support/IVS7/plugin
- Go to the Build tab and double click the Per-configuration Build Products Path entry. Remove the $(CONFIGURATION) option. This will remove the 'debug' from the end of the path.
- Scroll down to the Packaging section and set the extension to be: mac32.sh_plugin
- If you are building FMMidwater specific plugins, the extension would be: mac32.mw_plugin
- If you are building FMGT specific plugins, the extension would be: mac32.gt_plugin
Linux Environment
Setting up the Environment
- First ensure that you have make and a compiler installed on your system. On Ubuntu, the packages are named make and gcc.
- Next download the open source Qt .4.7.x source code from ftp://ftp.qt.nokia.com/qt/source/qt-everywhere-opensource-src-4.7.1.tar.gz
- Unarchive the tarball in a convenient, empty directory::
- tar zxvf qt-everywhere-opensource-src-4.7.1.tar.gz
- Change to the directory where Qt is unarchived and issue the command:
- ./configure –no-make demos –no-make examples
- When asked for the type of license, choose the open source license.
- Once the configure script completes, type make.
- Once makecompletes, install the library as the root user:
- sudo make install
- Edit your shell profile (~/.bashrc for bash or ~/.cshrc for tcsh) and add:
- For bash add:
- export HOSTMACHINE=lin64
- export PATH=/usr/local/Trolltech/Qt-4.7.1/bin:$PATH
- For tcsh add
- setenv HOSTMACHINE lin64
- setenv PATH /usr/local/Trolltech/Qt-4.7.1/bin:$PATH
- For bash add:
- Source the updated profile or close the terminal window and open it again.
- To see the version of qmake and check for correct installation, type: qmake -v
Building Linux Plugins
- Open a terminal window
- Change directories to the directory: QPA_SDK/plugins
- Type: make
- This will build a simple shared tool
- Start the FMMidwater tool
- Under the tools menu, you should see an 'Acme' sub-menu with the entry 'Demo Plugin'
- After activation, you should see a simple dialog box.
- Congratulations, your environment is properly set up!
