
VesselManager acts as a middleman between navigation data from a variety of sources and vehicle structures that are constantly updated with the latest vessel position that can be displayed in an application such as Fledermaus. Vessel objects in Fledermaus connect to the vehicle structures generated by VesselManager through the vehicle ID (a number between 0 and 9). All interaction with the vessels is done in Fledermaus, where the vessel data can be visualized and analyzed. Once VesselManager is configured, using it is simply a matter making sure the correct vehicle, listed in the Active Vehicles list, is selected and clicking the Start Acquisition button. If the auto-start option is checked and Save As Defaults is clicked, then acquisition begins automatically when VesselManager is started. First, configure your communications and message setup and save those, though. Here is view of the main VesselManager window. Details on the configuration of the application follows.
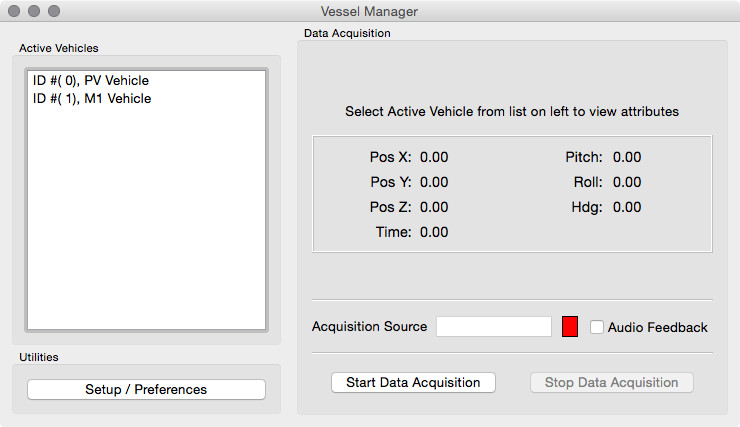
Figure 1. Vessel Manager Main Window
Before VesselManager can be used, it must be first setup to receive and process the received data. This is done by clicking the Setup/Preference button in the lower left corner of the main display. Once the application is configured, the settings can be saved as defaults. This makes using the application again in the future easier by saving your preferred settings. The setup dialog box is shown in the Setting up VesselManager below. It contains a tabbed display that covers most of the dialog and steps one through the setup process. As the tabs suggest, one needs to configure the message format (Message Configuration), the data source (Communication Setup), and the vehicle setup (Vehicle Setup). You may optionally configure logging and simulation in the respective tabs. To automatically start acquiring data upon startup, check the box at the bottom left of the dialog. Once the setup is complete, it can be made the application default by clicking the Save As Defaults button, or choose Ok to finish. Clicking Cancel exits the dialog without changing the current configuration. Each tab will be described in detail.
Setting up VesselManager
Check the box below the tabbed display to tell the system to start acquiring data immediately upon startup. This is convenient if the setup has been saved with Save As Defaults and the data source will be ready whenever VesselManager is started. This can also be used for demonstration if the simulation mode is enabled. See below.
The first tab, called Message Configuration as shown in Figure 2 is used to identify the format of the data. The system currently supports four different data formats, all which now support multiple vehicles. These include standard NMEA messages, POS MV messages, PLO binary messages and a custom defined message. NMEA is most commonly used when reading raw navigation data from a serial port or a network connection. The custom string is generally used in conjunction with a navigation package such as WinFrog. WinFrog, as a full featured navigation system, can receive a wide variety of navigation strings from multiple sources and create the appropriate custom string that VesselManager uses. The format of this string is discussed below.
Note that the Z-values for any of these formats can be negated (changed from a positive to a negative, or vice versa) when the Negate Z-values in NMEA string is selected (checked). When this option is unchecked, the Z-values will not be changed. Selecting this option may be necessary if depths increase with positive numbers. Checking this option will make the depths negative in this case, so that deeper is more negative.
Message Formats
The first option listed is the PLO MV format, which is a US Navy format. Note that a message box will popup when the PLO MV option is selected, be sure to check if it is under the setup dialog if you do not see it. Otherwise, the application will become unresponsive.
Message Configuration Setup
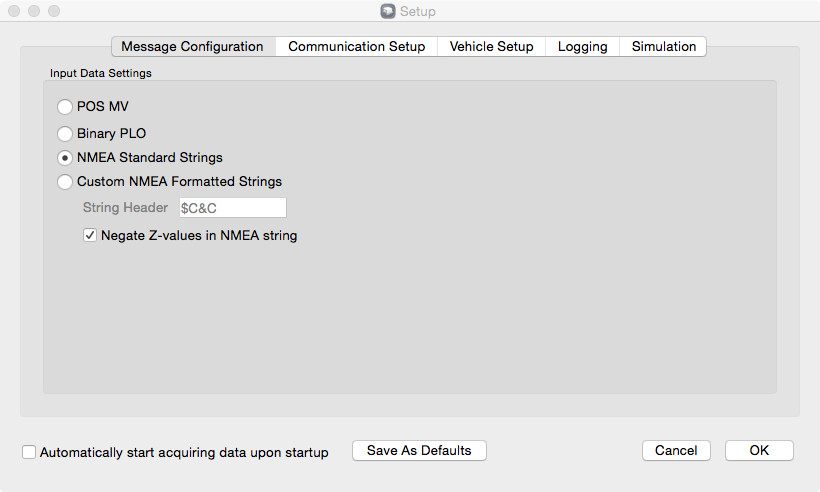
Figure 2. Setting up VesselManager
The second data format option is PLO, which is a binary input format used by the US Navy. It contains a series of records where each record contains a vehicle ID, and appropriate positioning information.
The third option, NMEA standard strings, have no extra configuration options. The system reads a limited number of the standard strings as described below. All NMEA strings start with a dollar sign followed by a five digit code. For example: "$GPGGA" is a standard satellite navigation string. The actual message type is defined by the last three character of the string header. In the previous example that is the "GGA" portion of the message. Vessel manager uses the first two letters as the vehicle name. In this example "GP" would be the name of the vehicle. The NMEA message strings currently understood by VesselManager include (xx means any two characters):
|
Message Header |
Overview |
|
$xxGGA |
Provides geographic x, y positioning |
|
$xxGLL |
Provides geographic x, y positioning |
|
$xxHDT |
Provides heading information |
|
$xxDPT |
Provides depth which is negated to turn into a height. (z coordinate) |
|
$xxRMC |
Provides heading information |
|
$xxHDG |
Provides heading information |
Table 3. Message inpout formats
The last input format shown in Figure 2 is Custom which is designed to look like NMEA data strings but it supports a custom message string which can be output by navigation programs such as WinFrog. Currently, this input format is the only method to have full access to vehicle yaw, pitch, and roll information. The controls for this format include the ability to identify the NMEA string header (defaults to $C&C). A small sample of input in this format looks like:
$C&C,SIM,00:00:00.0,541175.375000,167894.781000,296.088928,0.0,0.0,-2.568574,0.0$C&C,SIM,00:00:00.0,541173.578779,167895.660529,296.088928,0.0,0.0,-2.564224,0.0$C&C,SIM,00:00:00.0,541169.088227,167897.859352,296.088928,0.0,0.0,-2.553348,0.0
The string follows NMEA conventions, it is a set of comma separate set of fields. Following the $C&C header the fields include:
Vehicle Name -> A string. In the example the name is SIM.
Time -> hh:mm:ss.s for hours, minutes, seconds and fractional secs.
X-Coordinate -> Can be a projected easting or decimal geographic longitude
Y-Coordinate -> Can be a projected northing or decimal geographic latitude
heading -> in degrees [0, 360]
pitch -> in degrees ( +ve is pitch up )
roll -> in degrees ( +ve is roll to starboard )
height -> in units of the data (+ve is up)
altitude -> in units of the data (currently not used)
The input message contains a string which represents the vehicle name as the first argument. In the example above the vehicle name is "SIM". If this string matches the name given to one of the active vehicles than the relevant navigation data will be sent to that vehicle.
Communications Setup
Starting with the Communication Setup tab as shown in the figure above the first choice is to specify how the application will receive its navigation data. There are three choices that include receiving data from a TCP/IP network, via the serial port, or as played back from a logged data file. Clicking on the appropriate choice activates any additional setup parameters required for the chosen method.
To use network based UDP packets you must specify the IP network address and network port number. The lower port numbers are often reserved for other system related activities so generally ports in the 30000-60000 range are recommended. You must specify the resolved IP address (the 4 numeric triplets – for example 192.168.0.45) and not a machine name (for example: mymachine.com ).
To receive data via the serial port it is necessary to identify which serial port and the expected baud rate. Generally the baud rate will be 9600 although 4800 is also fairly common. The serial port name on Windows machine will be "COMn" where "n" is a number, usually "1" or "2". For UNIX machines this will be a serial device name. For example on Linux for serial port #1 the serial port name is something similar to "/dev/ttyS0".
Lastly there is a file playback option. This is used to replay an existing log file saved to disk and is a handy option for re-analyzing how a job went or showing others. To use the file playback option you need to select the file and specify the file playback rate. A playback rate of 1 is real time and larger numbers playback the file at "n" times the speed for quick reviews. In previous versions of vessel manager file playback was a separate dialog now it is integrated in here.
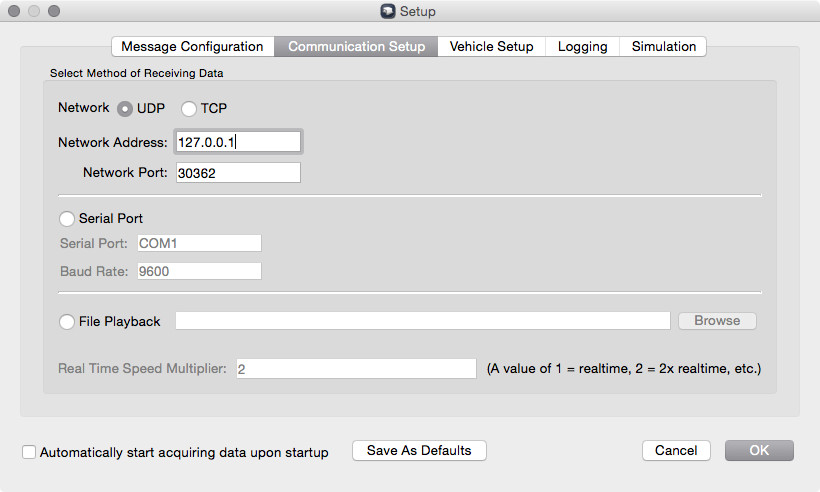
Figure 4. Comminications Setup
Vehicle Setup
The third tab is used to perform the vehicle setup. This identifies the names and/or ID's of particular vehicles of interest present in the incoming data stream and is used to route data to the appropriate vehicle slot.
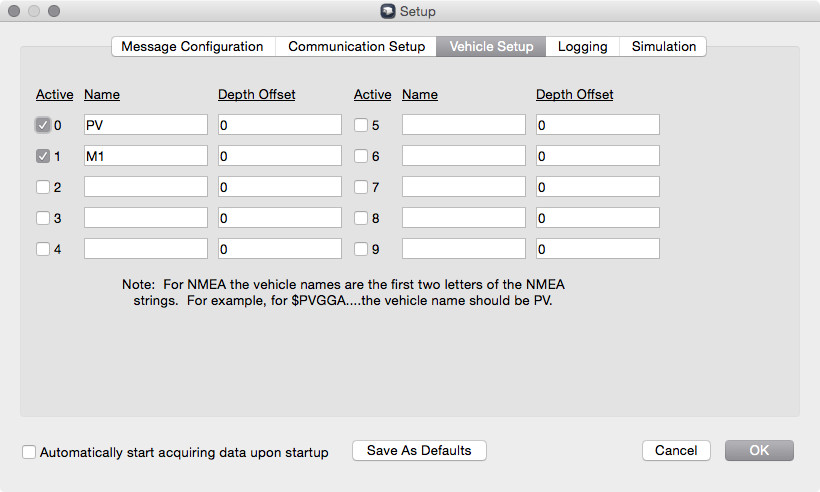
Figure 5. Vehicle Setup
The Vehicle Setup tab contains a set of up controls for up to ten vehicles. Each vehicle has an integer ID shown at the left hand edge of the controls labeled from zero to nine. When using Fledermaus, when you add a vessel, this is the ID # that you need to enter to activate the vessel inside Fledermaus. The vehicle name identifies the vehicle. How it is used depends on which data format was selected in the previous tab.
For standard NMEA messages a vehicle name is always two characters long. These characters must match the 1st two characters of the NMEA message header after the dollar sign. Thus if the NMEA message starts with "$V1HDT…" then one must name a vehicle "V1" (without the quotes) to match it. Any NMEA strings received that start with "$V1" send their data to the V1 vehicle.
For custom formatted data strings the 1st comma separated field after the header is the vehicle name. For example, for messages of the form "$C&C,HMCSHalifax,…" the vehicle name is HMCSHalifax.
Finally for PLO formatted data, the vehicle name is an integer number that matches the appropriate vehicle ID send inside the PLO data.
Data Logging Setup
The Logging tab is used to setup logging. If this option is activated then all received data is sent to a log file. This is useful to replay a job in the future. The resulting log files can be played back by using the file in the file playback option available in the communication setup tab previously described. To create a log file it is necessary to select the directory in which it will be created and a base name. Log files will be created in that directory with the name <baseName>-<JulianDay>.log. The Julian day is automatically appended onto the filename and is based on the current date when the logging starts. For example for the base name shown in the dialog below if the current date is January 1st then the resulting filename would be "mplog-1.log".
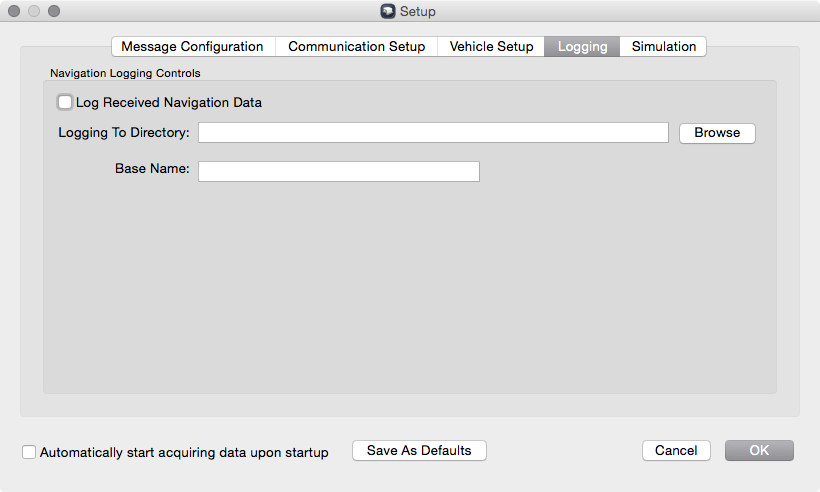
Figure 6. Data Logging Setup
Navigation logging lets one specify a directory in which the log files are written. If "Log Raw Nav Strings" is on then a file is written with all the acquired navigation data, along with the time stamp.
Simulation
The final tab, Simulation, allows setting up a demonstration mode, whereby VesselManager will generate data according the parameters set in this tab. This way, a moving vessel can be illustrated in Fledermaus under the full control, without requiring realtime data. Set the parameters for the initial conditions on the left, the variable conditions on the right and the update rate. Click the On checkbox to start the simulation.
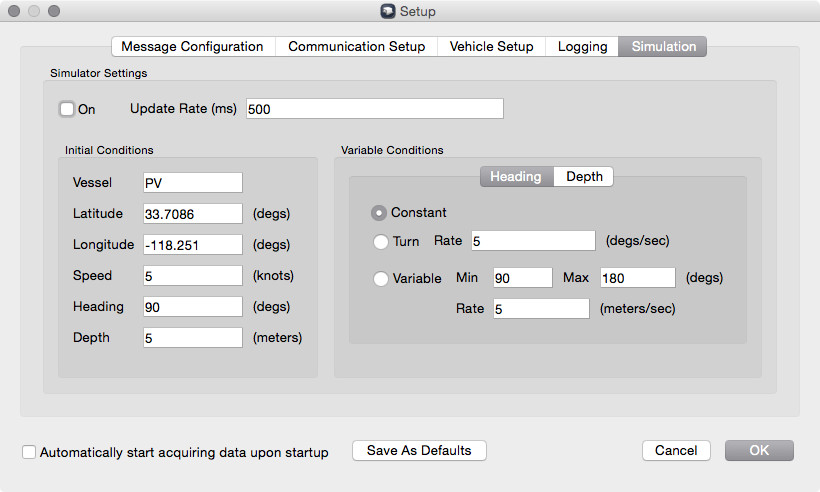
Figure 7. Simulation setup
.
Saving Configurations
Once the setup is complete, clicking Ok will make the settings active for the current session and return one to the main display.
From the main display there are several menu options available as shown in the File Menu for VesselManger figure below The current settings can be saved to a configuration file using the File > Save As… command. File names will automatically be given the extension ".vmf" which stands for vessel manager file. This file saves all the settings used to configure vesselmanager for a particular project. Once a configuration file is saved, it can be loaded back in simply using the File > Open option and selecting the saved ".vmf" file. Often this file can be immediately loaded just by looking at the File > Open Recent menu. If the ".vmf" file has been used recently it will be shown and can be loaded simply by clicking its name.
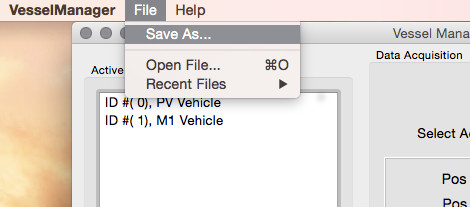
Figure 8. File Menu for VesselManager