Skip table of contents

dslr_tips_tricks

Performance

Connect the camera with Power DC in, instead of running on batteries. This will normally also prevent the camera from going into sleep mode.

Performance

Use a solid state drive (SSD) as location for the image destination folder.

PerformanceFor Image Transfer use Move instead of Copy.

Troubleshooting

Always check that the camera, when connected via USB to your computer, is recognized by the Windows Operating system.
If Windows does not recognize the camera, then Qinsy won't either.
See Interfacing Notes for more details about this.

Troubleshooting

When the camera is disconnected or switched off while on-line, you must go off-line and on-line again in order to re-establish a connection.

Troubleshooting / Performance

Capturing interval is too short in order for Qinsy to store the images to disk and trigger the next photo which results in missing photos.

  • This is probably caused by the fact that also the RAW image file is stored, or that the jpg image resolution is too high.
    Select action Get device settings information and increase the Compression Level and / or decrease the Image Size.
  • Also make sure that RAW storage is disabled.
  • Finally, try to capture without auto focus being enabled.

Calibrate Latency

Notice that, due to the characteristics of digital cameras, there will always be a latency. This is the time difference between the moment of the capture command, and the timestamp of the captured image. The latency is often variable and depends on camera settings. E.g. if the camera is auto focusing, the latency can be up to 800 milliseconds! Under normal conditions the latency is small, around 100ms.

If exact and accurate timing is important for your application, you may use the following calibration procedure in order to try determining the camera latency:

  • Step 1)
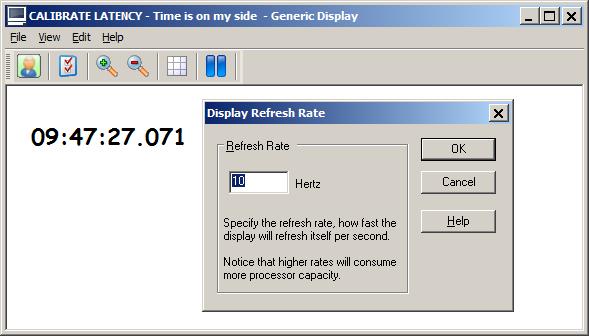
    Use a Generic Display and add a General Item 'Time', with format 'HH:MM:SS.sss'. Important is to set the refresh rate of the display to 10Hz:

  • Step 2)
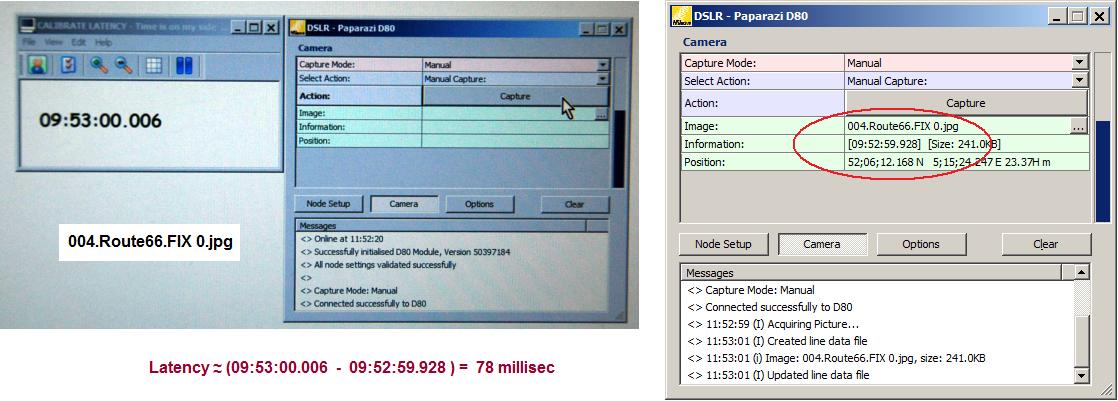
    Focus on your computer screen and take a picture of this display, using the Manual Capture command:

  • Step 3)
    View the image with your default image viewer, and compare the time in the Generic Display, with the time of the image, as displayed in the Information row in the driver's Camera menu.

    The difference in milliseconds can then be entered in the Node Setup menu.
    The GPS location and time, stored as EXIF Metadata in the image, will be corrected for every new captured image.
Camera Settings
  • Auto focus must be disabled. Sometimes the auto focusing fails, then camera keeps on trying, and when it already receives the next trigger, it may stop.
  • Please use a fixed focus lens e.g. f=20mm
  • Focus it to infinity, set the camera focus to "manual" and fix the focus ring on the lens by using a piece of tape (is very common in the photogrammetry).
JavaScript errors detected

Please note, these errors can depend on your browser setup.

If this problem persists, please contact our support.